Data Build Tool (DBT) – The Emerging Standard For Building SQL-First Data Transformation Pipelines – Part 1
Note: Part 2 of this post can be found HERE.
Introduction
It’s never a dull moment when working in IT and although Data Warehousing domain was not subjected to the hamster wheel of relentless innovation in the first few decades when Oracle, IBM, Microsoft and SAP reigned supreme, with the advent of cloud computing, it too had to adapt and change. For me, the most prolific changes included the separation of storage and compute, in-database machine learning, on-demand elasticity and server-less database models. The resulting upending of the status quo also had a large impact on the good, old-fashion ETL (Extract Transform Load) paradigm which started to shift to the new, more cloud-aligned architecture and many businesses contemplating Data Warehouse modernization are jumping on the ELT bandwagon. This is also where a suite of new tools started to emerge, and one company with its flagship product started to make serious inroads in this market.
dbt (data build tool) emerged as a development framework that combines modular SQL with software engineering best practices to make data transformation reliable, fast, and fun. It makes data engineering activities accessible to people with data analyst skills to transform the data in the warehouse using simple SELECT statements, effectively creating your entire transformation process with code. You can write custom business logic using SQL, automate data quality testing, deploy the code, and deliver trusted data with a comprehensive documentation side-by-side with the code. This is more important today than ever due to the shortage of data engineering professionals in the marketplace. Anyone who knows SQL can now build production-grade data pipelines, reducing the entry barriers that previously limited staffing capabilities for legacy technologies. In short, dbt turns your data analysts into engineers and allows them to own the entire analytics engineering workflow.
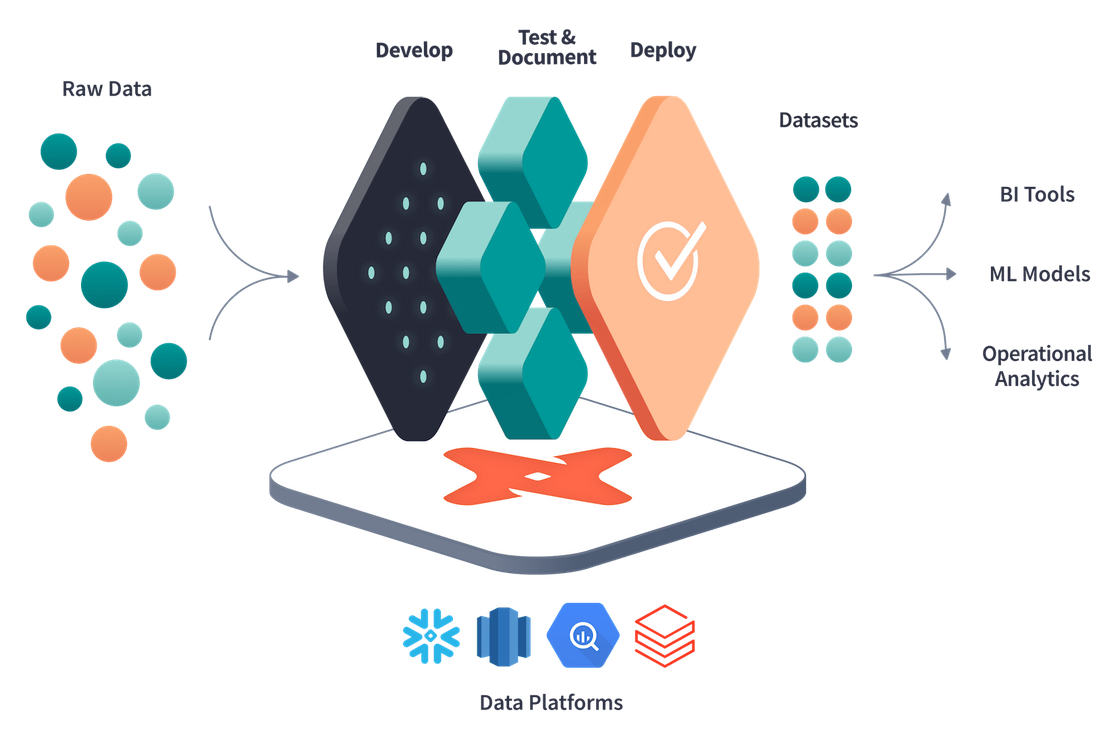
dbt has two core workflows: building data models and testing data models. It fits nicely into the modern data stack and is cloud agnostic – meaning it works within each of the major cloud ecosystems: Azure, GCP, and AWS. However, the biggest advantage of dbt is its new approach to building pipelines which traditionally have been quite clunky and inefficient. Some of the most prolific issues with the standard ETL workflow are:
- The schema within data warehouses is often strongly defined and controlled. The emphasis in ETL was therefore on getting data into the warehouse in the correct “one true” format, putting the burden on the people loading the data and making the process of getting data into the warehouse slow and fragile.
- This warehouse and the ETL processes would usually be managed by centralized data teams. These teams would be a fairly siloed bottleneck, always behind with the needs of the business for integrating and transforming the data.
- The ETL stacks and scripts would often be fragile, error prone, and difficult and slow to change.
- The tools providing ETL would often be GUI based and proprietary. Not only would they be expensive to license, they would also require specialist skills. This meant that neither the producers or consumers of the data would have access to the ETL scripts or the ability to make changes to them.
- Bringing ETL into anything which defines a software development lifecycle was tricky. For instance, the ETL process was always identified as being difficult to source control, version and test. Implementing the concept of development, test and production environments with accurate data management was also way behind the state of the art in the software development world.
With dbt, many of the above shortcomings have been addressed, improving reliability, repeatability and collaboration by breaking down organizational silos, and reducing time to market.
Environment Prep and Sample Data
Before I jump into what makes dbt such a powerful framework, I’d like to set the stage and outline the following mocked up example of building an end-to-end pipeline using modern data architecture tools to firstly acquire and load Google Analytics data into an Azure environment and finally to transform it using dbt framework. I believe that rather than installing dbt and running a few scripts to outline its core features it’s better to showcase it on a tangible mini-project which accurately reflects some of the problems many business may be grappling with. For this purpose, I will be following the below script:
- Stand up Azure environment (using Azure Python SDK), including Azure SQL database, Azure Data Lake gen2 (ADLS) and associated Resource Group. Technically this part can be done using any cloud provider or even on-premises environment but since modern data stack tends to rely on APIs and tools available from major public cloud vendors, this is in line with more contemporary information architecture and management practices
- Build a simple pipeline to acquire Google Analytics data and stage it in ADLS storage as well as Azure SQL database. This script can also be run as Azure Function to create automated, ETL-like process
- Install dbt and the supporting SQL Server connector on an isolated local environment
- Augment GA data with geocoding information to build a simple, one-table data mart using SQL and dbt Jinja templates
- Test our data, create a snapshot using dbt functionality and generate sample project documentation
Firstly, let’s provision a sample Azure environment consisting of a dedicated resource group as well as Azure Data Lake Gen 2 and Azure SQL database.
from azure.identity import AzureCliCredential
from azure.mgmt.resource import ResourceManagementClient
from azure.mgmt.storage import StorageManagementClient
from azure.storage.filedatalake import DataLakeServiceClient
from azure.mgmt.sql import SqlManagementClient
from humanfriendly import format_timespan
from timeit import default_timer as timer
import time
import pyodbc
from os import popen


_RESOURCE_GROUP_NAME = 'gademoresourcegroup2022'
_RESOURCE_GROUP_LOCATION = 'australiaeast'
_STORAGE_ACCOUNT_NAME = 'gademostorageacct2022'
_STORAGE_CONTAINER_NAME = 'gademooutputfiles2022'
_SUBSCRIPTION_ID = 'your_subscription_id'
_DF_LINKED_SERVICE_NAME = 'lsoutputfiles'
_SQL_SERVER_NAME = 'gademosqlserver2022'
_SQL_DB_NAME = 'sourcedb'
_SQL_USERNAME = 'testusername'
_SQL_PASSWORD = 'MyV3ry$trongPa$$word'
_SQL_DRIVER = '{ODBC Driver 18 for SQL Server}'
external_IP = popen("curl -s ifconfig.me").readline()


# create resource group
def create_resource_group(resource_client, _RESOURCE_GROUP_NAME, _LOCATION):
    print("Creating Azure Resource Group {rg_name}...".format(
        rg_name=_RESOURCE_GROUP_NAME), end="", flush=True)
    try:
        resource_client.resource_groups.create_or_update(
            _RESOURCE_GROUP_NAME, {'location': _LOCATION})
    except Exception as e:
        print(e)
    rg = [g.name for g in resource_client.resource_groups.list()]
    if _RESOURCE_GROUP_NAME in rg:
        print('OK')


# create storage account in the nominated resource group
def create_storage_account(storage_client, _STORAGE_ACCOUNT_NAME, _RESOURCE_GROUP_NAME, _RESOURCE_GROUP_LOCATION):
    print("Creating Azure Storage Account {st_acct}...".format(
        st_acct=_STORAGE_ACCOUNT_NAME), end="", flush=True)
    try:
        availability_result = storage_client.storage_accounts.check_name_availability(
            {'name': _STORAGE_ACCOUNT_NAME})
        if not availability_result.name_available:
            print('storage name {st_acct} is already in use. Try another name.'.format(
                st_acct=_STORAGE_ACCOUNT_NAME))
            exit()
        poller = storage_client.storage_accounts.begin_create(_RESOURCE_GROUP_NAME, _STORAGE_ACCOUNT_NAME,
                                                              {
                                                                  "location": _RESOURCE_GROUP_LOCATION,
                                                                  "kind": "StorageV2",
                                                                  "is_hns_enabled": "true",
                                                                  "sku": {"name": "Standard_LRS", "tier": "Standard"},
                                                                  "properties": {
                                                                      "minimumTlsVersion": "TLS1_2",
                                                                      "allowBlobPublicAccess": "true",
                                                                      "networkAcls": {
                                                                          "bypass": "AzureServices",
                                                                          "virtualNetworkRules": [],
                                                                          "ipRules": [],
                                                                          "defaultAction": "Allow"
                                                                      }
                                                                  }})
        account_result = poller.result()
        if account_result.name == _STORAGE_ACCOUNT_NAME:
            print('OK')
    except Exception as e:
        print(e)


# create storage container aka 'filesystem' in the nominated storage account
def create_adls_container(_STORAGE_ACCOUNT_NAME, _STORAGE_CONTAINER_NAME):
    print("Creating Azure Data Lake Storage Container {st_ct}...".format(
        st_ct=_STORAGE_CONTAINER_NAME), end="", flush=True)
    keys = storage_client.storage_accounts.list_keys(
        _RESOURCE_GROUP_NAME, _STORAGE_ACCOUNT_NAME)
    account_url = "https://{}.dfs.core.windows.net/".format(
        _STORAGE_ACCOUNT_NAME)
    datalake_service = DataLakeServiceClient(
        account_url=account_url, credential=keys.keys[0].value
    )
    try:
        datalake_service.create_file_system(
            file_system=_STORAGE_CONTAINER_NAME)
        file_systems = [i.name for i in datalake_service.list_file_systems()]
        if _STORAGE_CONTAINER_NAME in file_systems:
            print('OK')
    except Exception as e:
        print(e)


# create azure sql server in the nominated resource group
def create_sql_server(sql_client, _RESOURCE_GROUP_NAME, _SQL_SERVER_NAME,
                      _RESOURCE_GROUP_LOCATION, _SQL_USERNAME, _SQL_PASSWORD):
    print("Creating Azure SQL Server {ssvr_name}...".format(
        ssvr_name=_SQL_SERVER_NAME), end="", flush=True)
    try:
        sql_server = sql_client.servers.begin_create_or_update(
            _RESOURCE_GROUP_NAME,
            _SQL_SERVER_NAME,
            {
                'location': _RESOURCE_GROUP_LOCATION,
                'version': '12.0',
                'administrator_login': _SQL_USERNAME,
                'administrator_login_password': _SQL_PASSWORD
            }
        )
        sql_server.wait()
    except Exception as e:
        print(e)
    ssvr = [i.name for i in sql_client.servers.list_by_resource_group(
        _RESOURCE_GROUP_NAME)]
    if _SQL_SERVER_NAME in ssvr:
        print('OK')


# create azure sql db in the nominated resource group
def create_sql_db(sql_client, _RESOURCE_GROUP_NAME, _SQL_SERVER_NAME, _SQL_DB_NAME, _RESOURCE_GROUP_LOCATION):
    print("Creating Azure SQL Database {db_name}...".format(
        db_name=_SQL_DB_NAME), end="", flush=True)
    try:
        sql_db = sql_client.databases.begin_create_or_update(
            _RESOURCE_GROUP_NAME,
            _SQL_SERVER_NAME,
            _SQL_DB_NAME,
            {
                'location': _RESOURCE_GROUP_LOCATION,
                'collation': 'SQL_Latin1_General_CP1_CI_AS',
                'create_mode': 'default',
                'requested_service_objective_name': 'Basic'
            }
        )
        sql_db.wait()
    except Exception as e:
        print(e)
    dbs = [i.name for i in sql_client.databases.list_by_server(
        _RESOURCE_GROUP_NAME, _SQL_SERVER_NAME)]
    if _SQL_DB_NAME in dbs:
        print('OK')


# configure azure sql server firewall to accept connections from the host ip address
def configure_firewall(sql_client, _SQL_DRIVER, _RESOURCE_GROUP_NAME, _SQL_SERVER_NAME, _SQL_DB_NAME, _SQL_USERNAME, _SQL_PASSWORD, external_IP):
    print("Configuring Azure SQL Server Firewall Settings...", end="", flush=True)
    try:
        sql_client.firewall_rules.create_or_update(
            _RESOURCE_GROUP_NAME,
            _SQL_SERVER_NAME,
            "firewall_rule_name_" + external_IP,
            {
                "startIpAddress": external_IP,
                "endIpAddress": external_IP
            }
        )
    except Exception as e:
        print(e)
    _AZURE_SQL_SERVER = _SQL_SERVER_NAME + '.database.windows.net'
    with pyodbc.connect('DRIVER='+_SQL_DRIVER+';SERVER='+_AZURE_SQL_SERVER+';PORT=1433;DATABASE='+_SQL_DB_NAME+';UID='+_SQL_USERNAME+';PWD='+_SQL_PASSWORD) as conn:
        with conn.cursor() as cursor:
            cursor.execute("SELECT @@version")
            row = cursor.fetchone()
    if row:
        print('OK')


if __name__ == '__main__':
    print("\n")
    execution_start_time = timer()
    credentials = AzureCliCredential()
    storage_client = StorageManagementClient(credentials, _SUBSCRIPTION_ID)
    resource_client = ResourceManagementClient(credentials, _SUBSCRIPTION_ID)
    sql_client = SqlManagementClient(credentials, _SUBSCRIPTION_ID)
    resource_groups = [i.name for i in resource_client.resource_groups.list()]
    if _RESOURCE_GROUP_NAME in resource_groups:
        print("Deleting existing resource group{res_gr}...".format(
            res_gr=_RESOURCE_GROUP_NAME), end="", flush=True)
        delete_async_operation = resource_client.resource_groups.begin_delete(
            _RESOURCE_GROUP_NAME)
        delete_async_operation.wait()
        print('OK')

    create_resource_group(
        resource_client, _RESOURCE_GROUP_NAME, _RESOURCE_GROUP_LOCATION)
    create_storage_account(storage_client, _STORAGE_ACCOUNT_NAME,
                           _RESOURCE_GROUP_NAME, _RESOURCE_GROUP_LOCATION)
    create_adls_container(_STORAGE_ACCOUNT_NAME, _STORAGE_CONTAINER_NAME)
    create_sql_server(sql_client, _RESOURCE_GROUP_NAME, _SQL_SERVER_NAME,
                      _RESOURCE_GROUP_LOCATION, _SQL_USERNAME, _SQL_PASSWORD)
    create_sql_db(sql_client, _RESOURCE_GROUP_NAME,
                  _SQL_SERVER_NAME, _SQL_DB_NAME, _RESOURCE_GROUP_LOCATION)
    configure_firewall(sql_client, _SQL_DRIVER, _RESOURCE_GROUP_NAME,
                       _SQL_SERVER_NAME, _SQL_DB_NAME, _SQL_USERNAME, _SQL_PASSWORD, external_IP)
    execution_end_time = timer()
    elapsed_duration = execution_end_time - execution_start_time
    print('Elapsed resources(s) provisioning time was {time}.\n'.format(
        time=format_timespan(elapsed_duration)))
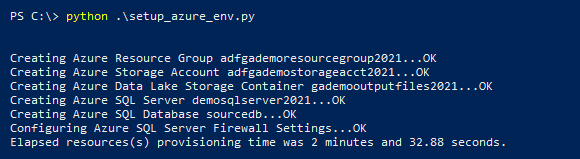
Running the above script produces the following output, providing we have the Azure subscription set up and configured on the local environment.
Now that we have all artefacts supporting Google Analytics data acquisition in place, let’s start by defining GA attributes we’d like to source, and stage those in our data lake and SQL database. For this exercise I used data from my own website – the one you’re reading right now – and restricted it to last 30 days and the following attributes: PagePath, PageTitle, Country, City, Medium, DeviceCategory, OperatingSystem, Browser and SessionDuration. I won’t go into how to set up GA account in this post as there are countless other internet resources on this topic and most of this code is self-explanatory. The only thing that was unnecessarily frustrating and took me a while to figure out was creating a service account and providing it access to my GA view, as denoted by _GA_Service_ACCT_KEY (JSON file) and _GA_VIEW_ID variables. Getting the account and its key generated was not a problem but modifying security details so that the service account could access the view was quite convoluted. The following script is responsible for GA data acquisition, tabulating and formatting it into a Pandas data frame and inserting it into the provisioned Azure SQL DB (table object is also created/truncated as part of this code).
from googleapiclient.discovery import build
from oauth2client.service_account import ServiceAccountCredentials
from pathlib import PureWindowsPath
from azure.storage.filedatalake import DataLakeServiceClient
from azure.mgmt.storage import StorageManagementClient
from azure.identity import AzureCliCredential
import pandas as pd
import pyodbc
import time


_GA_SCOPES = ['https://www.googleapis.com/auth/analytics.readonly']
_GA_VIEW_ID = 'your_ga_view_id'
_GA_OUTPUT_FILE_NAME = 'GADataExtract-'+time.strftime("%Y%m%d-%H%M%S")+'.csv'
_GA_Service_ACCT_KEY = PureWindowsPath('C:/your_file_path/your_json_service_account_key_file.json')
_SQL_SERVER_NAME = 'gademosqlserver2022.database.windows.net'
_SQL_DB_NAME = 'sourcedb'
_SQL_USERNAME = 'testusername'
_SQL_PASSWORD = 'MyV3ry$trongPa$$word'
_SQL_DRIVER = '{ODBC Driver 18 for SQL Server}'
_RESOURCE_GROUP_NAME = 'gademoresourcegroup2022'
_STORAGE_CONTAINER_NAME = 'gademooutputfiles2022'
_STORAGE_ACCOUNT_NAME = 'gademostorageacct2022'
_STORAGE_CONTAINER_DIRECTORY_NAME = time.strftime("%Y%m%d")
_SUBSCRIPTION_ID = 'your_subscription_id'
_GA_OUTPUT_FILE_PATH = PureWindowsPath('C:/your_file_path/{file_name}'.format(
        file_name=_GA_OUTPUT_FILE_NAME))
_SCHEMAS = ['stg', 'mart']

# get Google Analytics service account credentials
def initialize_analyticsreporting():
    credentials = ServiceAccountCredentials.from_json_keyfile_name(
        _GA_Service_ACCT_KEY, _GA_SCOPES)
    analytics = build('analyticsreporting', 'v4', credentials=credentials)
    return analytics


def get_report(analytics):
    return analytics.reports().batchGet(
        body={
            'reportRequests': [
                {
                    'viewId': _GA_VIEW_ID,
                    'dateRanges': [{'startDate': '30daysAgo', 'endDate': 'today'}],
                    'metrics': [{'expression': 'ga:sessions'}],
                    'dimensions': [{"name": "ga:pagePath"}, {"name": "ga:pageTitle"}, {"name": "ga:country"}, {"name": "ga:city"}, {"name": "ga:medium"}, {"name": "ga:deviceCategory"}, {"name": "ga:operatingSystem"}, {"name": "ga:browser"}],
                    'orderBys': [{"fieldName": "ga:sessions", "sortOrder": "DESCENDING"}],
                    'pageSize': 1000
                }]
        }
    ).execute()


def ga_response_dataframe(response):
    row_list = []
    for report in response.get('reports', []):
        column_header = report.get('columnHeader', {})
        dimension_headers = column_header.get('dimensions', [])
        metric_headers = column_header.get(
            'metricHeader', {}).get('metricHeaderEntries', [])
        for row in report.get('data', {}).get('rows', []):
            row_dict = {}
            dimensions = row.get('dimensions', [])
            date_range_values = row.get('metrics', [])

            for header, dimension in zip(dimension_headers, dimensions):
                row_dict[header] = dimension

            for i, values in enumerate(date_range_values):
                for metric, value in zip(metric_headers, values.get('values')):
                    if ',' in value or '.' in value:
                        row_dict[metric.get('name')] = float(value)
                    else:
                        row_dict[metric.get('name')] = int(value)

            row_list.append(row_dict)
    return pd.DataFrame(row_list)


# upload a file to data lake in Azure
def upload_file_to_lake(storage_client, ga_file_content, _RESOURCE_GROUP_NAME, _STORAGE_ACCOUNT_NAME, _STORAGE_CONTAINER_NAME, _STORAGE_CONTAINER_DIRECTORY_NAME, _GA_OUTPUT_FILE_PATH, _GA_OUTPUT_FILE_NAME):
    keys = storage_client.storage_accounts.list_keys(
        _RESOURCE_GROUP_NAME, _STORAGE_ACCOUNT_NAME)
    account_url = "https://{}.dfs.core.windows.net/".format(
        _STORAGE_ACCOUNT_NAME)
    service_client = DataLakeServiceClient(account_url="{}://{}.dfs.core.windows.net".format(
        "https", _STORAGE_ACCOUNT_NAME), credential=keys.keys[0].value)
    file_system_client = service_client.get_file_system_client(
        file_system=_STORAGE_CONTAINER_NAME)
    dir_client = file_system_client.get_directory_client(
        _STORAGE_CONTAINER_DIRECTORY_NAME)
    dir_client.create_directory()
    file_client = dir_client.create_file(_GA_OUTPUT_FILE_NAME)
    file_client.append_data(ga_file_content, 0, len(ga_file_content))
    file_client.flush_data(len(ga_file_content))


# create required database schemas
def create_stg_schema(_SQL_DRIVER, _SQL_SERVER_NAME, _SQL_DB_NAME, _SQL_USERNAME, _SQL_PASSWORD, _SCHEMAS):
    with pyodbc.connect('DRIVER='+_SQL_DRIVER+';SERVER='+_SQL_SERVER_NAME+';PORT=1433;DATABASE='+_SQL_DB_NAME+';UID='+_SQL_USERNAME+';PWD=' + _SQL_PASSWORD) as conn:
        with conn.cursor() as cursor:
            for schema in _SCHEMAS:
                cursor.execute('''IF (NOT EXISTS (SELECT TOP 1 (1) FROM sys.schemas WHERE name = '{schema}'))
                                BEGIN
                                    EXEC ('CREATE SCHEMA [{schema}] AUTHORIZATION [dbo]')
                                END'''.format(schema=schema))


# create required objects in the nomainated database and populate with data
def insert_into_azuresql(ga_data, _SQL_DRIVER, _SQL_SERVER_NAME, _SQL_DB_NAME, _SQL_USERNAME, _SQL_PASSWORD):
    with pyodbc.connect('DRIVER='+_SQL_DRIVER+';SERVER='+_SQL_SERVER_NAME+';PORT=1433;DATABASE='+_SQL_DB_NAME+';UID='+_SQL_USERNAME+';PWD=' + _SQL_PASSWORD) as conn:
        with conn.cursor() as cursor:
            if not cursor.tables(table='ga_data', tableType='TABLE').fetchone():
                cursor.execute('''CREATE TABLE dbo.ga_data (ID INT IDENTITY (1,1),
                                                            PagePath NVARCHAR(1024),
                                                            PageTitle NVARCHAR (2048),
                                                            Country NVARCHAR (256),
                                                            City NVARCHAR (256),
                                                            Medium NVARCHAR (256),
                                                            DeviceCategory NVARCHAR (512),
                                                            OperatingSystem VARCHAR (128),
                                                            Browser NVARCHAR (256),
                                                            SessionDuration INT)''')
                cursor.commit()
            for index, row in ga_data.iterrows():
                cursor.execute('''INSERT INTO dbo.ga_data
                                    (PagePath,
                                    PageTitle,
                                    Country,
                                    City,
                                    Medium,
                                    DeviceCategory,
                                    OperatingSystem,
                                    Browser,
                                    SessionDuration)
                          values (?, ?, ?, ?, ?, ?, ?, ?, ?)''',
                               row[0], row[1], row[2], row[3], row[4], row[5], row[6], row[7], row[8])
                cursor.commit()
            cursor.execute('SELECT TOP (1) 1 FROM dbo.ga_data')
            rows = cursor.fetchone()
            if rows:
                print('All Good!')
            else:
                raise ValueError(
                    'No data generated in the source table. Please troubleshoot!'
                )


def main():
    credentials = AzureCliCredential()
    storage_client = StorageManagementClient(credentials, _SUBSCRIPTION_ID)
    analytics = initialize_analyticsreporting()
    response = get_report(analytics)
    df = ga_response_dataframe(response)
    df.columns = [x.replace(':', '_') for x in df.columns]
    ga_data = df.replace('(none)', '').replace(
        '(not set)', '')
    ga_data.to_csv(_GA_OUTPUT_FILE_NAME, index=False)
    with open(_GA_OUTPUT_FILE_PATH) as file:
        ga_file_content = file.read()
    upload_file_to_lake(storage_client, ga_file_content, _RESOURCE_GROUP_NAME, _STORAGE_ACCOUNT_NAME,
                        _STORAGE_CONTAINER_NAME, _STORAGE_CONTAINER_DIRECTORY_NAME, _GA_OUTPUT_FILE_PATH, _GA_OUTPUT_FILE_NAME)
    create_stg_schema(_SQL_DRIVER, _SQL_SERVER_NAME,
                      _SQL_DB_NAME, _SQL_USERNAME, _SQL_PASSWORD, _SCHEMAS)
    insert_into_azuresql(ga_data, _SQL_DRIVER, _SQL_SERVER_NAME,
                         _SQL_DB_NAME, _SQL_USERNAME, _SQL_PASSWORD)

if __name__ == '__main__':
    main()
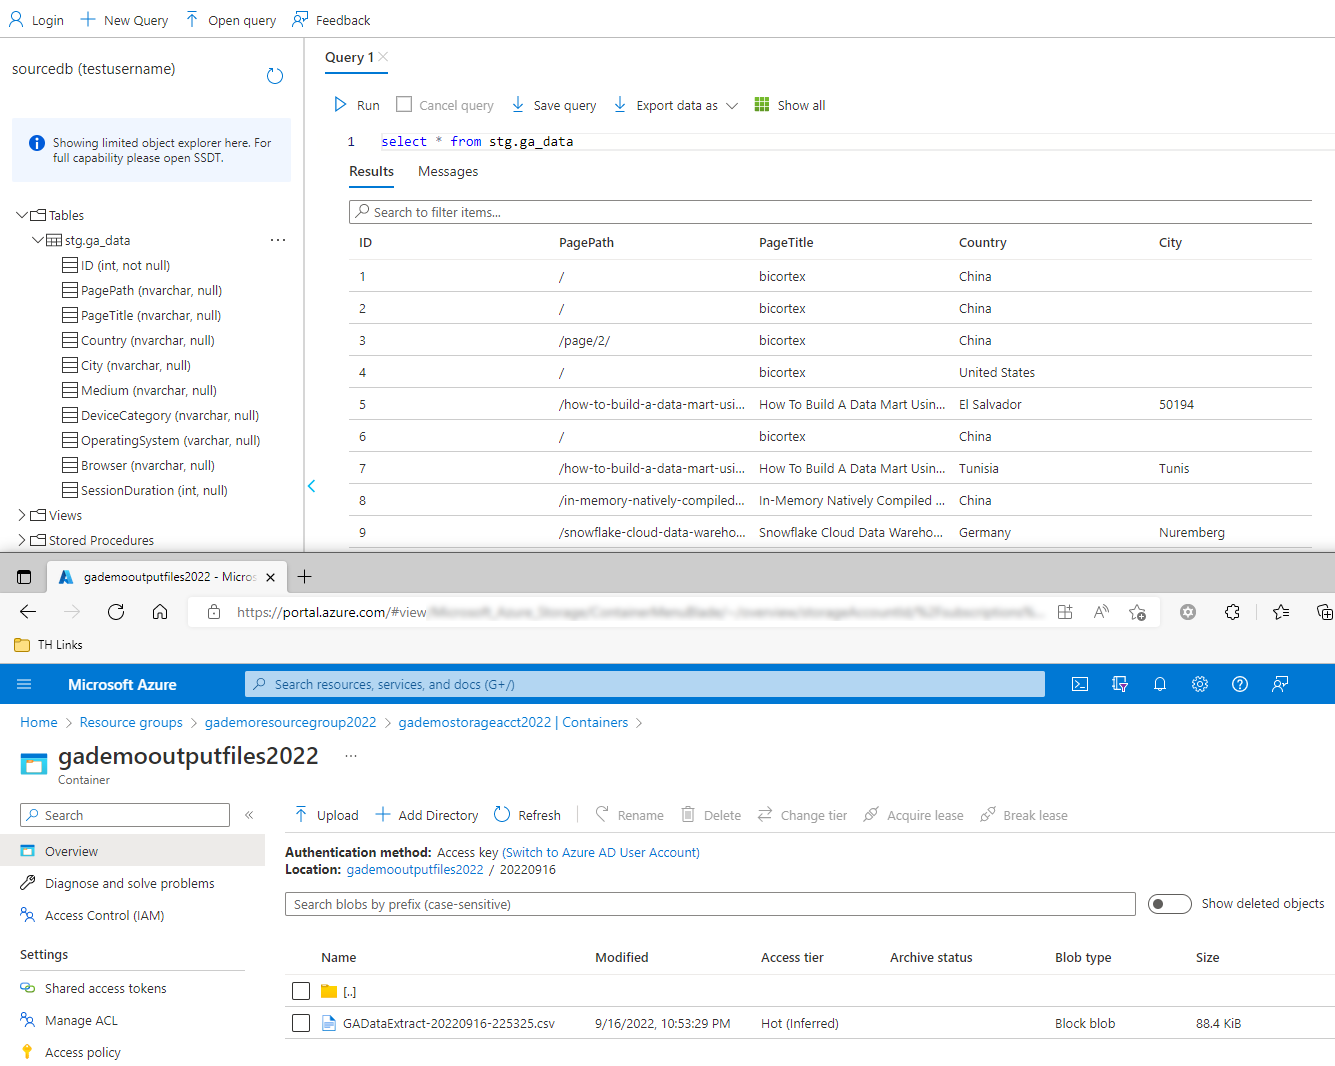
When executed, our Azure SQL DB table is created (if it does not exist) and GA data inserted into the ADLS container and the aforementioned table (click on image to enlarge).
Now that we have our GA data, lets launch into how dbt can help us with shaping it by building our sample ELT pipeline.
DBT Installation
Installing dbt is a fairly straightforward affair. One can also go with a Docker container or WSL approach but in this post I’ll outline the steps to perform a local installation in a Python virtual environment on a Windows system. Providing Python is already installed, let’s go ahead and set up our virtual environment – a self-contained Python installation.
python -m venv dbt_env
\dbt_env\Scripts\activate.ps1
Once set up and activated, we can install dbt using pip and install dbt-sqlserver adapter as dbt does not support SQL Server out-of-the-box. You can find the official GitHub repo for it will all the supporting documentation in the following LINK.
pip install dbt-core
pip install dbt-sqlserver
Next, we will initialize our demo dbt project using dbt init command and provide a new name for the project we’re creating (in this case it’s azure_sql_demo). Please also note that newer versions of dbt only allow for lower case letters and underscores being used when specifying the project name.
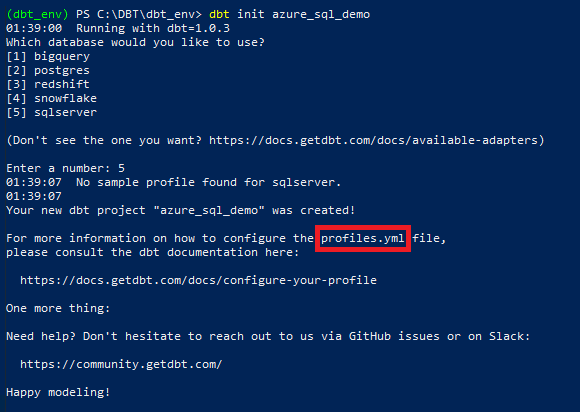
As we can see from the output, a sample profiles.yml file containing placeholder configuration was created. Depending on which option we selected i.e. (1) for BigQuery, (2) for PostgreSQL etc., the default profiles.yml file contains only generic properties or get created in an empty state. This will need to be amended to reflect our Azure SQL Server environment details e.g. user name, password, driver etc. As profiles.yml file contains database connections and credentials (sensitive information), it is generated in the ~/.dbt/ folder and not the project folder. On the other hand, the configuration file, the main file defining settings which apply to the whole project called dbt_project.yml, contains placeholders for development and production environment. Let’s go ahead populate profiles.yml file with the required information, ensuring that the profile name from dbt_project.yml matches that from profiles.yml file.
azure_sql_demo:
    target: dev
    outputs:
        dev:
            type: sqlserver
            driver: SQL Server
            server: demosqlserver2022.database.windows.net
            database: sourcedb
            port: 1433
            schema: stg
            user: testusername
            password: MyV3ry$trongPa$$word
Finally, we can check our target database connectivity to ensure all the parameters have been entered correctly by running dbt debug command as per below. It’s a good sign if you see no error messages at this point and all the critical outputs (color-coded in green) are telling us that all checks have passed.

In the next part of this post I will dive deeper in the functionality dbt provides out of the box and some of its features, for example, snapshots, tests, docs and more. You can view part 2 of this series HERE.
http://scuttle.org/bookmarks.php/pass?action=addThis entry was posted on Tuesday, September 27th, 2022 at 8:00 pm and is filed under Cloud Computing, Data Modelling, SQL, Uncategorized. You can follow any responses to this entry through the RSS 2.0 feed. You can leave a response, or trackback from your own site.


Raji November 3rd, 2022 at 8:14 am
Hi Martin
Thanks for your blog post.
Would this tutorial be very different if I were to use dbt cloud instead of dbt on-prem?
Raji