How to implement Slowly Changing Dimensions – Part 2. Using Checksum Transformation SSIS component to load dimension data
In the previous post I briefly outlined the methodology and steps behind updating a dimension table using a default SCD component in Microsoft’s SQL Server Data Tools environment. This post also deals with SCD updates but this time I want to introduce a different, open-sourced, third party component which anyone can use to process SCD – the checksum transformation (you can download it HERE). SQL Server Checksum function returns the checksum value computed over a row of a table or over a list of expressions. Checksum is intended for use in building hash indexes but in this context it will become valuable to update dimension tables based on the values the ‘Checksum Transformation’ component produces.
If you want to continue hands-on with this tutorial I suggest you create all the objects and data I will be using throughout this post by executing the following SQL code.
--CREATE RELATIONAL TABLES AND CONSTRAINTS. POPULATE TABLES WITH SOME DUMMY DATA
CREATE TABLE Customer(
CustomerID int IDENTITY (1,1),
First_Name varchar (50) NULL,
Middle_Name varchar (50),
Last_Name varchar (50) NULL,
Email_Address varchar (100) NULL,
Phone_Number varchar (50) NULL,
Created_Date datetime NULL,
Modified_Date datetime NULL,
CONSTRAINT pk_CustID PRIMARY KEY (CustomerID))

CREATE TABLE Address(
AddressID int IDENTITY (1,1) NOT NULL,
Address1 varchar (50) NULL,
Address2 varchar (50) NULL,
City varchar (50)  NULL,
Post_Code char (4) NULL,
Is_Current_Flag char(1) NULL,
CONSTRAINT pk_AddressID PRIMARY KEY (AddressID))

CREATE TABLE Customer_Address_Bridge(
CustomerID int NOT NULL,
AddressID int NOT NULL)
GO

INSERT INTO Customer
(First_Name, Middle_Name, Last_Name,Email_Address,Phone_Number,Created_Date,Modified_Date)
SELECT 'Mary', 'Joeanne', 'Black', 'mary0120@yahoo.com.au', '03-8573-9455', '2012-01-01', NULL UNION ALL
SELECT 'John', 'Lorance', 'Moore', 'johnnym@awol.com', '03-3423-1155', '2012-01-01', '2012-05-30' UNION ALL
SELECT 'Martin', NULL, 'Laser', 'mlaser91@aol.com', '03-2355-1109', '2012-01-01', '2012-05-12' UNION ALL
SELECT 'Spencer', 'Chris', 'McEvans', 'spencerdude@hotmail.com', '03-1122-0007', '2012-01-01', '2012-05-30' UNION ALL
SELECT 'Mark', NULL, 'King', 'mk038722@gmail.com', '03-3423-1155', '2012-01-01', '2012-05-30' UNION ALL
SELECT 'Mary', 'Susan', 'Grey', 'mmgrey@gmail.com', '03-1299-3859', '2012-01-01', NULL UNION ALL
SELECT 'Luis', 'Blake', 'Shimaro', 'shimarolou@yahoo.com.au', '03-0385-3999', '2012-01-01', NULL UNION ALL
SELECT 'Natalie', 'G', 'Chin', 'nataliechin@mediasmarts.com.au', '03-3759-1001', '2012-01-01', NULL UNION ALL
SELECT 'Marian', NULL, 'McErin', 'marianmcerin@gmail.com', '03-3400-3331', '2012-01-01', '2012-05-01' UNION ALL
SELECT 'Rick', 'Tony', 'Webster', 'rikky69@gmail.com', '03-9459-1112', '2012-01-01', NULL

INSERT INTO Address
(Address1, Address2, City, Post_Code, Is_Current_Flag)
SELECT '6 Agave Street', 'Apartment 4A', 'Launceston', '7250', 'Y' UNION ALL
SELECT '88 Dodge Street', NULL, 'Sunshine', '3020', 'Y' UNION ALL
SELECT '3 McKenzie Court', 'Level 9', 'Perthville', '2795', 'Y' UNION ALL
SELECT '5 Spencer Drive', 'Unit 9D', 'Melbourne', '3002', 'Y' UNION ALL
SELECT '8 Sunny Avenue', NULL, 'Sydney', '2000', 'Y' UNION ALL
SELECT '83 Mara Drive', NULL, 'Echuca', '3563', 'Y' UNION ALL
SELECT '1038 Mustang Street', NULL, 'Brisbane', '4000', 'Y' UNION ALL
SELECT '1 Bradman Street', NULL, 'Bendigo', '3550', 'Y' UNION ALL
SELECT '12 Cruger Drive', 'Block C', 'Cairns', '4870', 'Y' UNION ALL
SELECT '124 Lasting Court', NULL, 'Adelaide', '5000', 'Y'

INSERT INTO Customer_Address_Bridge
(CustomerID, AddressID)
SELECT 1, 1 UNION ALL
SELECT 2,2 UNION ALL
SELECT 3,3 UNION ALL
SELECT 4,4 UNION ALL
SELECT 5,5 UNION ALL
SELECT 6,6 UNION ALL
SELECT 7,7 UNION ALL
SELECT 8,8 UNION ALL
SELECT 9,9 UNION ALL
SELECT 10, 10

--CREATE CONSTRAINTS
ALTER TABLE Customer_Address_Bridge
ADD FOREIGN KEY (AddressID) REFERENCES Address(AddressID)
ALTER TABLE Customer_Address_Bridge
ADD FOREIGN KEY (CustomerID) REFERENCES Customer(CustomerID)
GO

--CREATE DIMENSION 'DimCustomer' TABLE
CREATE TABLE DimCustomer(
CustomerSK int IDENTITY (1,1) NOT NULL,
CustomerID int NULL,
First_Name varchar (50) NULL,
Last_Name varchar (50) NULL,
Email_Address varchar (100) NULL,
City varchar (50) NULL,
DT_Valid_From datetime NULL,
DT_Valid_To datetime NULL,
Is_Current bit NULL,
DimChecksum bigint NULL
CONSTRAINT PK_DimCustomer PRIMARY KEY CLUSTERED (CustomerSK asc))

ALTER TABLE [dbo].[DimCustomer] ADD  CONSTRAINT [DF_DimCustomer_RowChecksum]  DEFAULT ((0)) FOR [DimChecksum]
GO

--CREATE TEMPORARY TABLE TO HOLD TYPE 1 SCD DATA
CREATE TABLE Temp_Customer_Updates(
Checksum bigint NULL,
DimChecksum bigint NULL,
CustomerID int NULL,
First_Name varchar(50) NULL,
Last_Name varchar(50) NULL,
City varchar (50) NULL,
Email_Address varchar (100) NULL,
CustomerSK int NULL)
This should form the foundations for our SCD package. As with the previous post to this series (Part 1), attributes such as ‘First_Name’, ‘Last_Name’ and ‘City’ will be treated as Type 2 SCD whereas ‘Email_Address’ column will be marked as Type 1 SCD. Also, notice that this code is essentially the same as the code I created for the previous post in this series (Part 1) with two differences – firstly, our ‘DimCustomer’ dimension table contains an additional attribute (line such and such) called ‘DimChecksum’ (bigint datatype) to cater for our checksum transformation and we have added ‘Temp_Customer_Updates’ table as a temporary storage for Type 1 SCD (all explained later).
Now, onto the main part – creating an SSIS package. Fire up SQL Server Data Tools development environment and create a new SSIS project. Next, on the ‘Control Flow’ pane drop three ‘Execute SQL Task’ and one ‘Data Flow’ transformations and link them together as per image below – ‘Truncate Temp Table’ (Execute SQL Task 1) –> ‘Process SCD’ (Data Flow Task) –> ‘Update DimCustomer from Temp Table’ (Execute SQL Task 2) –> ‘Update Is_Current Flag’ (Execute SQL Task 3).
Next, create a database connection in ‘Truncate Temp Table’ component and enter the following SQL in ‘SQLStatement’ property:
TRUNCATE TABLE Temp_Customer_Updates
This will empty our temporary table at the start of package execution. Following the green precedence lines, double-click on ‘Process SCD’ transform to go to ‘Data Flow’ pane. Here, drop the ‘OLE DB Source’ transformations onto the development surface and using the previously created database connection, input the following query into its ‘SQL command text:’ textbox.
SELECT cu.CustomerID,
cu.First_Name,
cu.Last_Name,
ad.City,
cu.Email_Address
FROM dbo.Address AS ad INNER JOIN
dbo.Customer_Address_Bridge AS br ON ad.AddressID = br.AddressID INNER JOIN
dbo.Customer AS cu ON br.CustomerID = cu.CustomerID
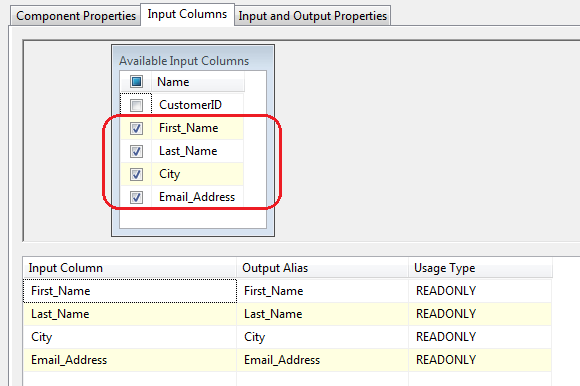
This query’s output will form our dimension table data structure. Next, drop the ‘Checksum Transformation’, link it to our data source and within the transform, on ‘Input Columns’ tab select all attributes from ‘Available Input Columns‘ except for the business key as per below.
This means that only the columns selected will have a checksum values created for each row for SCD comparison. Now it is time to take care of the ‘Lookup’ transform. Open it up and adjust the properties for each property group i.e. General, Connection, Columns, Advanced and Error Output as per below.
- In ‘General’, select Cache Mode as ‘Full Cache, Connection Type as ‘OLE DB connection manager’ and ‘Redirect rows to no match output’ from the options tied to handling entries which do not match. This will handle our Type 2 SCD or ‘INSERT new rows’ execution.
- In ‘Connection’, use the database connection created earlier and select ‘DimCustomer’ table as our source
- In ‘Columns’, select ‘CustomerSK’ and ‘DimChecksum’ fields as the columns we will be bringing it and link the columns selected in ‘Checksum Transformation’ (query source) to their counterparts in ‘DimCustomer’ table as per below. Notice that we will not be linking ‘Email_Address’ attribute as this will be treated as Type 1 SCD i.e. not record created if a change occurs, only update to the existing data.
- Don’t alter ‘Advanced’ section and finally, change ‘Error Output’ group properties as per below.
The function of this ‘Lookup’ transform is to differentiate between Type 1 and Type 2 or ‘INSERT new rows’ SCD. The logic is simple – if a new record is found or an update to an existing Type 2 record is detected then redirect the data to ‘Lookup No Match Output’. If there are no new records created in the source or a change is detected in Type 1 SCD record then redirect data flow to ‘Lookup Match Output’ way. I have also attached ‘Trash Destination’ component to the ‘Lookup’ transform (which is just a neat way of terminating data flow) but you can replace it something more meaningful e.g. script component to send an e-mail on error or similar. Now, following ‘Lookup No Match Output’ precedence constraint, drop ‘Derived Column’ transform onto the surface and create ‘DT_Valid_From’, ‘DT_Valid_To’ and ‘Is_Current’ derived columns which will be used for populating control attributes in the dimension table relating to the record history. Assign the following expressions and corresponding data types to newly created derived column as per below.
Next, attach ‘Data Conversion’ transform and change Is_Current input column data type into Boolean as per below.
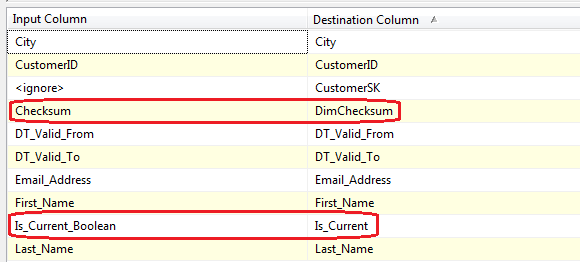
Finally, for our ‘OLE DB Destination’ which takes records with no match, match up the records from our source to the DimCustomer table making sure that ‘Is_Current_Boolean’ is paired up with ‘Is_Current’ and ‘Checksum’ is paired up with ‘DimChecksum’ in the destination table (see below).
That is our Type 2 SCD or ‘INSERT new rows’ records handled. Now let’s go back to our ‘Lookup’ transform and connect ‘Conditional Split’ transform for ‘Lookup Match Output’. This will handle Type 1 SCD. What we will do here is create a conditional statement which will filter out the records based on the checksum values. This means that if a checksum value created by our ‘Checksum Transform’ matches that of our dimension table than the records will be left unchanged i.e. there is no change for the Type 1 ‘Email_Address’ attribute. If however the checksum value is different than the rows with the new values will be moved to our temporary table which we set up at the start. The content of our ‘Conditional Split’ transformation looks as per image below.
From here, all the is left to do is to terminate execution by ending the data flow for those rows where checksum value was matched by linking the ‘Conditional Split’ to ‘Trash Destination’. Those records where the checksum figure was different though will need to be inserted into ‘Temp_Customer_Updates’ table. The final ‘Data Flow’ package layout should look as per below.
Going back to our ‘Control Flow’ layout, let’s input he following query into ‘Update DimCustomer from Temp Table’ Execute SQL task container.
UPDATE DimCustomer
SET First_Name = Temp.First_Name,
    Last_Name = Temp.Last_Name,
    City = Temp.City,
    Email_Address = Temp.Email_Address,
    DimChecksum = Temp.Checksum,
    DT_Valid_From = GetDate(),
    DT_Valid_To = '9999-12-31'
FROM Temp_Customer_Updates as Temp INNER JOIN
DimCustomer as Cust on Temp.CustomerSK = Cust.CustomerSK
WHERE Is_Current = 1
What that does is update Type 1 values in the dimension table with changed values from our temporary table as well as resetting date fields for history tracking. Finally, in our last Execute SQL Task container we will update ‘Is_Current’ flag across the whole dimension to ensure that only one record (oldest one based on the date created) for each ‘CustomerID’ has the flag ‘Is_Current’ against it. So go ahead and execute the following query which should complete our SSIS package development.
UPDATE DimCustomer
SET Is_Current = 0, DT_Valid_To = GetDate()
FROM DimCustomer
INNER JOIN
	(SELECT CustomerID, MAX(DT_Valid_From) as Last_Update
    FROM DimCustomer
    GROUP BY CustomerID HAVING Count(CustomerID)>1) as a
    ON DimCustomer.CustomerID =a.CustomerID
    AND DimCustomer.DT_Valid_From < a.Last_Update
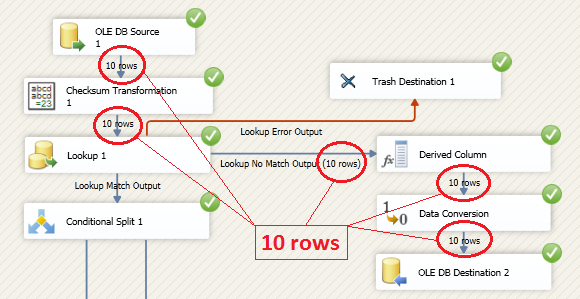
If you have followed through with the above steps, you can now execute the package which should populate our dimension table with ten records (based on the dummy data inserted into our source tables execution the script at the beginning of this post). If everything goes well, you should only see Type 2 or ‘INSERT new rows’ section of the ‘Data Flow’ processing our source data as at this stage all records should be treated as new (see image below).
If you run the package again, without making any changes to the source tables, no data should be altered in the ‘DimCustomer’ dimension and the ‘Data Flow’ should process the incoming steam via the ‘Conditional Split’ which points to ‘Trash Destination’, meaning that no data alteration or addition was detected. Now, to test if the package does what is expected of it, let’s alter the source tables to see the changes reflected and handled according to our Type 1 and Type 2 SCD assumptions. What the below query does is it adds 3 records to the source ‘Customer’ table which should be processed as additions to our existing table, changes ‘Email_Address’ fields of three existing records in the source data which should be processed as Type 1 SCD and finally updates ‘First_Name’, ‘Last_Name’ and ‘City’ of three other records which should be processed as Type 2 SCD update. The code is pretty much self-explanatory.
--INSERT NEW VALUES INTO CUSTOMER
INSERT INTO Customer
(First_Name, Middle_Name, Last_Name, Email_Address, Phone_Number, Created_Date, Modified_Date)
SELECT '11_xxx', NULL, '11_yyy', '11_some_email_address', NULL, GetDate(), NULL UNION ALL
SELECT '12_xxx', NULL, '12_yyy', '12_some_email_address', NULL, GetDate(), NULL UNION ALL
SELECT '13_xxx', NULL, '13_yyy', '13_some_email_address', NULL, GetDate(), NULL
GO

--INSERT NEW VALUES INTO ADDRESS
INSERT INTO Address
(City, Is_Current_Flag)
SELECT '11_some_city', 'Y' UNION ALL
SELECT '12_some_city', 'Y' UNION ALL
SELECT '13_some_city', 'Y'
GO

--UPDATE TYPE 1 SCD RECORDS. DON'T WORRY ABOUT UPDATING 'MODIFIED_DATE' COLUMN
UPDATE Customer
SET Email_Address = '1_some_email_address' WHERE CustomerID = 1
UPDATE Customer
SET Email_Address = '2_some_email_address' WHERE CustomerID = 2
UPDATE Customer
SET Email_Address = '3_some_email_address' WHERE CustomerID = 3
GO

--UPDATE TYPE 2 SCD RECORDS. DON'T WORRY ABOUT UPDATING 'MODIFIED_DATE' COLUMN
UPDATE Customer
SET First_Name = '4_some_first_Name', Last_Name = '4_some_last_Name' WHERE CustomerID = 4
UPDATE Customer
SET First_Name = '5_some_first_Name', Last_Name = '5_some_last_Name' WHERE CustomerID = 5
UPDATE Customer
SET First_Name = '6_some_first_Name', Last_Name = '6_some_last_Name' WHERE CustomerID = 6

--UPDATE BRIDGING TABLE
INSERT INTO Customer_Address_Bridge
(CustomerID, AddressID)
VALUES (11,11)
INSERT INTO Customer_Address_Bridge
(CustomerID, AddressID)
VALUES (12,12)
INSERT INTO Customer_Address_Bridge
(CustomerID, AddressID)
VALUES (13,13)
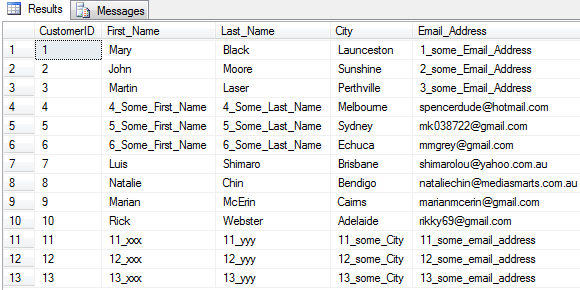
When we link the tables together and single out the attributes for our dimension population we should get 3 records which qualify for Type 2 SCD update (row 4, 5, 6), 3 records which qualify for Type 1 SCD update (row 1, 2, 3) and 3 records which qualify just for an INSERT (row 11, 12, 13) as per below.
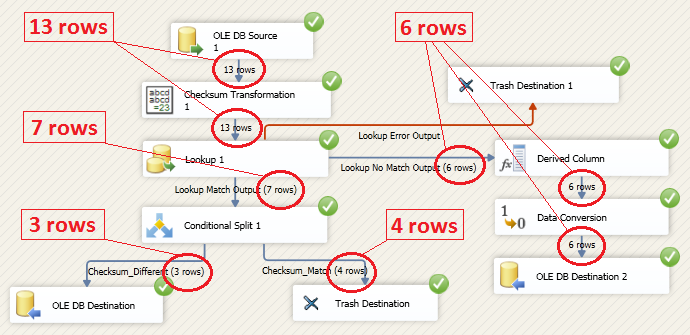
Now, let’s run the package again to see how those records are handled by the ‘Data Flow’ in SSIS once the package finished processing.
What we can notice here is a standard SCD Type 1 and 2 as well as new records INSERT handling. Let’s start from the top (image below). Records 1, 2 and 3 (blue rectangle) have been updated according to Type 1 SCD methodology i.e. email addresses on those have been altered to reflected the latest status for those 3 customers without creating additional records. Records 11, 12, 13 (green rectangle) have been created as Type 2 attributes were changed in the source, therefore new records needed to be added for already existing rows (notice that ‘CustomerIDs’ are exactly the same for rows 4 to 6 as they are for rows 11 to 13. Finally, new records which did not exist in the dimension table (not updates) are represented by row numbers 14, 15, 16 (red rectangle). These are not updates, therefore SCD Type 1 or SCD Type 2 do not apply. It is just a straight INSERT.
So there you go – another method which can be utilized in order to update dimension tables which handles SCD types and new data elegantly and efficiently. In the next part to this series (part 3) I will describing the Kimball method Slowly Changing Dimension component which is another method one can implement to manage SCD through a SSIS environment.
http://scuttle.org/bookmarks.php/pass?action=addThis entry was posted on Tuesday, August 21st, 2012 at 11:45 am and is filed under How To's, SQL, SSIS. You can follow any responses to this entry through the RSS 2.0 feed. You can leave a response, or trackback from your own site.







admin November 15th, 2013 at 1:51 am
Hi Todd
Sorry to hear you’re having issues with this solution. I have uploaded a sample SSIS package based on the instructions in my blog under the following link: https://skydrive.live.com/redir?resid=715AEF07A82832E1!57150&authkey=!AK0x_bxBtwimSmc
The package is password protected. Password is: ‘bicortex’ – no quotation marks and all lower case 🙂
If you would like to see the package demo while executing, I have also uploaded a sample video footage which demonstrates the execution output and data changes applied through this solution. All these files can be downloaded and if you wish to use my package as a template (pending you’ve got a ‘sandbox’ database provisioned as per the video) – just modify the data source connection and you should be able to get the same output as I did in the video. Hope that helps……cheers, Marcin!