How to Programmatically Archive File into A Directory using Script Task in SSIS
In ‘How to create an XML file using SSIS and MS SQL Server’ as well as ‘Generating Files through bcp Utility in SQL Server’ I showed how to generate files (CSV, XML, TXT etc) using common tools and SQL available with Microsoft SQL Server. These two posts were followed up with ‘Programmatically Checking If File Exits In SSIS’ which can provide an extension to the file generating processes. In this post I would like to show how to programmatically archive a file into a directory once it has been created. Although this can be achieved through the use of a ‘File System Task’ from SSIS Toolbox menu (which also has the ability to copy, delete, create and rename files or directories), a simple C# script can do the job just as nicely. A common scenario for such application would be to archive a file after it was created/generated, FTP’ed to a remote location. I often find that having an archive of a file which was sent to a client can save me a lot of hassle when the file does not get delivered successfully or a client requests another copy. The script for archiving an CSV file can be found below.
using System;
using System.Data;
using Microsoft.SqlServer.Dts.Runtime;
using System.Windows.Forms;
using System.IO;

namespace ST_2ef9e8dab497461da7eedabd19e69fa4.csproj
{
    [System.AddIn.AddIn("ScriptMain", Version = "1.0", Publisher = "", Description = "")]
    public partial class ScriptMain : Microsoft.SqlServer.Dts.Tasks.ScriptTask.VSTARTScriptObjectModelBase
    {

        #region VSTA generated code
        enum ScriptResults
        {
            Success = Microsoft.SqlServer.Dts.Runtime.DTSExecResult.Success,
            Failure = Microsoft.SqlServer.Dts.Runtime.DTSExecResult.Failure
        };
        #endregion

        public void Main()
        {

            DirectoryInfo di = new DirectoryInfo(Dts.Variables["Local_Dir"].Value.ToString());

            FileInfo[] fi = di.GetFiles("*.csv");
            String filename = fi[0].Name;

            string sourceFileName = filename;
            string destinationFile = @"\\c:\Destination\" + sourceFileName;
            string sourceFile = @"\\c:\Source" + sourceFileName;

            if (File.Exists(destinationFile))
                File.Delete(destinationFile);
            // To move a file or folder to a new location:
            System.IO.File.Move(sourceFile, destinationFile);
            Dts.TaskResult = (int)ScriptResults.Success;
        }
    }
}
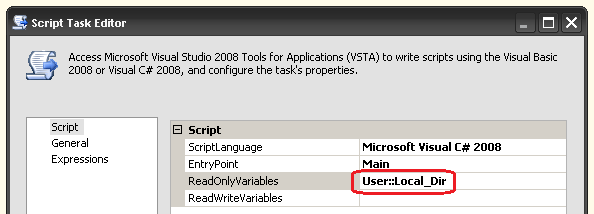
As you can see, the script uses a variable which we need to create before we execute the script as part of an SSIS package and later declare as ‘ReadOnlyVariable’ in the Script Task properties window as per below:
This variable (Local_Dir), previously declared as string, points to the folder where the file is stored before moving it off to a ‘history’ folder. As for the script, it is quite simple. Firstly, what we do here is creating an array, populating it with files from our Local_Dir variable and declaring paths for a source and destination directories. Next, we check if the file with the same name already exists in the destination folder, deleting it if it does. In this way we can ensure that an exception will not be thrown due to a file with an exactly the same name already sitting in our destination folder. Finally, we move the file to our destination folder.
That is really it! Now we can use this script in combination with other techniques e.g. ‘generating files through bcp utility’ and ‘programmatically checking if the file exists script’ to create a more comprehensive file management solution in SSIS.
http://scuttle.org/bookmarks.php/pass?action=addThis entry was posted on Tuesday, May 8th, 2012 at 6:21 am and is filed under .NET, SSIS. You can follow any responses to this entry through the RSS 2.0 feed. You can leave a response, or trackback from your own site.


