AWS S3 data ingestion and augmentation patterns using DuckDB and Python
December 28th, 2024 / 11 Comments » / by admin
Introduction
Many of the popular data warehouses vendors utilize Object Storage services provided by major cloud providers e.g. ADLS, S3 as their intermediate or persistent data store. S3 (Simple Storage Service) especially has gained a lot of traction in the data community due to its virtually unlimited scalability at very low costs, along with its industry-leading durability, availability and performance – S3 has become the new SFTP. As a result, more Data Warehouse vendors are integrating S3 as their primary, transient or secondary storage mechanism e.g. Vertica Eon, Snowflake, not to mention countless data lake vendors.
However, pushing data into S3 is half the battle and in-house-built S3 data ingestion pipelines oftentimes turn out to be more complex than initially thought or required. In addition to this, there’s already a sea of solutions, architectures and approaches which solve this simple problem in a very roundabout way, so it’s easy to get lost or over-engineer.
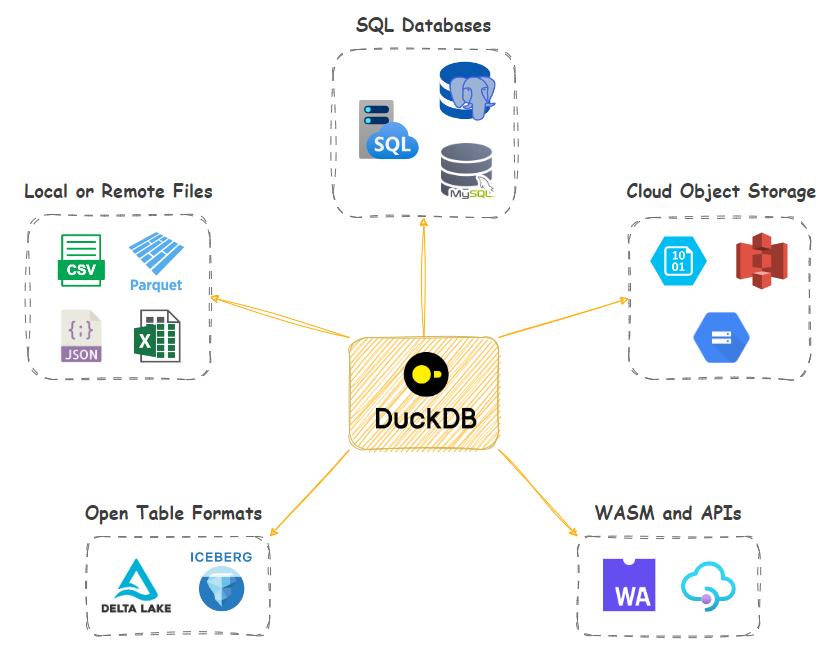
In this post, I’d like to look at how DuckDB in – a small footprint, in-process OLAP RDBMS – can alleviate some of these challenges by providing native S3 integration with a few extra “quality of life” features thrown in. Let’s look at how DuckDB, with a little bit of SQL and/or Python, can serialize, transform, augment and integrate data into S3 with little effort using a few different patterns and approaches. I’ll be using Synthea synthetic hospital data and SQL Server engine as my source in all the below examples, but the same methodology can be applied to any data or RDBMS. Also, in case you’d like to replicate these exact scenarios, additional code used for CSV to Parquet files serialization as well as DuckDB and SQL Server import (Python and T-SQL) can be found HERE.
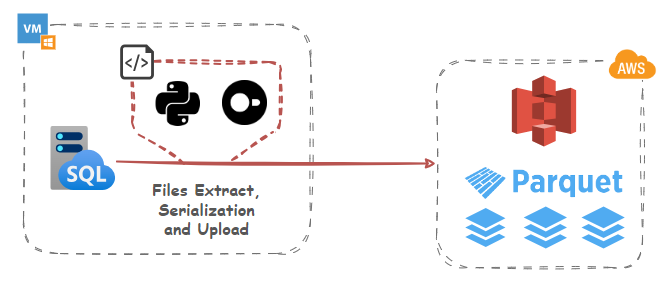
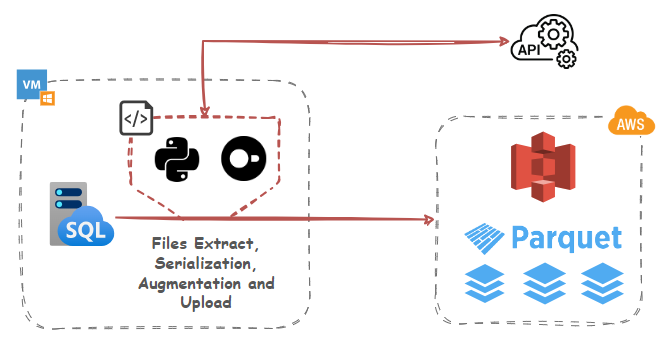
Data Export, Serialization and S3 Ingestion
Let’s start with a simple example of using DuckDB and its httpfs extension which supports reading/writing/globbing files on object storage servers to convert source data into Parquet columnar storage format and upload it into an S3 bucket. DuckDB conforms to the S3 API out-of-the-box and httpfs filesystem is tested with AWS S3, Minio, Google Cloud, and lakeFS. Other services that implement the S3 API (such as Cloudflare R2) should also work, but not all features may be supported.
While using DuckDB may seem a bit odd at first glance as it involves utilizing another OLAP engine, the small footprint (it runs in-process) and its rich ecosystem of features means that we can leverage its potential for a small to medium data serialization and transformations without significant investments in other services and tooling. And because it’s a library, there’s no need for a dedicated client-server architecture and many operations can run in-memory.
Polars library is used as an intermediate data structure to load, transform, and validate data before converting it to Arrow. Arrow Tables provide a columnar in-memory format that is highly efficient for data analytics and serialization. This minimizes the overhead of converting data from a database query to a Parquet file. By leveraging Arrow, we benefit from its optimized data pipelines, reducing processing and serialization overhead.
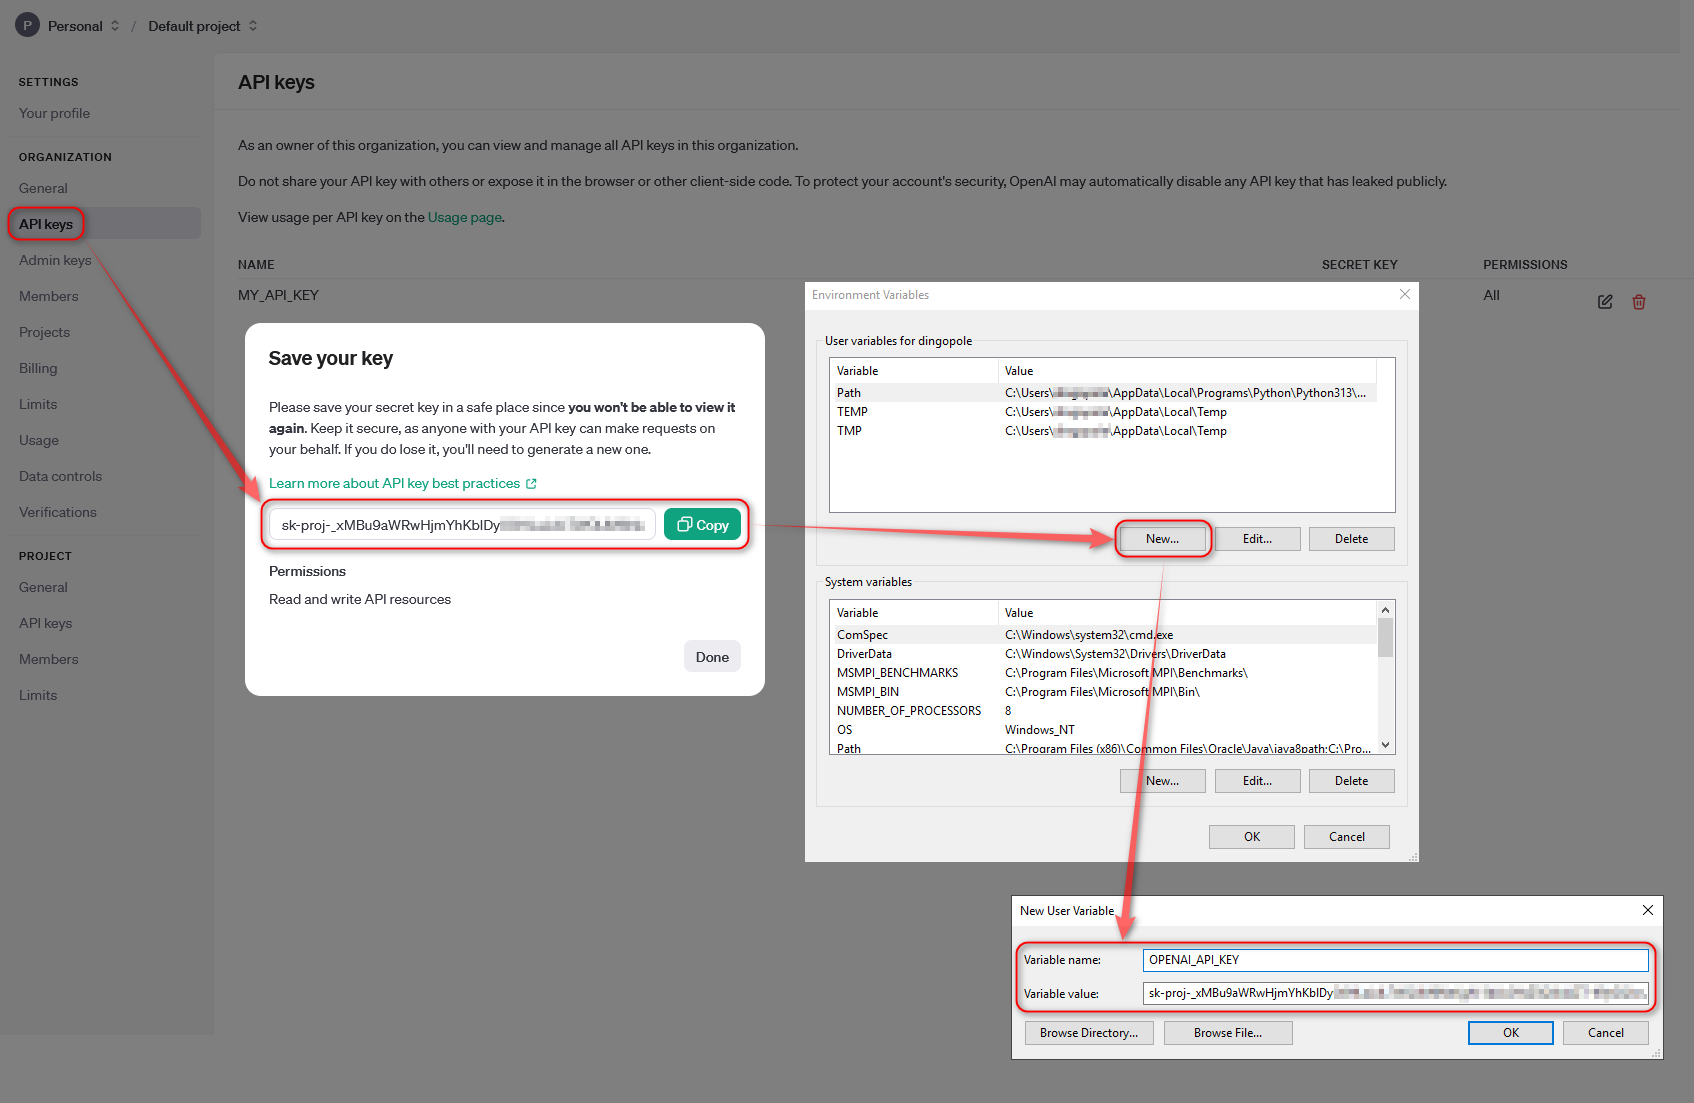
This Python script also assumes S3 bucket has already been created. In a production environment, for S3 access, you’re better off using Amazon IAM service to create a set of keys that only has permission to perform the tasks that you require for your script. For SQL Server access, use Windows Auth or SQL Server login with limited access privileges. Notice how secrets are used to authenticate to AWS S3 endpoints (credential chain from AWS SDK provider is also supported) in line 45. In DuckDB, the Secrets manager provides a unified user interface for secrets across all backends that use them. Secrets can also be persisted, so that they do not need to be specified every time DuckDB is launched.
import pyodbc
import polars as pl
import duckdb
import boto3
from humanfriendly import format_timespan
from time import perf_counter

_SQL_DRIVER = "{ODBC Driver 17 for SQL Server}"
_SQL_SERVER_NAME = "WINSVR2019\\MSSQL2022"
_SQL_USERNAME = "Your_MSSQL_UserName"
_SQL_PASSWORD = "Your_MSSQL_Password"
_SQL_DB = "Synthea"
_AWS_S3_KEY_ID = "Your_AWS_Key"
_AWS_S3_SECRET = "Your_AWS_Secret"
_AWS_S3_REGION = "ap-southeast-2"
_AWS_S3_BUCKET_NAME = "s3bicortex"


def mssql_db_conn(_SQL_SERVER_NAME, _SQL_DB, _SQL_USERNAME, _SQL_PASSWORD):
    connection_string = (
        "DRIVER="
        + _SQL_DRIVER
        + ";SERVER="
        + _SQL_SERVER_NAME
        + ";PORT=1433;DATABASE="
        + _SQL_DB
        + ";UID="
        + _SQL_USERNAME
        + ";PWD="
        + _SQL_PASSWORD
    )
    try:
        conn = pyodbc.connect(connection_string, timeout=1)
    except pyodbc.Error as err:
        conn = None
    return conn


def load_duckdb_tables(
    _SQL_SERVER_NAME, _SQL_DB, _SQL_USERNAME, _SQL_PASSWORD, duckdb_conn, mssql_conn
):
    try:
        duckdb_cursor = duckdb_conn.cursor()
        duckdb_cursor.execute(
            f'CREATE SECRET (TYPE S3,KEY_ID "{_AWS_S3_KEY_ID}",SECRET "{_AWS_S3_SECRET}",REGION "{_AWS_S3_REGION}");'
        )
        duckdb_cursor.execute("INSTALL httpfs;")
        duckdb_cursor.execute("LOAD httpfs;")
        with mssql_conn.cursor() as cursor:
            sql = f"SELECT table_name FROM {_SQL_DB}.INFORMATION_SCHEMA.TABLES WHERE TABLE_SCHEMA = 'dbo';"
            cursor.execute(sql)
            metadata = cursor.fetchall()
            tables_to_load = [row[0] for row in metadata]
            for table in tables_to_load:
                extract_query = (
                    f"SELECT * FROM {table}"  # Modify your SQL query as needed
                )
                row_count_query = f"SELECT COUNT(1) FROM {table}"
                print(
                    f"Serializing MSSQL '{table}' table content into a duckdb schema...",
                    end="",
                    flush=True,
                )
                cursor = mssql_conn.cursor()
                cursor.execute(row_count_query)
                records = cursor.fetchone()
                mssql_row_count = records[0]
                cursor.execute(extract_query)
                columns = [column[0] for column in cursor.description]
                rows = cursor.fetchall()
                rows = [tuple(row) for row in rows]
                df = pl.DataFrame(
                    rows, schema=columns, orient="row", infer_schema_length=1000
                )
                duckdb_conn.register("polars_df", df)
                duckdb_conn.execute(
                    f"CREATE TABLE IF NOT EXISTS {table} AS SELECT * FROM polars_df"
                )
                duckdb_cursor.execute(f"SELECT COUNT(1) FROM {table}")
                records = duckdb_cursor.fetchone()
                duckdb_row_count = records[0]
                if duckdb_row_count != mssql_row_count:
                    raise Exception(
                        f"Table {table} failed to load correctly as record counts do not match: mssql {table} table: {mssql_row_count} vs duckdb {table} table: {duckdb_row_count}.\
                            Please troubleshoot!"
                    )
                else:
                    print("OK!")
                print(
                    f"Serializing DUCKDB '{table}' table content into parquet schema and uploading to '{_AWS_S3_BUCKET_NAME}' S3 bucket...",
                    end="",
                    flush=True,
                )
                duckdb_cursor.execute(
                    f'COPY {table} TO "s3://{_AWS_S3_BUCKET_NAME}/{table}.parquet";'
                )
                s3 = boto3.client(
                    "s3",
                    aws_access_key_id=_AWS_S3_KEY_ID,
                    aws_secret_access_key=_AWS_S3_SECRET,
                    region_name=_AWS_S3_REGION,
                )
                file_exists = s3.head_object(
                    Bucket=_AWS_S3_BUCKET_NAME, Key=".".join([table, "parquet"])
                )
                duckdb_cursor.execute(
                    f'SELECT COUNT(*) FROM read_parquet("s3://{_AWS_S3_BUCKET_NAME}/{table}.parquet");'
                )
                records = duckdb_cursor.fetchone()
                parquet_row_count = records[0]
                if file_exists and parquet_row_count == mssql_row_count:
                    print("OK!")
                    duckdb_conn.execute(f"DROP TABLE IF EXISTS {table}")
        duckdb_conn.close()
    except Exception as err:
        print(err)


if __name__ == "__main__":
    duckdb_conn = duckdb.connect(database=":memory:")
    mssql_conn = mssql_db_conn(_SQL_SERVER_NAME, _SQL_DB, _SQL_USERNAME, _SQL_PASSWORD)
    if mssql_conn and duckdb_conn:
        start_time = perf_counter()
        load_duckdb_tables(
            _SQL_SERVER_NAME,
            _SQL_DB,
            _SQL_USERNAME,
            _SQL_PASSWORD,
            duckdb_conn,
            mssql_conn,
        )
        end_time = perf_counter()
        time = format_timespan(end_time - start_time)
        print(f"All records loaded successfully in {time}!")
It’s a straightforward example where most of the heavy lifting logic is tied to a single line of code – the COPY command in line 95. The COPY…TO function can be called specifying either a table name, or a query. When a table name is specified, the contents of the entire table will be written into the resulting file. When a query is specified, it is executed, and the result of the query is written to the resulting file.
Datasets Row Diff Detection and Data Reconciliation
Now, let’s look at how DuckDB can be used for more than just data serialization and S3 upload. Suppose we’d like to do a diff on our parquet files staged in S3 and our local MSSQL database. This requirement can be useful for a number of reasons e.g.
- Data Versioning: In a versioned database, comparing tables allows for tracking changes between different versions of a dataset. This is crucial for maintaining data lineage and understanding how information has evolved over time.
- Data Migration Validation: When migrating data between systems or databases, ensuring that the integrity of the data is maintained is paramount. Table comparisons help verify that the transferred data aligns with the source.
- Quality Assurance: For datasets subject to frequent updates or manual interventions, comparing tables becomes a quality assurance measure. It ensures that modifications adhere to predefined standards and do not introduce unintended discrepancies.
- Detecting Anomalies: Identifying unexpected changes in a dataset is simplified through table comparisons. Sudden spikes or drops in data values can be promptly spotted, triggering further investigation.
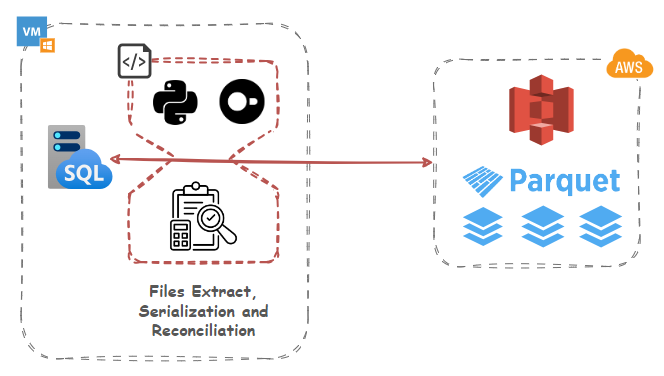
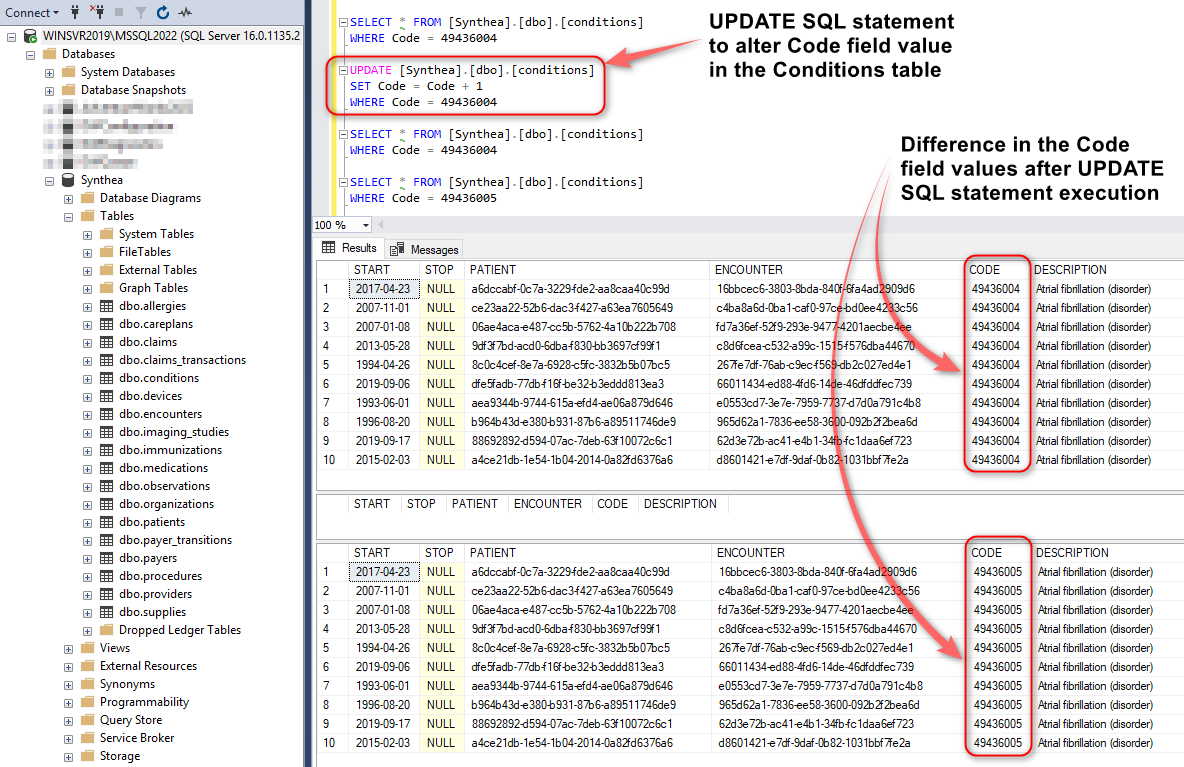
Normally, comparing Parquet file and database table content, would be difficult to achieve for a few reasons e.g. data structure, storage mechanism etc. not to mention the fact these are not co-located i.e. Parquet files are stored in S3 and DuckDB data on premises. However, DuckDB makes it relatively easy to query both, hash the entire file/table content and detect any discrepancies. To see how this may work in practice, let create a scenario where ten rows in the source database (MSSQL) are altered, running the following SQL statement:
SELECT * FROM [Synthea].[dbo].[conditions]
WHERE Code = 49436004

UPDATE [Synthea].[dbo].[conditions]
SET Code = Code + 1
WHERE Code = 49436004

SELECT * FROM [Synthea].[dbo].[conditions]
WHERE Code = 49436004

SELECT * FROM [Synthea].[dbo].[conditions]
WHERE Code = 49436005
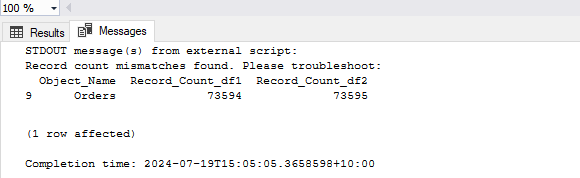
Next, let’s run the following script where “Conditions” database table is compared against its Parquet file counterpart and all ten updated records are surfaced as a discrepancy. Notice how compare_sql variable is creating a SHA256 hashmap value for all the data coming from a particular object to determine if any difference was recorded after which diff_detect_sql variable is used to handle difference output.
import pyodbc
import polars as pl
import duckdb
from humanfriendly import format_timespan
from time import perf_counter

_SQL_DRIVER = "{ODBC Driver 17 for SQL Server}"
_SQL_SERVER_NAME = "WINSVR2019\\MSSQL2022"
_SQL_USERNAME = "Your_MSSQL_UserName"
_SQL_PASSWORD = "Your_MSSQL_Password"
_SQL_DB = "Synthea"
_AWS_S3_KEY_ID = "Your_AWS_Key"
_AWS_S3_SECRET = "Your_AWS_Secret"
_AWS_S3_REGION = "ap-southeast-2"
_AWS_S3_BUCKET_NAME = "s3bicortex"


def mssql_db_conn(_SQL_SERVER_NAME, _SQL_DB, _SQL_USERNAME, _SQL_PASSWORD):
    connection_string = (
        "DRIVER="
        + _SQL_DRIVER
        + ";SERVER="
        + _SQL_SERVER_NAME
        + ";PORT=1433;DATABASE="
        + _SQL_DB
        + ";UID="
        + _SQL_USERNAME
        + ";PWD="
        + _SQL_PASSWORD
    )
    try:
        conn = pyodbc.connect(connection_string, timeout=1)
    except pyodbc.Error as err:
        conn = None
    return conn


def load_duckdb_tables(duckdb_conn, mssql_conn):
    try:
        duckdb_cursor = duckdb_conn.cursor()
        duckdb_cursor.execute(
            f'CREATE SECRET (TYPE S3,KEY_ID "{_AWS_S3_KEY_ID}",SECRET "{_AWS_S3_SECRET}",REGION "{_AWS_S3_REGION}");'
        )
        duckdb_cursor.execute("INSTALL httpfs;")
        duckdb_cursor.execute("LOAD httpfs;")
        with mssql_conn.cursor() as cursor:
            sql = f"SELECT table_name FROM {_SQL_DB}.INFORMATION_SCHEMA.TABLES WHERE TABLE_SCHEMA = 'dbo' and table_name = 'conditions';"
            cursor.execute(sql)
            metadata = cursor.fetchall()
            tables_to_load = [row[0] for row in metadata]
            for table in tables_to_load:
                extract_query = f"SELECT * FROM {table}"
                cursor = mssql_conn.cursor()
                cursor.execute(extract_query)
                columns = [column[0] for column in cursor.description]
                rows = cursor.fetchall()
                rows = [tuple(row) for row in rows]
                df = pl.DataFrame(
                    rows, schema=columns, orient="row", infer_schema_length=1000
                )
                duckdb_conn.register("polars_df", df)
                duckdb_conn.execute(
                    f"CREATE TABLE IF NOT EXISTS {table}_source AS SELECT * FROM polars_df"
                )
                duckdb_conn.execute(
                    f'CREATE TABLE IF NOT EXISTS {table}_target AS SELECT * FROM read_parquet("s3://{_AWS_S3_BUCKET_NAME}/{table}.parquet");'
                )
                columns_result = duckdb_conn.execute(
                    f"SELECT column_name FROM information_schema.columns WHERE table_name = '{table}_source'"
                ).fetchall()
                columns = [col[0] for col in columns_result]
                cols_str = ", ".join(columns)
                coalesce_columns = ", ".join(
                    [
                        f"COALESCE(table_a.{col}, table_b.{col}) AS {col}"
                        for col in columns
                    ]
                )
                compare_sql = duckdb_conn.execute(
                    f"SELECT (SELECT sha256(list({table}_source)::text) \
                                FROM {table}_source) = \
                                (SELECT sha256(list({table}_target)::text) \
                                FROM {table}_target) AS is_identical"
                ).fetchone()
                if compare_sql[0] is False:
                    diff_detect_sql = f"""
                            CREATE TABLE {table}_diff AS
                            WITH
                            table_a AS (
                                SELECT 's3' AS table_origin,
                                    sha256(CAST({table}_target AS TEXT)) AS sha256_key,
                                    {cols_str}
                                FROM {table}_target
                            ),
                            table_b AS (
                                SELECT 'dbms' AS table_origin,
                                    sha256(CAST({table}_source AS TEXT)) AS sha256_key,
                                    {cols_str}
                                FROM {table}_source
                            )
                        SELECT
                            COALESCE(table_a.sha256_key, table_b.sha256_key) AS sha256_key,
                            COALESCE(table_a.table_origin, table_b.table_origin) AS table_origin,
                            {coalesce_columns}
                        FROM
                            table_a
                        FULL JOIN
                            table_b
                        ON
                            table_a.sha256_key = table_b.sha256_key
                        WHERE {" OR ".join([f"table_a.{col} IS DISTINCT FROM table_b.{col}" for col in columns])};
                    """
                    duckdb_conn.execute(diff_detect_sql)
                    result = duckdb_conn.execute(
                        f"SELECT * FROM {table}_diff LIMIT 100"
                    ).fetchall()
                    full_columns = ["sha256_key", "table_origin"] + columns
                    with pl.Config(
                        tbl_formatting="MARKDOWN",
                        tbl_hide_column_data_types=True,
                        tbl_hide_dataframe_shape=True,
                        tbl_cols=11,
                    ):
                        df = pl.DataFrame(result, schema=full_columns, orient="row")
                        print(df.sort('table_origin', 'sha256_key'))
                else:
                    print("No changes detected, bailing out!")
        duckdb_conn.close()
    except Exception as err:
        print(err)


if __name__ == "__main__":
    duckdb_conn = duckdb.connect(database=":memory:")
    mssql_conn = mssql_db_conn(_SQL_SERVER_NAME, _SQL_DB, _SQL_USERNAME, _SQL_PASSWORD)
    if mssql_conn and duckdb_conn:
        start_time = perf_counter()
        load_duckdb_tables(
            duckdb_conn,
            mssql_conn,
        )
        end_time = perf_counter()
        time = format_timespan(end_time - start_time)
        print(f"All records loaded successfully in {time}!")
When executed, the following output is generated in terminal which can be persisted and acted on as a upstream workflow.

In-Process SQL-Based Data Augmentation using Public APIs
But wait, there’s more! Let’s take it further and explore how DuckDB can be used for augmenting existing data “in-flight” using public API data. In addition to native parquet file format integration, DuckDB can also query and consume API request JSON output, which than can be used to augment or enrich source data before loading it into the destination table or file. Normally, this would require additional logic and Python libraries e.g. requests module, but with DuckDB, one can stitch together a simple workflow to query, parse, transform and enrich data in pure SQL.
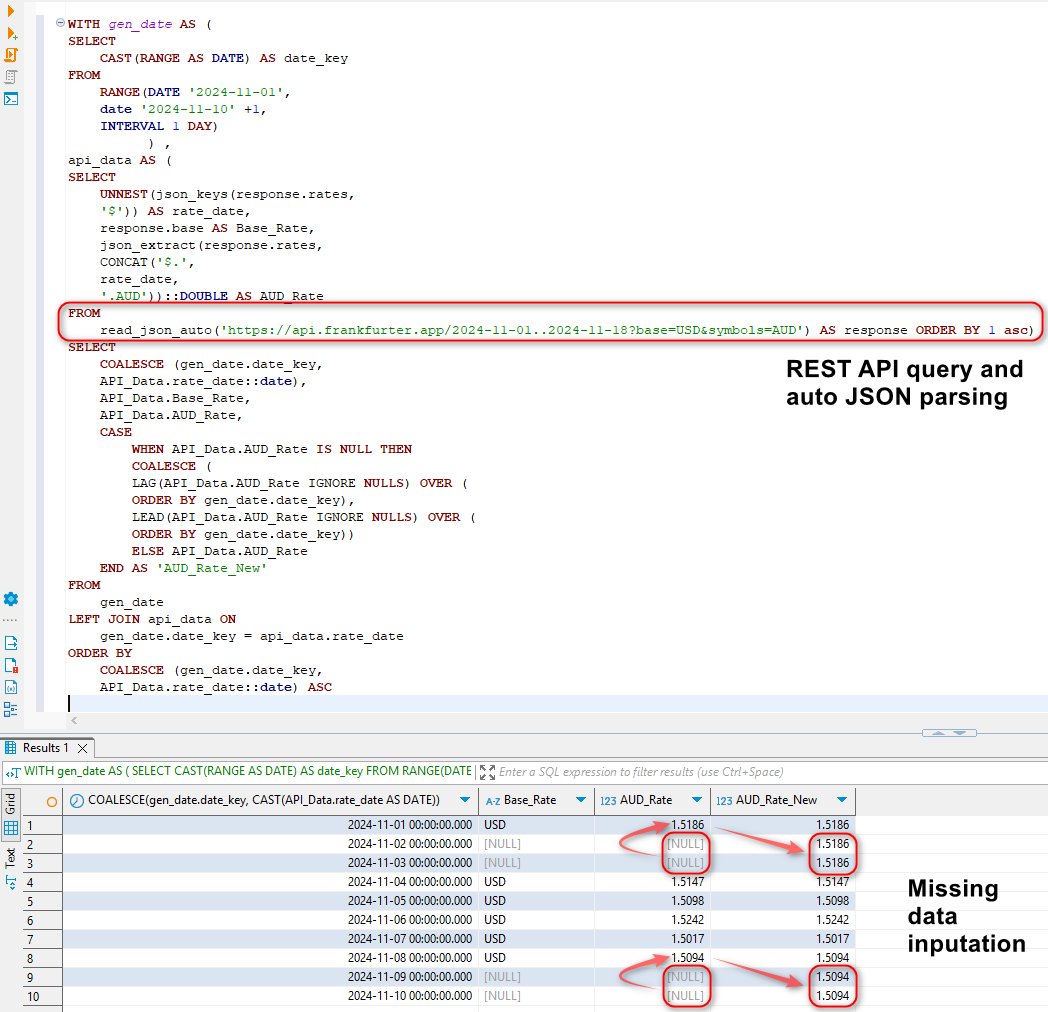
For this example, I’ll query and enrich Synthea data with converted currency rate data from a Frankfurter API. Frankfurter is a free, open-source API for current and historical foreign exchange rates based on data published by the European Central Bank. Their API is well documented on their website HERE.
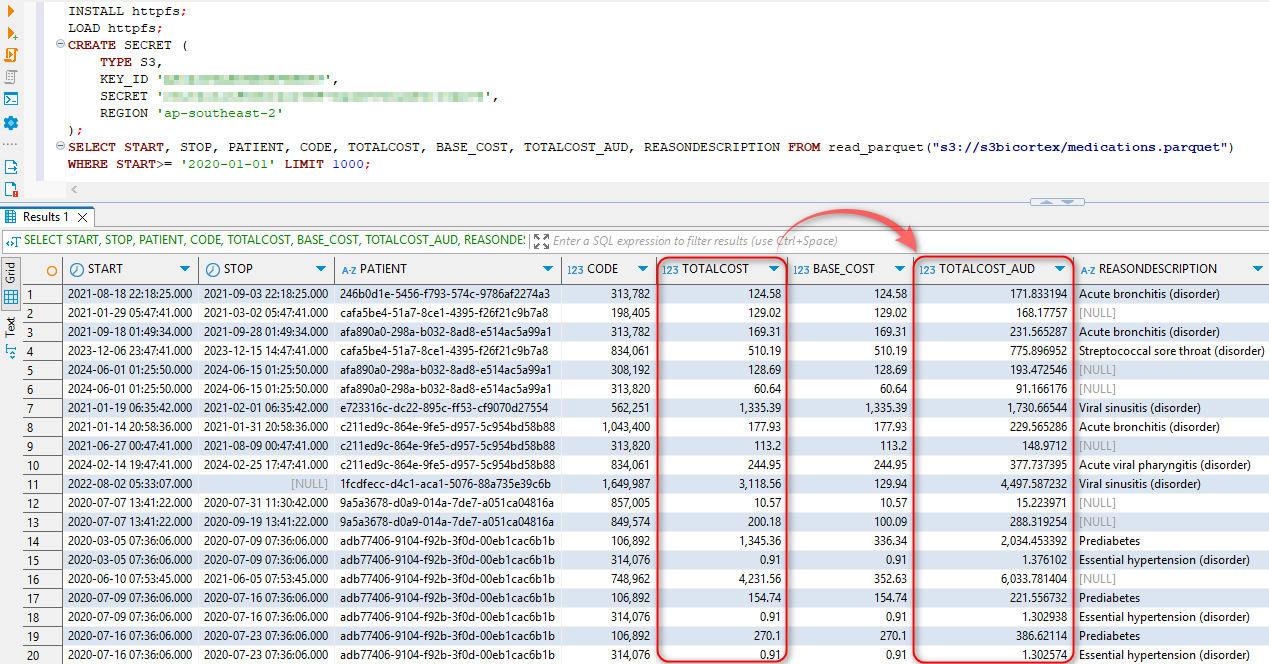
Looking at the Medications table in MSSQL source database, the field TOTALCOST is expressed in USD which we now wish to convert to AUD. The conversion rate needs to correspond to the START field value which denotes when the medication was issued so that the correct rate is sourced, associated with the date value and applied to the dataset. Querying Frankfurter API endpoint for a particular timeline (as per start and end dates) returns a valid JSON payload as per the image below.

However, there are a couple of issues with this approach. Firstly, when a larger time frame is considered e.g. a period over one year, the API is hard-coded to sample weekly averages. To circumvent this, we will loop over each year in the dataset by deriving start year and end year dates for each calendar year and querying the API for each year with the exception of the current year where today’s date will mark the end period. For example, when querying data for 2023-01-01 until today i.e. 25/12/2024, the following time frames will be looped over: 2023-01-01 – 2023-12-31 and 2024-01-01 – 25/12/2024. Secondly, the API does not return data for weekends and public holidays. To fix this, we will apply previous non-NULL value to all the dates which are missing. This will be done exclusively in SQL by creating a full date table, merging it with the API unnested JSON data and then filling in missing dates using SQL functions such as LEAD and LAG in a newly created AUD_Rate_New field. This shows the power of DuckDB’s engine which is capable of not only sourcing data from public API endpoints, but also shredding the output JSON and performing additional transformations (in-memory) as required. Here’s a sample SQL statement implemented as a CTE with a corresponding output.
WITH gen_date AS (
SELECT
	CAST(RANGE AS DATE) AS date_key
FROM
	RANGE(DATE '2024-11-01',
	date '2024-11-10' +1,
	INTERVAL 1 DAY)
          ) ,
api_data AS (
SELECT
	UNNEST(json_keys(response.rates,
	'$')) AS rate_date,
	response.base AS Base_Rate,
	json_extract(response.rates,
	CONCAT('$.',
	rate_date,
	'.AUD'))::DOUBLE AS AUD_Rate
FROM
	read_json_auto('https://api.frankfurter.app/2024-11-01..2024-11-18?base=USD&symbols=AUD') AS response ORDER BY 1 asc)
SELECT
	COALESCE (gen_date.date_key,
	API_Data.rate_date::date),
	API_Data.Base_Rate,
	API_Data.AUD_Rate,
	CASE
		WHEN API_Data.AUD_Rate IS NULL THEN
		COALESCE (
		LAG(API_Data.AUD_Rate IGNORE NULLS) OVER (
		ORDER BY gen_date.date_key),
		LEAD(API_Data.AUD_Rate IGNORE NULLS) OVER (
		ORDER BY gen_date.date_key))
		ELSE API_Data.AUD_Rate
	END AS 'AUD_Rate_New'
FROM
	gen_date
LEFT JOIN api_data ON
	gen_date.date_key = api_data.rate_date
ORDER BY
	COALESCE (gen_date.date_key,
	API_Data.rate_date::date) ASC
Now that we have a way of extracting a complete set of records and “massaging” the output into a tabular format which lend itself to additional manipulations and transformations, let’s incorporate this into a small Python script.
import pyodbc
import polars as pl
import duckdb
import boto3
from datetime import datetime
from humanfriendly import format_timespan
from time import perf_counter

_SQL_DRIVER = "{ODBC Driver 17 for SQL Server}"
_SQL_SERVER_NAME = "WINSVR2019\\MSSQL2022"
_SQL_USERNAME = "Your_MSSQL_UserName"
_SQL_PASSWORD = "Your_MSSQL_Password"
_SQL_DB = "Synthea"
_AWS_S3_KEY_ID = "Your_AWS_Key"
_AWS_S3_SECRET = "Your_AWS_Secret"
_AWS_S3_REGION = "ap-southeast-2"
_AWS_S3_BUCKET_NAME = "s3bicortex"


def mssql_db_conn(_SQL_SERVER_NAME, _SQL_DB, _SQL_USERNAME, _SQL_PASSWORD):
    connection_string = (
        "DRIVER="
        + _SQL_DRIVER
        + ";SERVER="
        + _SQL_SERVER_NAME
        + ";PORT=1433;DATABASE="
        + _SQL_DB
        + ";UID="
        + _SQL_USERNAME
        + ";PWD="
        + _SQL_PASSWORD
    )
    try:
        conn = pyodbc.connect(connection_string, timeout=1)
    except pyodbc.Error as err:
        conn = None
    return conn


def year_boundaries_with_days(low_date_tuple, high_date_tuple):
    low = (
        low_date_tuple[0]
        if isinstance(low_date_tuple, tuple) and isinstance(low_date_tuple[0], datetime)
        else None
    )
    high = (
        high_date_tuple[0]
        if isinstance(high_date_tuple, tuple)
        and isinstance(high_date_tuple[0], datetime)
        else None
    )
    if low is None or high is None:
        raise ValueError(
            "Invalid date input: Both dates must be datetime tuples containing datetime objects."
        )
    today = datetime.now()
    year_boundaries_dict = {}

    def days_in_year(year):
        if year == today.year:
            return (today - datetime(year, 1, 1)).days + 1
        else:
            start_of_year = datetime(year, 1, 1)
            end_of_year = datetime(year, 12, 31)
            return (end_of_year - start_of_year).days + 1

    for year in range(low.year, high.year + 1):
        start_of_year = datetime(year, 1, 1)
        end_of_year = datetime(year, 12, 31)

        if year == today.year and end_of_year > today:
            end_of_year = today

        if start_of_year >= low and end_of_year <= high:
            year_boundaries_dict[year] = {
                "start_of_year": start_of_year.strftime("%Y-%m-%d"),
                "end_of_year": end_of_year.strftime("%Y-%m-%d"),
                "days_in_year": days_in_year(year),
            }
        elif start_of_year < low and end_of_year >= low and end_of_year <= high:
            year_boundaries_dict[year] = {
                "start_of_year": low.strftime("%Y-%m-%d"),
                "end_of_year": end_of_year.strftime("%Y-%m-%d"),
                "days_in_year": days_in_year(year),
            }
        elif start_of_year >= low and start_of_year <= high and end_of_year > high:
            year_boundaries_dict[year] = {
                "start_of_year": start_of_year.strftime("%Y-%m-%d"),
                "end_of_year": high.strftime("%Y-%m-%d"),
                "days_in_year": days_in_year(year),
            }
    return year_boundaries_dict


def load_duckdb_tables(_SQL_DB, duckdb_conn, mssql_conn):
    try:
        duckdb_cursor = duckdb_conn.cursor()
        duckdb_cursor.execute(
            f'CREATE SECRET (TYPE S3,KEY_ID "{_AWS_S3_KEY_ID}",SECRET "{_AWS_S3_SECRET}",REGION "{_AWS_S3_REGION}");'
        )
        duckdb_cursor.execute("INSTALL httpfs;")
        duckdb_cursor.execute("LOAD httpfs;")
        with mssql_conn.cursor() as cursor:
            sql = f"SELECT table_name FROM {_SQL_DB}.INFORMATION_SCHEMA.TABLES WHERE TABLE_SCHEMA = 'dbo';"
            cursor.execute(sql)
            metadata = cursor.fetchall()
            tables_to_load = [row[0] for row in metadata]
            for table in tables_to_load:
                extract_query = (
                    f"SELECT * FROM {table}"  # Modify your SQL query as needed
                )
                row_count_query = f"SELECT COUNT(1) FROM {table}"
                print(
                    f"Serializing MSSQL '{table}' table content into a duckdb schema...",
                    end="",
                    flush=True,
                )
                cursor = mssql_conn.cursor()
                cursor.execute(row_count_query)
                records = cursor.fetchone()
                mssql_row_count = records[0]
                cursor.execute(extract_query)
                columns = [column[0] for column in cursor.description]
                rows = cursor.fetchall()
                rows = [tuple(row) for row in rows]
                df = pl.DataFrame(
                    rows, schema=columns, orient="row", infer_schema_length=1000
                )
                duckdb_conn.register("polars_df", df)
                duckdb_conn.execute(
                    f"CREATE TABLE IF NOT EXISTS {table} AS SELECT * FROM polars_df"
                )
                duckdb_row_count = duckdb_conn.execute(
                    f"SELECT COUNT(*) FROM {table};"
                ).fetchone()
                if table == "medications":
                    min_date = duckdb_conn.execute(
                        f"SELECT MIN(START) FROM {table} WHERE START>= '2020-01-01';"
                    ).fetchone()
                    max_date = duckdb_cursor.execute(
                        "SELECT CAST(current_date AS TIMESTAMP);"
                    ).fetchone()
                    duckdb_conn.execute(
                        f"ALTER TABLE {table} ADD COLUMN TOTALCOST_AUD DOUBLE;"
                    )
                    years = year_boundaries_with_days(min_date, max_date)
                    for k, v in years.items():
                        start_of_year = v["start_of_year"]
                        end_of_year = v["end_of_year"]
                        number_of_days = v["days_in_year"]
                        duckdb_conn.execute(
                            f"""
                            CREATE OR REPLACE TEMP TABLE api_rate_data AS
                            WITH gen_date AS (
                            SELECT
                                CAST(RANGE AS DATE) AS date_key
                            FROM
                                RANGE(DATE '{start_of_year}',
                                DATE '{end_of_year}' + 1,
                                INTERVAL 1 DAY)
                                    ) ,
                            api_data AS (
                            SELECT
                                UNNEST(json_keys(response.rates,
                                '$')) AS rate_date,
                                response.base AS Base_Rate,
                                json_extract(response.rates,
                                CONCAT('$.',
                                rate_date,
                                '.AUD'))::DOUBLE AS AUD_Rate
                            FROM
                                read_json_auto('https://api.frankfurter.app/{start_of_year}..{end_of_year}?base=USD&symbols=AUD') response)
                            SELECT
                                COALESCE (gen_date.date_key,
                                API_Data.rate_date::date) AS 'Rate_Date',
                                API_Data.Base_Rate,
                                API_Data.AUD_Rate,
                                CASE
		                            WHEN API_Data.AUD_Rate IS NULL THEN
                                    COALESCE (
                                    LAG(API_Data.AUD_Rate IGNORE NULLS) OVER (
                                    ORDER BY gen_date.date_key),
                                    LEAD(API_Data.AUD_Rate IGNORE NULLS) OVER (
                                    ORDER BY gen_date.date_key))
                                    ELSE API_Data.AUD_Rate
	                            END AS 'AUD_Rate_New'
                            FROM
                                gen_date
                            LEFT JOIN api_data ON
                                gen_date.date_key = api_data.rate_date
                            ORDER BY
                                COALESCE (gen_date.date_key,
                                API_Data.rate_date::date) ASC;

                            UPDATE medications
                            SET TOTALCOST_AUD = TOTALCOST * api_rate_data.AUD_Rate_New
                            FROM api_rate_data
                            WHERE medications.start::date = api_rate_data.Rate_Date::date;
                            """
                        ).fetchall()
                        api_data = duckdb_conn.execute(
                            "SELECT COUNT(*) FROM api_rate_data"
                        ).fetchone()
                        if api_data[0] != int(number_of_days):
                            raise Exception(
                                "Number of records returned from api.frankfurter.app is incorrect. Please troubleshoot!"
                            )
                        duckdb_conn.execute("""UPDATE medications
                            SET TOTALCOST_AUD = TOTALCOST * api_rate_data.AUD_Rate_New
                            FROM api_rate_data
                            WHERE medications.start::date = api_rate_data.Rate_Date::date;
                            """)
                if duckdb_row_count[0] != mssql_row_count:
                    raise Exception(
                        f"Table {table} failed to load correctly as record counts do not match: mssql {table} table: {mssql_row_count} vs duckdb {table} table: {duckdb_row_count}.\
                            Please troubleshoot!"
                    )
                else:
                    print("OK!")
                print(
                    f"Serializing DUCKDB '{table}' table content into parquet schema and uploading to '{_AWS_S3_BUCKET_NAME}' S3 bucket...",
                    end="",
                    flush=True,
                )
                duckdb_cursor.execute(
                    f'COPY {table} TO "s3://{_AWS_S3_BUCKET_NAME}/{table}.parquet";'
                )
                s3 = boto3.client(
                    "s3",
                    aws_access_key_id=_AWS_S3_KEY_ID,
                    aws_secret_access_key=_AWS_S3_SECRET,
                    region_name=_AWS_S3_REGION,
                )
                file_exists = s3.head_object(
                    Bucket=_AWS_S3_BUCKET_NAME, Key=".".join([table, "parquet"])
                )
                duckdb_cursor.execute(
                    f'SELECT COUNT(*) FROM read_parquet("s3://{_AWS_S3_BUCKET_NAME}/{table}.parquet");'
                )
                records = duckdb_cursor.fetchone()
                parquet_row_count = records[0]
                if file_exists and parquet_row_count == mssql_row_count:
                    print("OK!")
                    duckdb_conn.execute(f"DROP TABLE IF EXISTS {table}")
        duckdb_conn.close()
    except Exception as err:
        print(err)


if __name__ == "__main__":
    duckdb_conn = duckdb.connect(database=":memory:")
    mssql_conn = mssql_db_conn(_SQL_SERVER_NAME, _SQL_DB, _SQL_USERNAME, _SQL_PASSWORD)
    if mssql_conn and duckdb_conn:
        start_time = perf_counter()
        load_duckdb_tables(
            _SQL_DB,
            duckdb_conn,
            mssql_conn,
        )
        end_time = perf_counter()
        time = format_timespan(end_time - start_time)
        print(f"All records loaded successfully in {time}!")
Once executed, we can run a SELECT directly on our parquet file in S3, confirming that the added column with converted currency rate has been persisted in the target file.
DuckDB Extensions for Intermediary Data Transformation and Augmentation
Up until this point, we’ve used DuckDB to serialize, transform, reconcile, enrich and upload our datasets but since Large Language Models are all the rage now, how about interfacing it with OpenAI’s GPT models to provide additional context and augment it with some useful information via extensions.
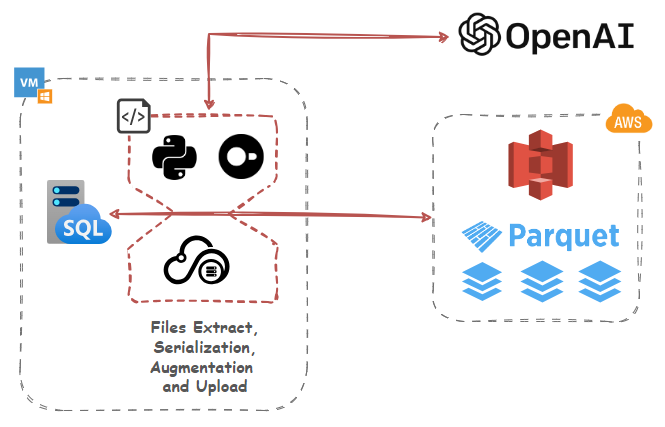
DuckDB has a flexible extension mechanism that allows for dynamically loading additional functionality using extensions. These may extend DuckDB’s functionality by providing support for additional file formats, introducing new types, and domain-specific functionality. To make the DuckDB distribution lightweight, only a few essential extensions are built-in, varying slightly per distribution. Which extension is built-in on which platform is documented in the list of core extensions as well as community extensions.
To get a list of extensions, we can query duckdb_extension function, like so:
SELECT extension_name, installed, description
FROM duckdb_extensions();
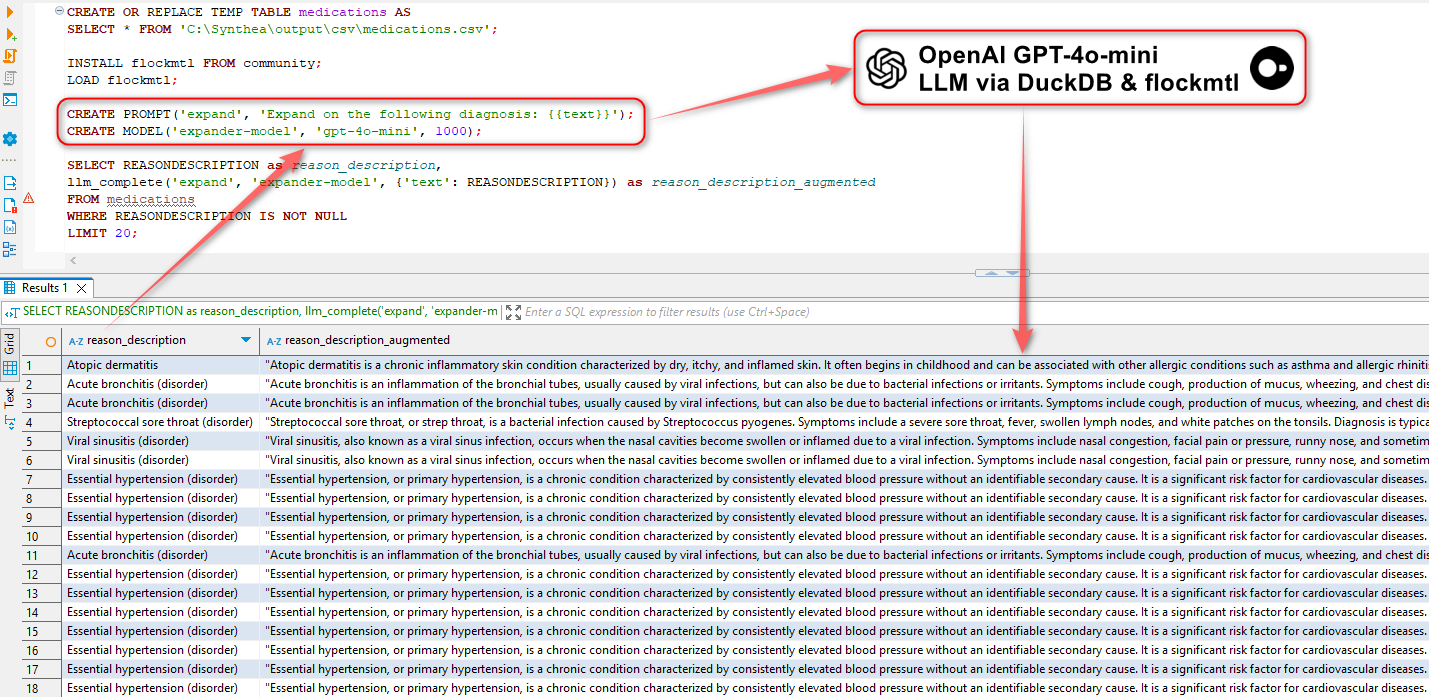
This presents us with some interesting possibilities, for example, we could use flockmtl extension to augment our data with Large Language Models before we push it into S3 with just a little bit of SQL. For example, the following is used to create a “medications” table (part of Synthia dataset) from a CSV file, install flockmtl extension, create a prompt and model objects and augment our data using OpenAI models. In this example, we can use gpt-4o-mini model (OpenAI API key needs to be saved as an environment variable) to provide more context based on the text saved in REASONDESCRIPTION field.
CREATE OR REPLACE TEMP TABLE medications AS
SELECT * FROM 'C:\Synthea\output\csv\medications.csv';

INSTALL flockmtl FROM community;
LOAD flockmtl;

CREATE PROMPT('expand', 'Expand on the following diagnosis: {{text}}');
CREATE MODEL('expander-model', 'gpt-4o-mini', 1000);

SELECT REASONDESCRIPTION as reason_description,
llm_complete('expand', 'expander-model', {'text': REASONDESCRIPTION}) as reason_description_augmented
FROM medications
WHERE REASONDESCRIPTION IS NOT NULL
LIMIT 20;
While the idea of querying LLMs in pure SQL is not new and every database vendor is outdoing itself trying to incorporate GenAI capabilities to their product, it’s still impressive that one can wield such powerful technology with just a few lines of SQL.
Conclusion
This post is only scratching the surface on the versatility and expressiveness of DuckDB and how it can be utilized for a multitude of different applications, in an on-premises and cloud architectures, with little effort or overhead e.g. in this post, I also described how it can be incorporated into an Azure Function for data serialization. Tools like DuckDB prove that being a small project in the sea of big vendors can also have its advantages – small footprint, narrow focus, ease of development and management and good interoperability with major cloud providers. In addition, as demonstrated in this post, many tasks requiring intermediate data processing, serialization and integration can mostly be done in standard SQL, with no complex setup involved and with speed and efficiency which is very refreshing in the world of expensive and bloated software.


Hello Kind of what I've been looking for - thanks for posting. I don't use Snowflake but gives me an…