SQL Server Data Synchronization Automation Using Tablediff Utility and SSIS – Part 1
Note: Second part to this series can be found HERE
On one of the recent project a client posed a requirement that a data synchronization routine between database objects is to be developed with minimal complexities i.e. as little SQL as possible, definitely no .NET/Python and preferably using in-house ETL tool such as MS SQL Server Integration Services. The solution was to be exceptionally serviceable by their internal group of analysts with no elaborate code base to maintain. Given the fact that SSIS has become their de facto tool for all data transformations and loading and most staff were familiar with the intuitive drag-and-drop style of development, the constraint of using SSIS in its purest form was the primary success-defining factor. I have written in length in my previous posts (mainly HERE, HERE and HERE) on different methods of synchronizing database objects and their content, however, I found that when KISS (Keep It Simple Stupid) methodology is a preference and no elaborate features and required, a little tool called tablediff, in combination with a simple SSIS package, gets the job done very nicely.
Tablediff lets you compare the data in two tables in order to identify any discrepancies and generate the T-SQL script necessary to update the data in the second table to conform to the first table, if discrepancies are found. Though originally intended primarily as a utility for troubleshooting non-convergence in a replication topology, tablediff can actually be used to perform a row-by-row comparison of any two tables that share a similar schema. The tool has a number of limitations which prohibit it from serving as a more enterprise-geared option e.g. the source table must be configured with a primary key/identity/rowguid column or only tables sharing same schema can be compared. Also, tablediff enforces certain restrictions around datatype support – synchronization feature doesn’t work with varchar(max) nvarchar(max), varbinary(max), timestamp, xml, text, ntext or image datatypes. However, in its defence, tablediff is free and very simple to use on its own or alternatively integrate with other services.
In this post I will not focus on all options and characteristics that tablediff offers but explain how a simple SSIS package can be built and configured to take advantage of its functionality and features to automate data synchronization process.
Let’s start with a sample dataset to demonstrate how those data differences can be resolved. Below is a simple SQL script which when run, creates 2 databases and 4 tables – 2 in each database. When executed, Source_DB database and its 2 tables contains data which serves as the master copy, whereas Target_DB database contains data which requires ‘alignment’ with the source to reflect its copy in an identical way. Even though I could contain the tablediff tool’s functionality using only two tables (the script creates a pair for each database, totaling to 4 tables all together), I decided to multiply it by the factor of 2 to showcase how we can loop through each table to encompass a large collection of objects. In this way, rather than running tablediff for each table separately, we can specify an assortment of tables which can be as small as a few hand-picked objects all the way up to the whole database with all tables included.
USE [master]
GO
IF EXISTS (SELECT name FROM sys.databases WHERE name = N'Source_DB')
BEGIN
-- Close connections to the DW_Sample database
ALTER DATABASE [Source_DB] SET SINGLE_USER WITH ROLLBACK IMMEDIATE
DROP DATABASE [Source_DB]
END
GO
CREATE DATABASE [Source_DB]

IF EXISTS (SELECT name FROM sys.databases WHERE name = N'Target_DB')
BEGIN
-- Close connections to the DW_Sample database
ALTER DATABASE [Target_DB] SET SINGLE_USER WITH ROLLBACK IMMEDIATE
DROP DATABASE [Target_DB]
END
GO
CREATE DATABASE [Target_DB]

USE Source_DB
CREATE TABLE Tbl1 (
ID int NOT NULL,
Sample_Data_Col1 varchar (50) NOT NULL,
Sample_Data_Col2 datetime NOT NULL)
GO

INSERT INTO Tbl1
(ID, Sample_Data_Col1, Sample_Data_Col2)
SELECT 1, 'OddValue1', '9999/12/31'
UNION ALL
SELECT 2, 'OddValue2', '9999/12/31'

SELECT * INTO Tbl2 FROM Tbl1
GO

ALTER TABLE Tbl1
ADD CONSTRAINT Source_pk_ID1 PRIMARY KEY (ID)
ALTER TABLE Tbl2
ADD CONSTRAINT Source_pk_ID2 PRIMARY KEY (ID)

USE Target_DB
CREATE TABLE Tbl1 (
ID int NOT NULL,
Sample_Data_Col1 varchar (50) NOT NULL,
Sample_Data_Col2 datetime NOT NULL)
GO

INSERT INTO Tbl1
(ID, Sample_Data_Col1, Sample_Data_Col2)
SELECT 1, 'OddValue1', GetDate()
UNION ALL
SELECT 3, 'OddValue3', '1900/01/01'

SELECT * INTO Tbl2 FROM Tbl1
GO
You can notice the difference when running a simple SELECT statement against both databases as per image below.

Now that we have our source and target databases and tables defined, we need to create a separate table which will act as a placeholder for the objects we wish to synchronize and their corresponding details. We will refer to this table during package execution while looping through each of its records to fetch relevant information e.g. schema name, database name etc.
The code for this table which I called Params_details is as per below but you can populate it using other methods which reflect your environment setup more adequately.
IF OBJECT_ID('dbo.Params_details', 'U') IS NOT NULL
  DROP TABLE dbo.Params_details

CREATE TABLE Params_details
(ID	int IDENTITY		(1,1),
Source_DB	  varchar	(100)	NOT NULL,
Target_DB     varchar	(100)	NOT NULL,
Source_Schema varchar	(50)	NOT NULL,
Target_Schema varchar	(50)	NOT NULL,
Source_Tbl    varchar	(100)	NOT NULL,
Target_Tbl    varchar	(100)	NOT NULL)
GO

DECLARE @source_db_name varchar		(100)	= 'Source_DB'
DECLARE @target_db_name varchar		(100)	= 'Target_DB'
DECLARE @source_schema_name varchar (50)	= 'dbo'
DECLARE @target_schema_name varchar (50)	= 'dbo'
DECLARE @sql1 varchar (1000) =
	'INSERT INTO Params_details
	(Source_DB, Target_DB, Source_Schema, Target_Schema, Source_Tbl, Target_Tbl)
	SELECT DISTINCT '''+@source_db_name+''', '''+@target_db_name+''',
	'''+@source_schema_name+''', '''+@target_schema_name+''', a.name, b.name
	FROM '+@source_db_name+'.sys.tables a
	JOIN '+@target_db_name+'.sys.tables b ON a.name = b.name
	WHERE a.type = ''U'' and b.type = ''U'''

exec (@sql1)
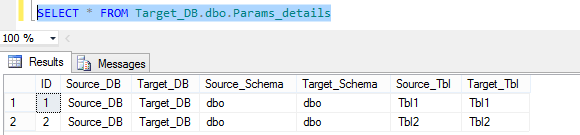
Running a simple select against it, you can see that its content simply reflects the collection of objects with their schema and database details which we identified as the candidates for data merging.
For the purpose of this exercise, I have also created a directory on my C:\ drive called DiffOutput which will house the batch file used by the package, SQL files created during its execution and another directory called Archived_Files where files generated will be moved into and stored for further reference and in order to keep DiffOutput less cluttered. The directory structure and content should resemble the image below.
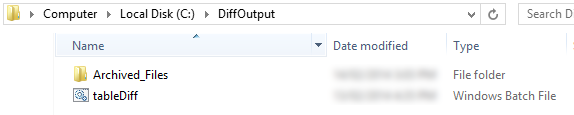
Lastly, before I start exploring the SSIS package components in the NEXT post to this series, I would like to touch on the batch file code and its functionality. As you can see in the above image the DiffOutput directory contains a small batch file which is called by the package’s Execute Process Task. The file executes tablediff.exe utility which providing you have SQL Server installed should also be created in SQL Server directory sub-tree. A number of parameters are also passed down from the package when the file is called as, at the minimum, tablediff requires source and target database, source and target schema and source and target table to be specified. As the script is configured to generate a SQL file containing modification code to be applied in order to synchronize source and target, -f option, followed by the full path and file name of the script file is also used to output the file into the nominated directory. Also, notice that all information is a single line entry only, if you choose to break it down into multiple lines tablediff will complain and throw an error. The remaining lines (lines 2-6) simply define the current date and time which are used to rename the file(s) generated, appending date and time string thus allowing for more effective archiving strategy. The batch file content is as per below.
"C:\Program Files\Microsoft SQL Server\110\COM\tablediff.exe" -sourceserver "SHERLOCK\MSSQL12_Tabular" -sourcedatabase [%1]  -sourceschema [%2]  -sourcetable [%3]   -destinationserver SHERLOCK\MSSQL12_TABULAR  -destinationdatabase [%4]  -destinationschema [%5]  -destinationtable [%6] -f c:\DiffOutput\difference.sql
set d=%date:~-4,4%%date:~-7,2%%date:~0,2%
set d=%d: =_%
set t=%time:~0,2%%time:~3,2%%time:~6,2%
set t=%t: =0%
RENAME "c:\diffoutput\difference.sql" "diff_%d%_%t%.sql"
In the NEXT post I will outline the SSIS package development steps and present the complete solution ‘at work’ in a short video footage.
http://scuttle.org/bookmarks.php/pass?action=addThis entry was posted on Wednesday, February 19th, 2014 at 9:56 am and is filed under SQL, SSIS. You can follow any responses to this entry through the RSS 2.0 feed. You can leave a response, or trackback from your own site.


Hello Kind of what I've been looking for - thanks for posting. I don't use Snowflake but gives me an…