Twitter Data Analysis using Microsoft SQL Server, C#, SSIS, SSAS and Excel
January 26th, 2013 / 11 Comments » / by admin
With the advent of social media which inadvertently seems to be penetrating more and more aspects of our lives, BI is also starting to look at the values it can derive from it. There are many providers offering the insight to the data generated by the social sites for a small fee and with billions of people using Twitter, Facebook, Pinterest etc. you can see why this type of data has become a precious commodity. Microsoft’s BI tools do not offer default integration with the social media applications however, with third-party plug-ins e.g. NodeXL for Excel or a little hacking anyone can create a basic solution that will provide just that. This post explains how to put together an SSIS package and build a small SSAS cube with a report on top of it to look at Twitter feeds. The premise is quite simple: create a ETL routine which will harvest Tweeter data in certain intervals, store them on SQL Server database in a fact table, try to determine the messages sentiment (whether it is positive, negative or neutral), build an SSAS cube based on the data collected and display the tweets on an Excel based report.
I will not go through the entire solution step-by-step; however, I think it is worthwhile to go through some key components which constitute this project to clarify the reasons for the approach taken. Please also bear in mind that this is not a production ready product but rather a ‘quick and dirty’ way to build a basic Twitter data analysis solution in a short space of time. If you are more serious about Twitter data, connecting to their API programmatically would be the preferred option. Also, if you are keen to replicate this method or create something similar all the files used (SSIS, SSAS, SQL, TXT etc.) are located HERE for download.
No let’s take a look at how we can take advantage of RSS/ATOM Feed functionality and connect to Twitter and harvest the feeds using Microsoft’s SQL Server Integration Services. For that purpose I have created a simple FOR LOOP Container (point 1 on the first image) which houses the rest of the transformations.
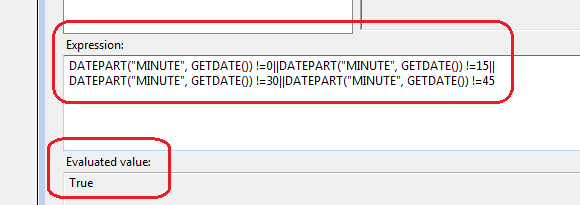
The purpose of this is to be able to periodically connect to Twitter RSS via a series of HTTP connections, load the feeds into a database and process the cube without having to create an SQL Server Agent job which would kick off at set intervals (nice and simple). This loop has the following expression in EvalExpression property ‘TRUE ==TRUE’. As this expression always evaluates to TRUE, the loop never stops so we can leave the package running (in development environment only) until we are satisfied we have enough data to analyze. Next, we have a simple EXECUTE SQL TASK (point 2 on the first image) as a package starting point with a short SQL statement ‘WAITFOR DELAY ‘000:00:05”. This enables to establish time intervals between the subsequent re-connections. You can change the value to whatever you consider appropriate but since I didn’t want to lose any feeds (by default, with this method you can only get the top 15 feeds for the given hashtag) I have it executing quite frequently. Next, we have two PRECEDENCE CONSTRAINTS (points 3 and 4 on the first image) which point to two different directions – on the left hand side is the Twitter feeds harvesting logic, on the right hand side is the fact table population and SSAS cube processing logic. The logic in those PRECEDENCE CONSTRAINTS evaluates which ‘way to go’ based on an expression:
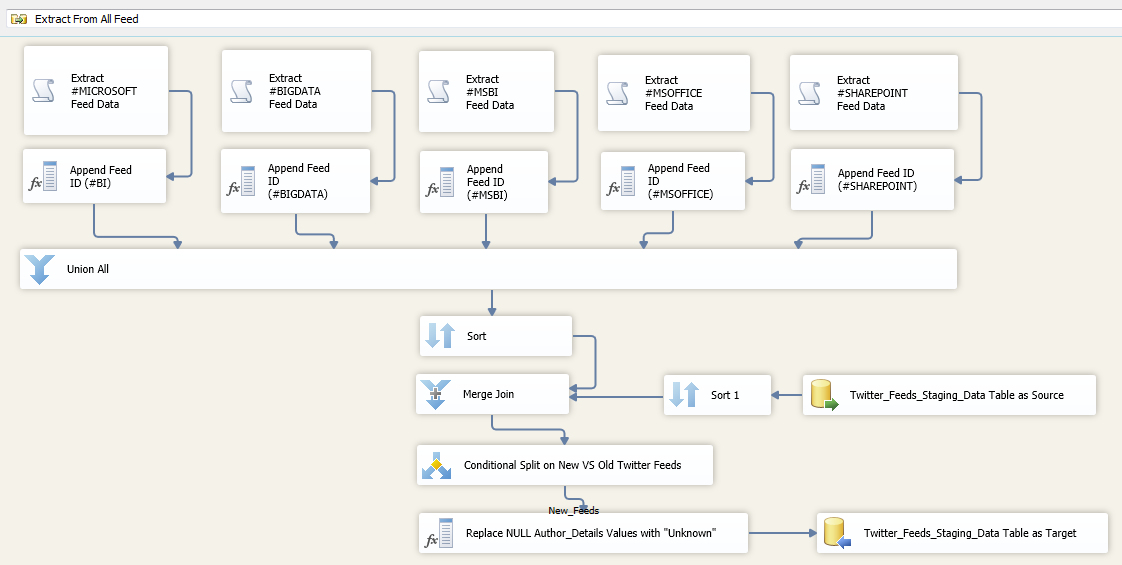
This allows the left hand side to run every time except when the minute part of the server time is either 15, 30, 45 or 00. These are the times when the right hand side executes to process fact table and the cube. This allows the cube to be fairly up-to-date and does not permit the staging table where the feeds are inserted to initially to grow too much (it gets truncated every time the fact table is updated as per first image, point 9). The left hand side of the LOOP CONTAINER is where most of the heavy lifting is done. DATA FLOW TASK called ‘Extract From All Feeds’ (point 5 on the first image) is where the RRS Twitter connections are made using C# script component and data routed to a staging table. The actual C# code can easily be found searching on the Internet. This is what it looks like for #MICROSOFT feeds data extraction (all other feeds use the same code, the only difference is the HTTP connection assigned):
using System;
using System.Data;
using Microsoft.SqlServer.Dts.Pipeline.Wrapper;
using Microsoft.SqlServer.Dts.Runtime.Wrapper;
using System.Xml;
using System.ServiceModel.Syndication;
using System.ServiceModel.Web;
using System.Xml;
using System.Text;

[Microsoft.SqlServer.Dts.Pipeline.SSISScriptComponentEntryPointAttribute]
public class ScriptMain : UserComponent
{
    private SyndicationFeed myfeed = null;
    private XmlReader myxmlreader = null;

    public override void PreExecute()
    {
        base.PreExecute();
        myxmlreader = XmlReader.Create(Connections.Connection.ConnectionString);
        myfeed = SyndicationFeed.Load(myxmlreader);
    }
    public override void PostExecute()
    {
        base.PostExecute();
    }
    public override void CreateNewOutputRows()
    {
        if (myfeed != null)
        {
            foreach (var item in myfeed.Items)
            {
                Output0Buffer.AddRow();
                Output0Buffer.TwitterID = item.Id.ToString();
                Output0Buffer.TwitterFeed = item.Title.Text;
                Output0Buffer.TwitterDate = item.PublishDate.DateTime;
                Output0Buffer.AuthorDetails = item.Authors[0].Email;
            }
            Output0Buffer.SetEndOfRowset();
        }
    }
}
When opened up you can see there are five HTTP connections, each dedicated to harvest feeds relating only to specific realm e.g. Microsoft, MS Office, SharePoint etc.
The connection string is formatted to take only feeds containing specific hashtags into considerations e.g. feeds containing hashtag #BigData will be extracted using the following string:
This allows us to target feeds pertaining only to specific content. The rest of the DATA FLOW CONTAINER simply appends ID values (#MICROSOFT =1, #BIGDATA = 2 etc.), unions the feeds together and does a comparison between the newly harvested feeds and what is already in the staging table using MERGE COMPONENT to extract only those feeds which are new.
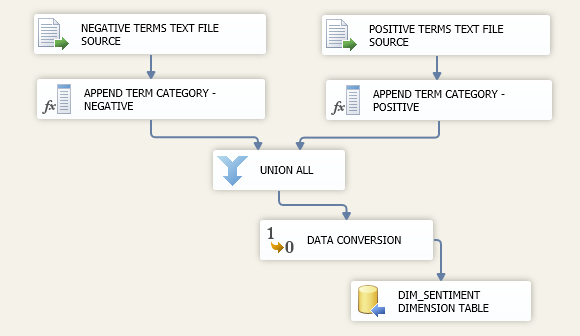
Coming back to CONTROL FLOW, connected to ‘Extract From All Feeds’ DATA FLOW TASK we have an EXECUTE SQL TASK called ‘Append Feed Sentiment’ (point 6 on the first image) which executes a stored procedure responsible for determining whether the feed content is positive or negative (if neither, a default ‘Neutral’ tag is assigned). To understand the process, you can have a look at the actual code (the whole solution, including SQL files can be downloaded from HERE) but in a nutshell, it breaks up the Twitter feed string into individual words using an SQL function, compares them to a dictionary stored in a control table (via a lookup), and doing the ranking, it assigns the sentiment value based on that lookup. The actual dictionary is stored in the same database as a control table which is populated via a separate SSIS solution using two text files I found on the Internet (also downloadable as part of the whole solution). One file contains words which are typically viewed as negative; the other one stores words with positive connotations. The solution for sentiment control table population is quite simple as per image below.
The stored procedure also extracts e-mail addresses and author names from the feed content as well as deletes duplicate feeds. This is what the SQL code for string splitting function and sentiment analysis stored procedure looks like.
--Create string splitting function
CREATE FUNCTION [dbo].[Split]
    (
      @sep VARCHAR(32) ,
      @s VARCHAR(MAX)
    )
RETURNS @t TABLE ( val VARCHAR(MAX) )
AS
    BEGIN
        DECLARE @xml XML
        SET @XML = N'' + REPLACE(@s, @sep, '') + ''

        INSERT  INTO @t
                ( val
                )
                SELECT  r.value('.', 'VARCHAR(50)') AS Item
                FROM    @xml.nodes('//root/r') AS RECORDS ( r )
        RETURN
    END
--Create stored procedure for sentiment analysis and other clean up tasks
IF  EXISTS (SELECT * FROM sys.objects WHERE object_id = OBJECT_ID(N'[dbo].[usp_Update_Twitter_Feeds_Staging_Data]') AND type in (N'P', N'PC'))
DROP PROCEDURE [dbo].[usp_Update_Twitter_Feeds_Staging_Data]
GO
CREATE PROCEDURE usp_Update_Twitter_Feeds_Staging_Data AS

BEGIN
BEGIN TRY

IF  EXISTS (SELECT * FROM sys.objects WHERE object_id = OBJECT_ID(N'[dbo].[#Email]') AND type in (N'U'))
DROP TABLE [dbo].[#Email];

IF  EXISTS (SELECT * FROM sys.objects WHERE object_id = OBJECT_ID(N'[dbo].[#Author]') AND type in (N'U'))
DROP TABLE [dbo].[#Author];

IF  EXISTS (SELECT * FROM sys.objects WHERE object_id = OBJECT_ID(N'[dbo].[#Sentiment]') AND type in (N'U'))
DROP TABLE [dbo].[#Sentiment];


--Extract E-mail addresses
SELECT  Twitter_ID, CASE WHEN AtIndex=0 THEN '' --no email found
           ELSE RIGHT(head, PATINDEX('% %', REVERSE(head) + ' ') - 1)
        + LEFT(tail + ' ', PATINDEX('% %', tail + ' '))
        END Author_Email
INTO #Email
FROM (SELECT Twitter_ID,RIGHT(EmbeddedEmail, [len] - AtIndex) AS tail,
             LEFT(EmbeddedEmail, AtIndex) AS head, AtIndex
			 FROM (SELECT Twitter_ID,PATINDEX('%[A-Z0-9]@[A-Z0-9]%', EmbeddedEmail+' ') AS AtIndex,
					LEN(EmbeddedEmail+'|')-1 AS [len],
					EmbeddedEmail
					FROM   (SELECT Twitter_ID, Author_Details,Author_Email from [Twitter_DB].[dbo].[Twitter_Feeds_Staging_Data])
					AS a (Twitter_ID,EmbeddedEmail,Author_Email) WHERE a.[Author_Email] IS NULL
           )a
     )b


--Extract Author Names
SELECT Twitter_ID, CASE WHEN CHARINDEX ('(', Author_Details)>1 THEN
REPLACE(SUBSTRING (Author_Details, CHARINDEX ('(', Author_Details,0) +1, LEN(Author_Details)),')','') END AS Author
INTO #Author
FROM [Twitter_DB].[dbo].[Twitter_Feeds_Staging_Data]
WHERE [Author] IS NULL


--Extract Sentiment
DECLARE @0 nvarchar (1) SET @0 = ''
DECLARE @1 nvarchar (1) SET @1 = '>'
DECLARE @2 nvarchar (1) SET @2 = '<'
DECLARE @3 nvarchar (1) SET @3 = '('
DECLARE @4 nvarchar (1) SET @4 = ')'
DECLARE @5 nvarchar (1) SET @5 = '!'
DECLARE @6 nvarchar (1) SET @6 = '?'
DECLARE @7 nvarchar (1) SET @7 = ','
DECLARE @8 nvarchar (1) SET @8 = '@'
DECLARE @9 nvarchar (1) SET @9 = '#'
DECLARE @10 nvarchar (1) SET @10 = '$'
DECLARE @11 nvarchar (1) SET @11 = '%'
DECLARE @12 nvarchar (1) SET @12 = '&';

WITH temp_results as
	(
	SELECT  tfsd.Twitter_ID,
	upper(ltrim(rtrim(replace(replace(replace(replace(replace(replace(replace(replace(replace(replace(replace(replace
	(fs.val,@1,@0),@2,@0),@3,@0),@4,@0),@5,@0),@6,@0),@7,@0),@8,@0),@9,@0),@10,@0),@11,@0),@12,@0)))) as val, se.Term_Category
	FROM [Twitter_DB].[dbo].[Twitter_Feeds_Staging_Data] tfsd
	CROSS APPLY dbo.Split(' ',tfsd.Twitter_Feed) as fs
	LEFT JOIN Ctl_Sentiment se on
	upper(ltrim(rtrim(replace(replace(replace(replace(replace(replace(replace(replace(replace(replace(replace(replace
	(fs.val,@1,@0),@2,@0),@3,@0),@4,@0),@5,@0),@6,@0),@7,@0),@8,@0),@9,@0),@10,@0),@11,@0),@12,@0))))
	= se.term
	WHERE tfsd.Sentiment IS NULL
	)
SELECT Twitter_ID, Term_Category as Sentiment
INTO #Sentiment
FROM
	(SELECT  Twitter_ID, Term_Category,rnk FROM
		(SELECT Counts, Twitter_ID, Term_Category, RANK() OVER (PARTITION BY Twitter_ID ORDER BY Counts DESC) AS rnk FROM
			(SELECT COUNT(Term_Category) Counts, Twitter_ID, Term_Category FROM
				temp_results
				GROUP BY Twitter_ID, Term_Category
			) a
		)b
	where b.rnk = 1) c

--Update Twitter_Feeds_Staging_Data
UPDATE [Twitter_DB].[dbo].[Twitter_Feeds_Staging_Data]
SET
Author_Email	=	CASE WHEN b.Author_Email = '' THEN 'Unknown' ELSE b.Author_Email END,
Author			=	ISNULL(c.Author,'Unknown'),
Sentiment		=	ISNULL(d.Sentiment,'Neutral')
FROM [Twitter_DB].[dbo].[Twitter_Feeds_Staging_Data] a
LEFT JOIN #Email b		ON a.Twitter_ID = b.Twitter_ID
LEFT JOIN #Author c		ON a.Twitter_ID = c.Twitter_ID
LEFT JOIN #Sentiment d	ON a.Twitter_ID = d.Twitter_ID
WHERE a.Author_Email IS NULL OR a.Author IS NULL OR a.Sentiment IS NULL
OR a.Author_Email = '' OR a.Author = '' OR a.Sentiment = ''


--Delete Duplicate Twitter Feeds
DECLARE @ID varchar (200)
DECLARE @COUNT int
DECLARE CUR_DELETE CURSOR FOR
	SELECT [Twitter_ID],COUNT([Twitter_ID]) FROM [Twitter_DB].[dbo].[Twitter_Feeds_Staging_Data]
	GROUP BY [Twitter_ID] HAVING COUNT([Twitter_ID]) > 1

	OPEN CUR_DELETE

		FETCH NEXT FROM CUR_DELETE INTO @ID, @COUNT
		WHILE @@FETCH_STATUS = 0
		BEGIN
		DELETE TOP(@COUNT -1) FROM [Twitter_DB].[dbo].[Twitter_Feeds_Staging_Data] WHERE [Twitter_ID] = @ID
		FETCH NEXT FROM CUR_DELETE INTO @ID, @COUNT
	END
CLOSE CUR_DELETE
DEALLOCATE CUR_DELETE


END TRY

BEGIN CATCH
		IF @@TRANCOUNT > 0
		BEGIN
			ROLLBACK TRANSACTION
		END

		DECLARE @ErrorMessage NVARCHAR(4000);
		DECLARE @ErrorSeverity INT;
		DECLARE @ErrorState INT;

		SELECT
			@ErrorMessage = ERROR_MESSAGE(),
			@ErrorSeverity = ERROR_SEVERITY(),
			@ErrorState = ERROR_STATE();

		RAISERROR (@ErrorMessage, -- Message text.
				   @ErrorSeverity, -- Severity.
				   @ErrorState -- State.
				   );
END CATCH

	IF @@TRANCOUNT > 0
	BEGIN
		COMMIT TRANSACTION
	END
END
It is not an ideal solution as I experienced. To mine text data in a proper manner it takes a lot more than a list of words and SQL code to perform a comparison. For example, as ‘cloud computing’ term has become a bit of a buzz word and ‘cloud’ is a negatively trending word on a list of words used to for my sentiment intelligence. Therefore, by default, any Twitter feeds containing the word ‘cloud’ are tagged as negative which is not necessarily correct. However, most of the time it seemed pretty reliable and good enough for this simple exercise. On the right hand side of FOR LOOP CONTAINER, executing in roughly 15 minutes intervals are the two EXECUTE SQL TASKS (point 7 and 9 one the first image) as well as one ANALYSIS SERVICES PROCESSING TASK (point 8 on the first image). First container is responsible for updating the fact table with fresh tweets using a stored procedure. Next up, going down the PRECEDENCE CONSTRAINTS lines we have a standard Analysis Services cube processing container pointing to the SSAS cube and finally another SQL task which simply truncates staging table once all the tweets have been incorporated into the fact table. That is it. As mentioned before, all this can be downloaded from HERE and minus the actual server connections which rely on your specific environment you shouldn’t have any problems replicating this setup if you wish to.
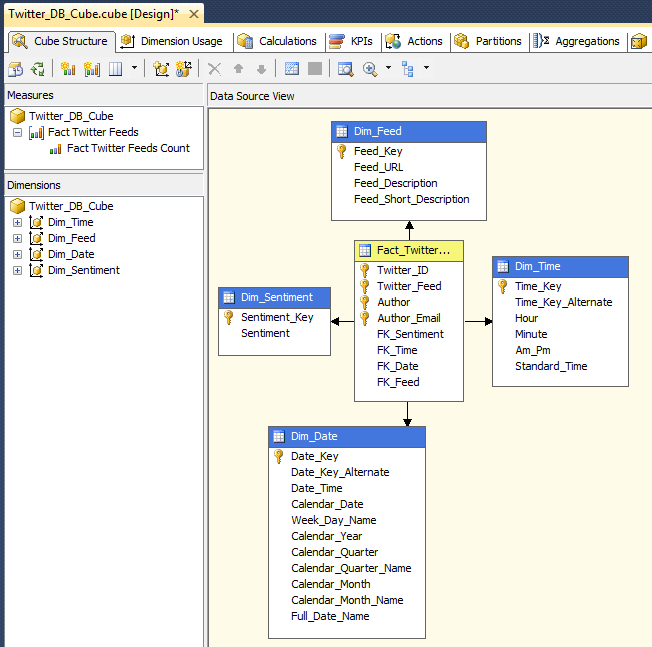
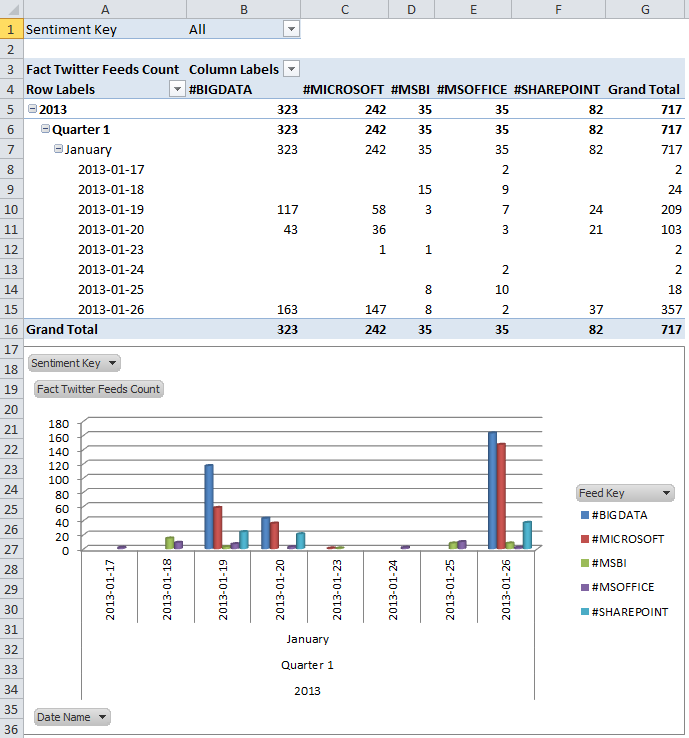
Based on the tweets data I managed to harvest through this simple SSIS package and SSAS cube I created as a separate solution I was able to generate basic Excel report which provides some rudimentary analytics on the volume of feeds and their sentiment per hashtag and date/time they were generated. Here is the SSAS solution view.
 And here is a simple pivot table with some of the cube’s dimensions and measures displayed.
So there you go! A really elementary solution to extract Twitter feeds using SSIS. Below is a sample footage which shows the package in execution mode. Pay attention to how the left hand side is executed multiple times first, searching for new tweets until server time changes to 10.00 P.M. which triggers the right hand side of the FOR LOOP CONTAINER to process the fact table and SSAS cube.




Not sure about Polars but I did take ClickHouse (chDB) and DuckDB for a quick test drive - you can…