February 13th, 2012 / No Comments » / by admin
I have just come up against an interesting article (read HERE) in New York Times about the age of Bid Data which talks about the increasing proliferation of recognizing the value of (Big) Data and the wealth of answers it can provide if harnessed, crunched and analyzed. The media has been generating a lot of hype around Big Data and its impact across all industries and this media piece certainly conforms to this trend but, unlike other releases I have lately read, it also provides a nice, general, example-rich and technically-leveled view on how Big Data and its utilization make headways in todays world.
Continue Reading This Post
Posted in: This-and-That
Tags: Big Data, This-and-That
February 9th, 2012 / No Comments » / by admin
In this post I will demonstrate how to update a table (let’s call it a destination table) with data from another table (let’s call this one source table) based on the differences between the two via a SQL Server Integration Services package. This exercise can achieve the same result through a number of different implementation methods but since SSIS is a godsend for any kind of data transfer/manipulation automation, this process can be scheduled and left to its own devises. Also, as SSIS is very transparent about its processing (we can readily see what is happening and troubleshoot accordingly) and to build (who would want to write code when you can drop a few containers, stitch them together and consider it done!), this method is brain-dead and quick to develop/deploy. Doing it via SSIS also provides an option to handle errors in a more elegant way and in a single pass-through.
So let’s start with creating two new tables which will become our data source and destination as well as populating them with some dummy data via the following queries. This will form our core data source which we will use to execute incremental update against based on the difference between them.
--CREATE SOURCE TABLE
IF  EXISTS (SELECT * FROM sys.objects WHERE object_id = OBJECT_ID(N'[dbo].[tbl_Source]') AND type in (N'U'))
DROP TABLE [dbo].[tbl_Source]

CREATE TABLE [dbo].[tbl_Source](
	[Item_SKU] [int] NULL,
	[Item_Name] [varchar](100) NULL,
	[Item_Category] [varchar](50) NULL,
	[Item_Price] [money] NULL,
	[Item_Availability_Flag] [char](1) NULL,
	[Item_Discount_Flag] [char](1) NULL
) ON [PRIMARY]

--POPULATE SOURCE TABLE WITH DUMMY DATA
INSERT INTO tbl_Source
VALUES (2299, 'Pen', 'Stationary', 2.50, 'Y', 'Y');
INSERT INTO tbl_Source
VALUES (2212, 'Binder' , 'Stationary' , 2.10, 'Y', 'Y');
INSERT INTO tbl_Source
VALUES (1217, 'Scissors' , 'Stationary' , 3.20, 'N', 'N');

--CREATE DESTINATION TABLE
IF  EXISTS (SELECT * FROM sys.objects WHERE object_id = OBJECT_ID(N'[dbo].[tbl_Destination]') AND type in (N'U'))
DROP TABLE [dbo].[tbl_Destination]

CREATE TABLE [dbo].[tbl_Destination](
	[Item_SKU] [int] NULL,
	[Item_Name] [varchar](100) NULL,
	[Item_Category] [varchar](50) NULL,
	[Item_Price] [money] NULL,
	[Item_Availability_Flag] [char] (1) NULL,
	[Item_Discount_Flag] [char](1) NULL
) ON [PRIMARY]

--POPULATE DESTINATION TABLE WITH DUMMY DATA
INSERT INTO tbl_Destination
VALUES (2299, 'Pen', 'Stationary', 2.50,'Y', 'Y');

--SELECT DATA OUT OF BOTH TABLES
SELECT * FROM tbl_Source;
SELECT * FROM tbl_Destination;
The output from the above constitutes of two tables, source table has three items with their corresponding categories, price, SKU number etc., whereas, destination table has only one item. Based on this premise we need to update destination table with the missing two items from source table via SSIS package.

The package will only require one Data Flow Task on the Control Flow pane and most of the work will involve Data Flow components adjustments.
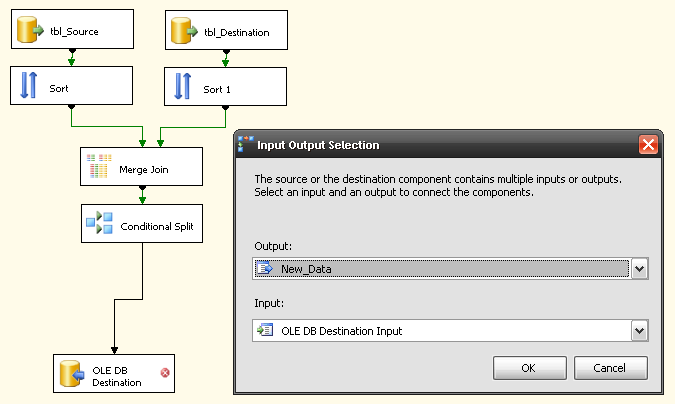
Let’s start by placing a Data Flow component from Toolbox onto the project surface area. Next, in the Data Flow Area we place two OLE DB Source components representing the two tables we previously created i.e. tbl_Source and tbl_Destination.

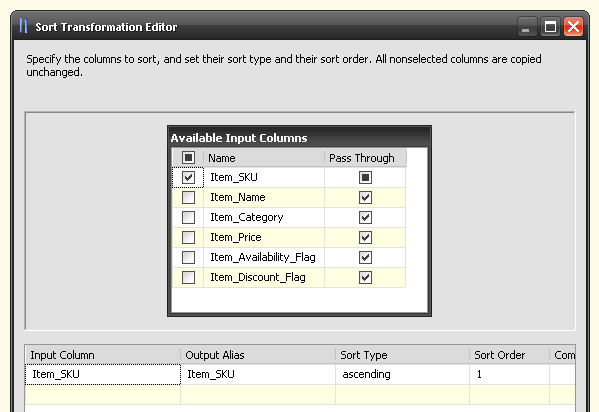
After configuring connections and selecting all columns from both sources we can place two Sort Data Flow components which should link to the OLE DB Source containers. Also, to configure Sort containers, we only specify Item_SKU column, while all remaining attributes are set as ‘Pass Through’ as per below. This is because we will compare tables by looking only at their Item_SKU fields, which should be distinct (can act as primary keys). This is an important feature of this process.

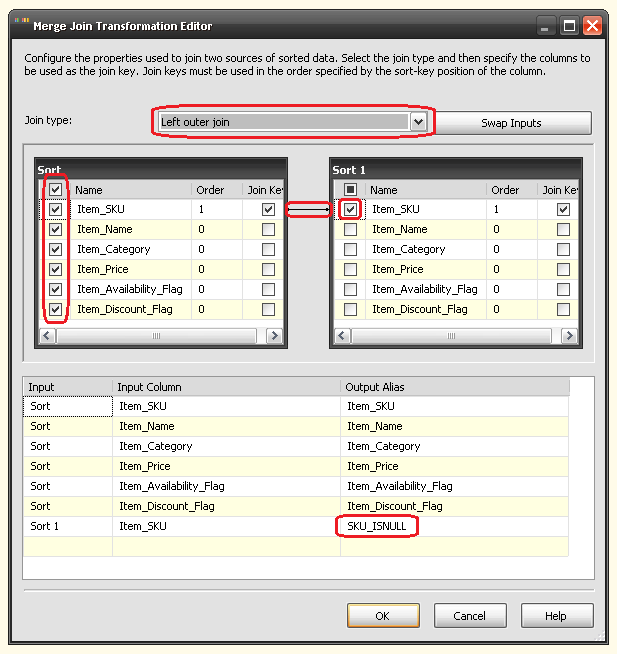
Next, we place and configure the Merge Join component. Here, the join type is set to left outer join (as we want to select all data from the source table), the join is configured between Item_SKU columns only, all columns are selected from tbl_Source and finally only one column – Item_SKU – is selected from tbl_Destination table, which we also rename to give it a more distinct alias. All these steps are highlighted in the image below.

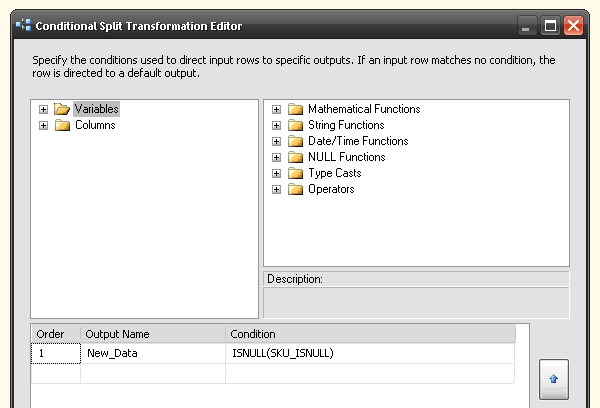
Once Merge Join has been configured, we use Conditional Split component to segregate the data. All we really need to do here is to specify the condition which will allow this transform to pull out the records which do not exist in tbl_Destination. These records have been qualified as SKU_ISNULL in the Merge Join component in the previous transform. To do this, we use ISNULL(SKU_ISNULL) statement and give the output a name, in this case it’s ‘New_Data’.

Finally, we create an OLE DB Destination container and when linking it to the Conditional Split transform, we select ‘New_Data’ (or whatever name we used to describe the data difference) from the drop-down box as per below.

As the last step we map the outputs from conditional split with the column names from tbl_Destination.
The same result can be achieved using other methods. For example, sticking to SSIS and BIDS we can use Execute SQL Task control flow component with the following query:
INSERT INTO tbl_Destination
(Item_SKU,Item_Name,Item_Category,Item_Price,Item_Availability_Flag,Item_Discount_Flag)
SELECT * FROM tbl_Source
EXCEPT
SELECT * FROM tbl_Destination
GO
Alternatively, we can issue a simple update statement which will do the trick just as nicely. Whichever method rocks your boat, this is just one of them and given some further customizations it can be quite effective in comparison to using simple ‘UPDATE’ or ‘INSERT with EXCEPT’. For example we can isolate the new data (tables difference) and do some further processing or transformations which would be cumbersome using SQL only.
Posted in: SSIS
Tags: Code, SQL, SSIS


Never thought Polybase could be used in this capacity and don't think Microsoft advertised this feature (off-loading DB data as…