TPC-DS big data benchmark overview – how to generate and load sample data
Ever wanted to benchmark your data warehouse and see how it stacks up against the competition? Ever wanted to have a point of reference which would give you industry-applicable and measurable set of metrics you could use to objectively quantify your data warehouse or decision support system’s performance? And most importantly, have you ever considered which platform and vendor will provide you with the most bang for your buck setup?
Well, arguably one of the best way to find out is to simulate a suit of TPC-DS workloads (queries and data maintenance) against your target platform to obtain a representative evaluation of the System Under Test’s (SUT) performance as a general-purpose decision support system. There are a few other data sets and methodologies that can be used to gauge data storage and processing system’s performance e.g. TLC Trip Record Data released by the New York City Taxi & Limousine Commission has gained a lot of traction amongst big data specialists, however, TPC-approved benchmarks have long been considered as the most objective, vendor-agnostic way to perform data-specific hardware and software comparisons, capturing the complexity of modern business processing to a much greater extent than its predecessors.
In this post I will explore how to generate test data and test queries using dsdgen and dsqgen utilities on a windows machine against the product supplier snowflake-type schema as well as how to load test data into the created database in order to run some or all of the 99 queries TPC-DS defines. I don’t want to go too much into details as TPC already provides a very comprehensive overview of the database and schema it provides, along with detail description of constraints and assumptions. This post is more focused on how to generate the required components used to evaluate the target platform the database used to for TPC-DS data sets and data loading.
In this post I will be referring to TPC-DS version 2.5.0rc2, the most current version at the time of this post publication. The download link can be found on the consortium website. The key components used for system’s evaluation using TPC-DS tools include the following:
- Data generator called dsdgen used for data sets creation
- Query generator called dsqgen used for creating benchmark query sets
- Three SQL files called tpcds.sql, tpcds_source.sql and tpc_ri.sql which create a sample implementation of the logical schema for the data warehouse
There are other components present in the toolkit, however, for the sake of brevity I will not be discussing data maintained functionality, verification data, alternative query sets or verification queries in this post. Let’s start with dsdgen tool – an executable used to create raw data sets in a form of files. The dsdgen solution supplied as part of the download needs to be complied before the use. For me it was as simple as firing up Microsoft Visual Studio, loading up dbgen2 solution and building the final executable. Once complied, the tool can be controlled from the command line by a combination of switches and environment variables assumed to be single flags preceded by a minus sign, optionally followed by an argument. In its simplest form of execution, it dsdgen can be called from Powershell e.g. I used the following combination of flags to generate the required data (1GB size) in a C:\TPCDSdata\SourceFiles\ folder location and to measure execution time.
Measure-Command {.\dsdgen /SCALE 1 /DIR C:\TPCDSdata\SourceFiles /FORCE /VERBOSE}
The captured output below shows that the execution time on my old Lenovo laptop (i7-4600U @ 2.1GHz, 12GB RAM, SSD HDD & Win10 Pro) was close to 10 minutes for 1GB of data generating sequentially.
The process can be sped up using PARALLEL flag which will engage multiple CPU cores, distributing workload across multiple processes. The VERBOSE parameter is pretty much self-explanatory – progress messages are displayed as the data is generated. FORCE flag overwrites previously created files. Finally, the scale parameter requires a little bit more explanation.
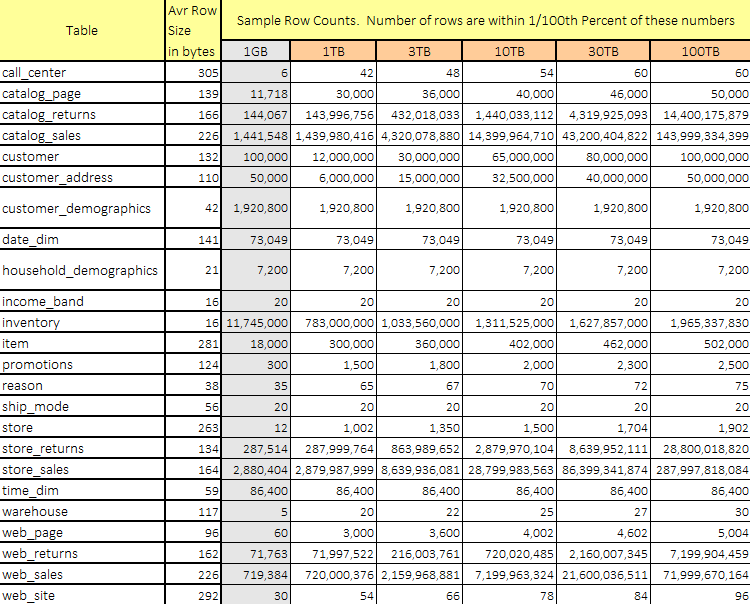
The TPC-DS benchmark defines a set of discrete scaling points – scale factors – based on the approximate size of the raw data produced by dsdgen. The set of scaling factors defined for the TPC-DS is 1TB, 3TB, 10TB, 30TB and 100TB where a terabyte (TB) is defined as 2 to the power of 40 bytes. The required row count for each permissible scale factor and each table in the test database is as follows.
Once the data has been generated, we can create a set of scripts used to simulate reporting/analytical business scenarios using another tool in the TPC-DS arsenal – dsqgen. As with the previous executable, dsqgen runs off the command line. Passing applicable query template (in this case Microsoft SQL Server specific), it creates a single SQL file containing queries used across a multitude of scenarios e.g. reporting queries, ad hoc queries, interactive OLAP queries as well as data mining queries. I used the following command to generate the SQL scripts file.
dsqgen /input .\query_templates\templates.lst /directory .\query_templates /dialect sqlserver /scale 1
Before I get to how the data loading script and schema overview, a quick mention of the final set of SQL scripts, tpcds.sql file, which create a sample implementation of the logical schema for the data warehouse. This file contains the necessary DDLs so running those on the environment of your choice should be executed before generated data is loaded into the data warehouse. Also, since the data/files generated by dsdgen utility come with a *.dat extension, it may be worthwhile to do some cleaning up before the target schema is populated. The following butchered Python script converts all *.dat files into *.csv files and breaks up some of the larger ones into a collection of smaller ones suffixed in an orderly fashion i.e. filename_1, filename_2, filename_3 etc. based on the values set for some of the variables declared at the start. This step is entirely optional but I found that some system utilities used for data loading find it difficult to deal with large files e.g. scaling factor greater than 100GB. Splitting a large file into a collection of smaller ones may be an easy loading speed optimisation technique, especially if the process can be parallelized.
from os import listdir, rename, remove, path, walk
from shutil import copy2, move
from csv import reader, writer
import pyodbc
import win32file as win
from tqdm import tqdm
import platform as p

srcFilesLocation = path.normpath('C:/TPCDSdata/SourceFiles/')
srcCSVFilesLocation = path.normpath('C:/TPCDSdata/SourceCSVFiles/')
tgtFilesLocation = path.normpath('C:/TPCDSdata/TargetFiles/')
delimiter = '|'
keepSrcFiles = True
keepSrcCSVFiles = True
rowLimit = 2000000
outputNameTemplate = '_%s.csv'
keepHeaders = False

def getSize(start_path):
    total_size = 0
    for dirpath, dirnames, filenames in walk(start_path):
        for f in filenames:
            fp = path.join(dirpath, f)
            total_size += path.getsize(fp)
    return total_size

def freeSpace(start_path):
    secsPerClus, bytesPerSec, nFreeClus, totClus = win.GetDiskFreeSpace(start_path)
    return secsPerClus * bytesPerSec * nFreeClus

def removeFiles(DirPath):
    filelist = [ f for f in listdir(DirPath)]
    for f in filelist:
        remove(path.join(DirPath, f))

def SplitAndMoveLargeFiles(file, rowCount, srcCSVFilesLocation, outputNameTemplate, keepHeaders=False):
    filehandler = open(path.join(srcCSVFilesLocation, file), 'r')
    csv_reader = reader(filehandler, delimiter=delimiter)
    current_piece = 1
    current_out_path = path.join(tgtFilesLocation, path.splitext(file)[0]+outputNameTemplate  % current_piece)
    current_out_writer = writer(open(current_out_path, 'w', newline=''), delimiter=delimiter)
    current_limit = rowLimit
    if keepHeaders:
        headers = next(csv_reader)
        current_out_writer.writerow(headers)
    pbar=tqdm(total=rowCount)
    for i, row in enumerate(csv_reader):
        pbar.update()
        if i + 1 > current_limit:
            current_piece += 1
            current_limit = rowLimit * current_piece
            current_out_path = path.join(tgtFilesLocation, path.splitext(file)[0]+outputNameTemplate  % current_piece)
            current_out_writer = writer(open(current_out_path, 'w', newline=''), delimiter=delimiter)
            if keepHeaders:
                current_out_writer.writerow(headers)
        current_out_writer.writerow(row)
    pbar.close()

def SourceFilesRename(srcFilesLocation, srcCSVFilesLocation):
    srcDirSize = getSize(srcFilesLocation)
    diskSize = freeSpace(srcFilesLocation)
    removeFiles(srcCSVFilesLocation)
    for file in listdir(srcFilesLocation):
        if file.endswith(".dat"):
            if keepSrcFiles:
                if srcDirSize >= diskSize:
                    print ('''Not enough space on the nominated disk to duplicate the files (you nominated to keep source files as they were generated i.e. with the .dat extension).
                    Current source files directory size is {} MB. At least {} MB required to continue. Bailing out...'''
                    .format(round(srcDirSize/1024/1024,2), round(2*srcDirSize/1024/1024),2))
                    exit(1)
                else:
                    copy2(path.join(srcFilesLocation , file), srcCSVFilesLocation)
                    rename(path.join(srcCSVFilesLocation , file), path.join(srcCSVFilesLocation , file[:-4]+'.csv'))
            else:
                move(srcFilesLocation + file, srcCSVFilesLocation)
                rename(path.join(srcCVSFilesLocation , file), path.join(srcCSVFilesLocation , file[:-4]+'.csv'))

def ProcessLargeFiles(srcCSVFilesLocation,outputNameTemplate,rowLimit):
    fileRowCounts = []
    for file in listdir(srcCSVFilesLocation):
        if file.endswith(".csv"):
            fileRowCounts.append([file,sum(1 for line in open(path.join(srcCSVFilesLocation , file), newline=''))])
    removeFiles(tgtFilesLocation)
    for file in fileRowCounts:
        if file[1]>rowLimit:
            print("Processing File:", file[0],)
            print("Measured Row Count:", file[1])
            SplitAndMoveLargeFiles(file[0], file[1], srcCSVFilesLocation, outputNameTemplate)
        else:
            #print(path.join(srcCSVFilesLocation,file[0]))
            move(path.join(srcCSVFilesLocation, file[0]), tgtFilesLocation)
    removeFiles(srcCSVFilesLocation)

if __name__ == "__main__":
    SourceFilesRename(srcFilesLocation, srcCSVFilesLocation)
    ProcessLargeFiles(srcCSVFilesLocation, outputNameTemplate, rowLimit)
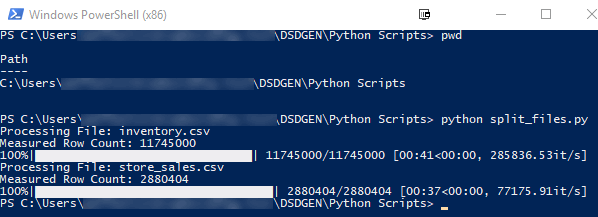
The following screenshot demonstrates execution output when the file is run in Powershell. Since there were only two tables with the record count greater than the threshold set in the rowLimit variable i.e. 2000000 rows, only those two tables get broken up into smaller chunks.
Once the necessary data files have been created and the data warehouse is prepped for loading we can proceed to load the data. Depending on the volume of data, which in case of TPC-DS directly correlates with the scaling factor used when running dsdgen utility, a number of different methods can be used to populate the schema. Looking at Microsoft SQL Server as a test platform, the most straightforward approach would be to use BCP utility. The following Python script executes bulk copy program utility across many cores/CPUs to load the data created in the previous step (persisted in C:\TPCSdata\TargetFiles\ directory). The script utilises python’s multiprocessing library to make the most out of the resources available.
from multiprocessing import Pool, cpu_count
from os import listdir,path, getpid,system
import argparse

odbcDriver = '{ODBC Driver 13 for SQL Server}'

parser = argparse.ArgumentParser(description='TPC-DS Data Loading Scriptby bicortex.com')
parser.add_argument('-S','--svrinstance', help='Server and Instance Name of the MSSQL installation', required=True)
parser.add_argument('-D','--db', help='Database Name', required=True)
parser.add_argument('-U','--username', help='User Name', required=True)
parser.add_argument('-P','--password', help='Autenticating Password', required=True)
parser.add_argument('-L','--filespath', help='UNC path where the files are located', required=True)
args = parser.parse_args()

if not args.svrinstance or not args.db or not args.username or not args.password or not args.filespath:
    parser.print_help()
    exit(1)

def loadFiles(tableName, fileName):
    print("Loading from CPU: %s" % getpid())
    fullPath = path.join(args.filespath, fileName)
    bcp = 'bcp %s in %s -S %s -d %s -U %s -P %s -q -c -t "|" -r"|\\n"' % (tableName, fullPath, args.svrinstance, args.db, args.username, args.password)
    #bcp store_sales in c:\TPCDSdata\TargetFiles\store_sales_1.csv -S <servername>\<instancename> -d <dbname> -U <username> -P <password> -q -c -t  "|" -r "|\n"
    print(bcp)
    system(bcp)
    print("Done loading data from CPU: %s" % getpid())

if __name__ == "__main__":
    p = Pool(processes = 2*cpu_count())
    for file in listdir(args.filespath):
        if file.endswith(".csv"):
            tableName = ''.join([i for i in path.splitext(file)[0] if not i.isdigit()]).rstrip('_')
            p.apply_async(loadFiles, [tableName, file])
    p.close()
    p.join()
The following screenshot (you can also see data load sample execution video HERE) depicts the Python script loading 10GB of data, with some files generated by dsdgen utility further split up into smaller chunks by the the split_files.py script. The data was loaded into a Microsoft SQL Server 2016 Enterprise instance running on Azure virtual machine with 20 virtual cores (Intel E5-2673 v3 @ 2.40GHz) and 140GB of memory. Apart from the fact that it’s very satisfying to watch 20 cores being put to work simultaneously, spawning multiple BCP instances significantly reduces data load times, even when accounting for locking and contention.
I have not bothered to test the actual load times as SQL Server has a number of knobs and switches which can be used to adjust and optimise system’s performance. For example, in-memory optimised tables, introduced in SQL Server 2014, store their data in memory using multiple versions of each row’s data. This technique is characterised as ‘non-blocking multi-version optimistic concurrency control’ and eliminates both locks and latches so a separate post may be in order to do justice to this feature and conduct a full performance analysis in a fair and unbiased manner.
So there you go – a fairly rudimentary rundown of some of the features of TPC-DS benchmark. For more detailed overview of TPC-DS please refer to the TPC website and their online resources HERE.
http://scuttle.org/bookmarks.php/pass?action=addThis entry was posted on Thursday, January 11th, 2018 at 11:11 am and is filed under Azure, How To's, Programming, SQL Server. You can follow any responses to this entry through the RSS 2.0 feed. You can leave a response, or trackback from your own site.


admin March 19th, 2018 at 4:55 am
Thanks for pointing it out! All fixed now…..cheers, Martin