May 8th, 2012 / No Comments » / by admin
In ‘How to create an XML file using SSIS and MS SQL Server’ as well as ‘Generating Files through bcp Utility in SQL Server’ I showed how to generate files (CSV, XML, TXT etc) using common tools and SQL available with Microsoft SQL Server. These two posts were followed up with ‘Programmatically Checking If File Exits In SSIS’ which can provide an extension to the file generating processes. In this post I would like to show how to programmatically archive a file into a directory once it has been created. Although this can be achieved through the use of a ‘File System Task’ from SSIS Toolbox menu (which also has the ability to copy, delete, create and rename files or directories), a simple C# script can do the job just as nicely. A common scenario for such application would be to archive a file after it was created/generated, FTP’ed to a remote location. I often find that having an archive of a file which was sent to a client can save me a lot of hassle when the file does not get delivered successfully or a client requests another copy. The script for archiving an CSV file can be found below.
using System;
using System.Data;
using Microsoft.SqlServer.Dts.Runtime;
using System.Windows.Forms;
using System.IO;

namespace ST_2ef9e8dab497461da7eedabd19e69fa4.csproj
{
    [System.AddIn.AddIn("ScriptMain", Version = "1.0", Publisher = "", Description = "")]
    public partial class ScriptMain : Microsoft.SqlServer.Dts.Tasks.ScriptTask.VSTARTScriptObjectModelBase
    {

        #region VSTA generated code
        enum ScriptResults
        {
            Success = Microsoft.SqlServer.Dts.Runtime.DTSExecResult.Success,
            Failure = Microsoft.SqlServer.Dts.Runtime.DTSExecResult.Failure
        };
        #endregion

        public void Main()
        {

            DirectoryInfo di = new DirectoryInfo(Dts.Variables["Local_Dir"].Value.ToString());

            FileInfo[] fi = di.GetFiles("*.csv");
            String filename = fi[0].Name;

            string sourceFileName = filename;
            string destinationFile = @"\\c:\Destination\" + sourceFileName;
            string sourceFile = @"\\c:\Source" + sourceFileName;

            if (File.Exists(destinationFile))
                File.Delete(destinationFile);
            // To move a file or folder to a new location:
            System.IO.File.Move(sourceFile, destinationFile);
            Dts.TaskResult = (int)ScriptResults.Success;
        }
    }
}
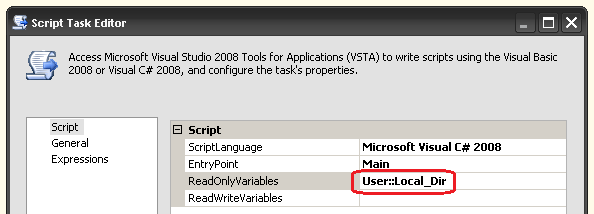
As you can see, the script uses a variable which we need to create before we execute the script as part of an SSIS package and later declare as ‘ReadOnlyVariable’ in the Script Task properties window as per below:

This variable (Local_Dir), previously declared as string, points to the folder where the file is stored before moving it off to a ‘history’ folder. As for the script, it is quite simple. Firstly, what we do here is creating an array, populating it with files from our Local_Dir variable and declaring paths for a source and destination directories. Next, we check if the file with the same name already exists in the destination folder, deleting it if it does. In this way we can ensure that an exception will not be thrown due to a file with an exactly the same name already sitting in our destination folder. Finally, we move the file to our destination folder.
That is really it! Now we can use this script in combination with other techniques e.g. ‘generating files through bcp utility’ and ‘programmatically checking if the file exists script’ to create a more comprehensive file management solution in SSIS.
Posted in: .NET, SSIS
Tags: .NET, C#, Code, Programming
April 17th, 2012 / 6 Comments » / by admin
In ‘Generating Files through bcp Utility in SQL Server’ post I showed how to create a simple CSV file and output it onto a file system. In this post I will demonstrate how to programmatically check if the file exists in the directory where we intended to place it (it enables us to take action if the file has not been created as expected). This can be incorporated into a process of creating files via bcp utility as its extension; for example, if the file has not been created notify operator(s) or perform some other action.
Firstly, we will create a variable named FileExists (you can call it anything you want as long as you stick to the name throughout the process) of Boolean type, set the scope to ‘Package’ and set its value to FALSE. This variable will store our result and we will use it in a VB.NET script as well as precedence constraints.

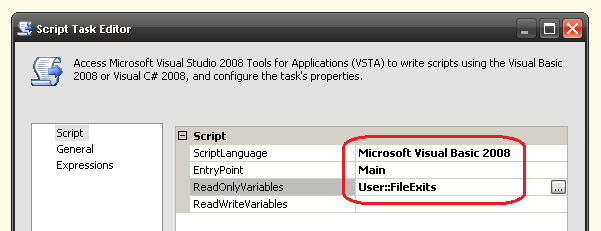
Next, ensure that our FileExists variable has been declared in the ‘Script Task Editor’ for ‘ReadOnlyVariables’ field as per below and that the language selected is set to Microsoft Visual Basic 2008.

We are now ready to create a simple VB.NET script which populates the FileExists variable (setting to TRUE or FALSE) depending on whether the file that we wish to check for existence is there or not.
Imports System
Imports System.Data
Imports System.Math
Imports Microsoft.SqlServer.Dts.Runtime
Imports System.IO

Public Class ScriptMain

    Enum ScriptResults
        Success = Microsoft.SqlServer.Dts.Runtime.DTSExecResult.Success
        Failure = Microsoft.SqlServer.Dts.Runtime.DTSExecResult.Failure
    End Enum

    Partial Public Class ScriptMain
        Inherits Microsoft.SqlServer.Dts.Tasks.ScriptTask.VSTARTScriptObjectModelBase

        Public Sub Main()

            Dim directory As DirectoryInfo = New DirectoryInfo("c:\")
            Dim file As FileInfo() = directory.GetFiles("*.csv")

            If file.Length > 0 Then
                Dts.Variables("User::FileExists").Value = True
            Else
                Dts.Variables("User::FileExists").Value = False
            End If

            Dts.TaskResult = ScriptResults.Success
         End Sub
    End Class
End Class
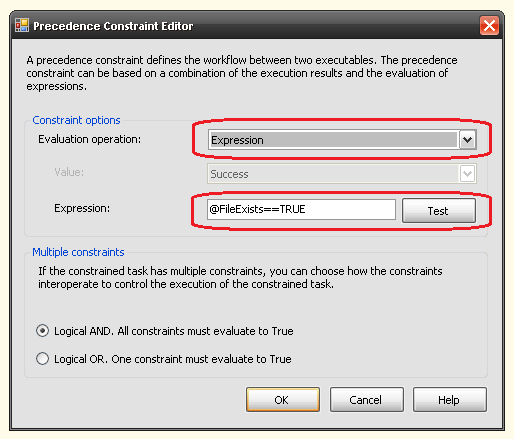
All the above script does is checking if the file exists on the c:\ drive and then populating our FileExists SSIS package variable with either a value of ‘TRUE’ if it does and ‘FALSE’ if it doesn’t. This can then be used by controlling the flow of the subsequent package containers based on the logic applied in the precedence constraint which follows the script task. In order to redirect the flow, let’s create two dummy ‘Execute SQL Task’ containers, link them to our ‘Script Task’ and populate them with some dummy SQL code (two dashes i.e. — will do for this exercise). Next, we will apply a simple logic in the expression field of the two ‘Precedence Constraints’of to how to proceed with the execution. In the first one, set the ‘Evaluation Operation’ to Expression and type in the following expression in the ‘Expression’ field: @FileExists==TRUE as per below.

The second ‘Precedence Constraint’ will look almost identical with the exception of the actual expression. Here, we change it to @FileExists==FALSE. When finished, you should see two blue squares next to our ‘Precedence Constraints’ and the actual connections should change their color to blue as well (SQL Server 2008 R2). So far, the part of the package we have just developed should look like this.

To check if the package works, all we need to do is to put a CSV file in the target directory (c:\ drive in our case) and the execution should follow the path of the ‘Precedence Constraint’ where the expression was set to ‘@FileExists==TRUE’. If we delete the file, the execution should go with the other Precendence Constraint. Those two scenarios are pictured below.

This can be further developed by incorporating other tasks and actions e.g. if @FileExists==FALSE (meaning that no CSV file was found), ‘Send Mail Task’ can be run to notify operator(s).
To check if the package works, all we need to do is to put a CSV file in the target directory (c:\ drive in our case) and the execution should follow the path of the ‘Precedence Constraint’ where the expression was set to ‘@FileExists==TRUE’. If we delete the file, the execution should go with the other Precendence Constraint. Those two scenarios are pictured above.
Posted in: .NET, SQL, SSIS
Tags: .NET, Code, Programming, SQL, SSIS, VB.NET


Not sure about Polars but I did take ClickHouse (chDB) and DuckDB for a quick test drive - you can…