February 7th, 2019 / 11 Comments » / by admin
Note: all code used in this post can be viewed and downloaded from my publicly accessible OneDrive folder HERE.
Most skilled BI/DW professionals, when planning and scoping to deliver a new data warehouse will choose to work with some sort of framework to automate and simplify certain common tasks e.g. data acquisition, index creation, schema rebuilt or synchronization etc. Over the years, I have design and built a large number of data marts and enterprise data warehouses using both industry standard as well as bespoke design patterns. It is fair to say that it often pays not to reinvent the wheel and reuse (where possible) some of the staple elements and code bases which may be applicable to those development activities. After all, time is money, and the quicker I can focus on delivering value through providing well-structured and rich data, the happier my clients will be. With that in mind, I thought it would be a good idea to share some of the code which handles many of the tedious but necessary tasks so that one can operationalize those with relative speed to start addressing a business or problem-specific architecture. In my experience, even most technology-savvy clients are not interested in the intricate details of how data is piped across the various domains and constructs. In the end, for most stakeholders, even the most elaborate and elegant solutions are just a part of a ‘shoe-box’ referred to as the data warehouse and until data can be realized and utilized through a report or a piece of analytics, code is just a means to an end – the quicker we can build it and make it work, the better.
The following tidbits of SQL provide a small collection of ‘utilities’ one can implement with zero to little modifications to automate activities such as index creation/dropping, foreign key creation/dropping, automated data acquisition from source databases, reconciling schema changes etc. All this code was developed using SQL Server platform as large chunk of my engagements still heavily rely on a virtual environment, on-premise or hybrid Microsoft SQL Server deployments. Also, rather than simply delivering the source code or a Github link, I tried to provide a common scenario or a problem statement, along with a short explanation of what it does and how it solves the after mentioned issue. In this structure, each problem statement roughly follows a sequence of tasks a typical architect or developer may need to address in the process of building a data acquisition framework i.e. check if source data/environment is accessible, build-up metadata for source and target environments, manage schema changes based on metadata, acquire data etc. This is not an exhaustive list of all activities and many of those may be redundant or not applicable to your specific scenario, but if you’re grappling with implementing a proof of concept or maybe a small scale project and look for a more defined hands-on springboard to take your architecture from idea to a set of tangible artifacts to jump-start development process, this may be of great help.
Also, it is worth pointing out that these scripts work well with POCs and prototypes as well as small projects, where speed and agility is paramount. Most enterprise data warehouse developments are not like that and require a fair amount of upfront planning and preparation (even when done in an agile manner). If your project is complex in nature and, for example, requires large systems integration, complex ETL/ELT functionality, changing APIs, non-relation/non-file-based data stores or comes with bespoke requirements, you may want to look at either buying an off-the-shelf framework or customize one which has already been developed. Building a new framework from scratch is probably a bad idea and since most DW core concepts have been left unchanged for many years, chances are it’s better to ‘stand on the shoulders of giants’ rather than trying to reinvent the wheel.
Problem 1
Check if Linked Server connection is active before data acquisition job can be initiated. If not, retry predefined number of times, waiting for a preset amount of time and if still not resolving notify the operator/administrator.
On a SQL Server platform, most database connections across number of different vendors can be configured using the good, old-fashion Linked Server functionality – in my experience it worked well on MSSQL, MySQL/MariaDB, PostgreSQL, Vertica, Oracle, Teradata and even Sqlite. Before data warehouse can be loaded with data from a source system (usually an externally hosted database), it’s worth checking if the connection we’ve created is active and resolving without issues. If not, we may want to wait for a few minutes (instead of failing the load completely) and if the problem persists, notify administrator to start the troubleshooting process. These issues are quite unlikely to appear and, in my personal experience, are mostly related to network failures and not source system availability problems but when they do surface, DW administrators are often left in the dark. The code for this small stored procedure can be downloaded from HERE.
Problem 2
Provide a selective list of objects, attributes and data and store this as metadata to be referenced at later stage e.g. schema rebuilt, data acquisition, indexes creation etc.
Often times, whether it’s because of security reasons (data viewed as a liability) or simply as a storage space-saving mechanism (largely uncommon these days), clients want to be able to selectively nominate a list of objects from a database, along with some of their attributes and data to be acquired. They may not want all tables and tables’ columns to be replicated in the staging area of the data warehouse. Furthermore, they may want to go down to the level of individual values from a given attribute. For example:
- Out of 200 tables in the source system, they are only interested in 150
- Since some of the columns are used for logging and metadata storage only, the want those excluded as they don’t provide any valuable information
- Finally, some columns may contain a mixture of data with various levels of sensitivity e.g. staff and clients’ e-mail addressed. As a result, they want staff e-mail address values but client e-mail addresses should be masked or obfuscated for security and/or privacy reasons
There are a few different ways to address this issue, but the simplest solution would be to create three views containing some of the metadata mentioned above i.e. table names, column names etc. and load those into a small, three-table database which can be used as a reference point for individual objects, attributes and data exclusion/inclusion. Let’s see how that would work in practice.
After creating the target environment as well as sample linked server to an Azure SQL DB to further demonstrate this in practice (again, all T-SQL downloadable from HERE) I typically create three views which hold source system metadata. The content of those is loaded into a small three-table database which can be referenced in a number of ways. The reason I create intermediary views as opposed to only storing this data in tables is because it’s a lot easier to manage metadata in this format e.g. version control it, make changes and alternations etc. Once the views are created we can use a simple stored procedure to (re)build table schema, provide the initial data load and update data based on business requirements and source systems changes.
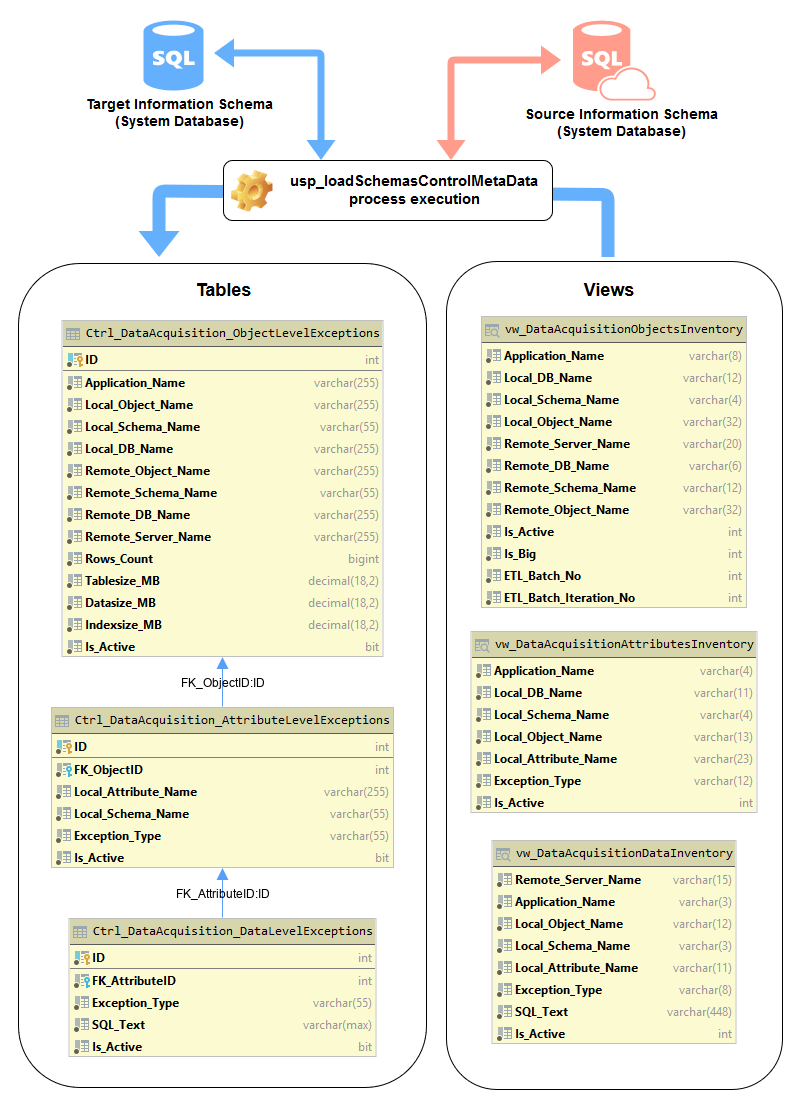
These three tables will become very helpful in providing the reference data for any other subsequent activities. For example, if we’d like to selectively specify object names for data acquisition tasks or run post-acquisition data reconciliation job, it’s a lot easier to have this information available on the local instance.
Problem 3
Dynamically manage schema changes in target database.
Changes to the source schema are usually communicated downstream, before going into production, so that data engineers can unit-test and validate them for impact on the data warehouse and ETL logic. However, in my experience, that’s often a pie-in-the-sky scenario and for teams/divisions with weak change control culture a highly likely event. Cloud technologies have offered tools to easily reconcile both: schema and data across various data sources, but in case I need to roll my own, I often rely on a script which can do it for me. The code (downloadable from HERE) stages source and target metadata and compares it for attributes such as data types, object and column names, numeric precision, numeric scale etc. If any changes are detected, it tries to replicate them on the target database, after which the comparison is run again to verify the fix.
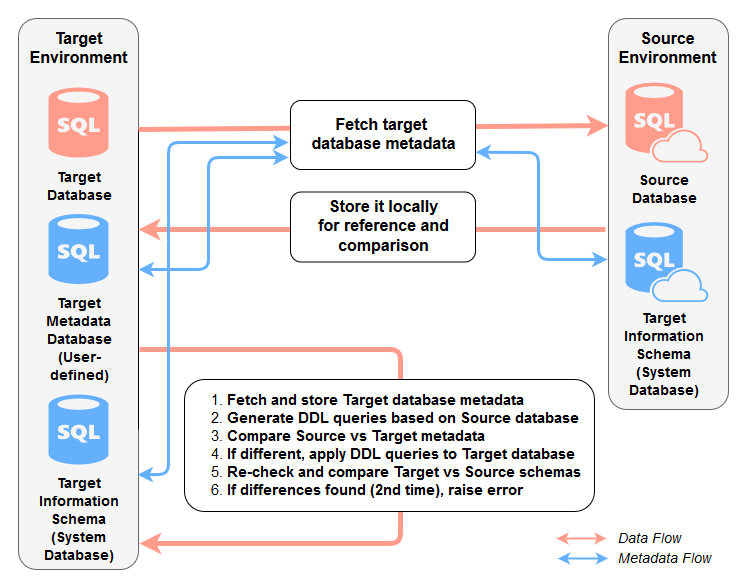
I have used this code extensively for schema reconciliation between number of different vendor database e.g. MSSQL, MariaDB, PostgreSQL with only small modifications to account for idiosyncrasies between how data can be represented across those (SQL Server being the target/sink database). In ideal world schema changes should always be treated as a potential risk to downstream processing, with a proper chain of custody in place to account for potential issues. Howerer, in many cases, it’s either not possible or the approach taken is ‘too agile’ to ensure precautions are taken before those are communicated and deployed so if ensuring schemas are in sync is required, this small step (executed before data acquisition kick-off) can be of great benefit.
Problem 4
Acquire data from source system based on metadata input and changes.
Sometimes, the most difficult issue when dealing with new data mart development is source data acquisition. Once data has been imported into the target zone, it usually quite easy to mold, transform and apply business rules to. However, due to factors such as source-to- target schema changes, history and CDC tracking, delta values reconciliation etc., acquiring source data can sometimes turn into a challenging problem to solve. Most organizations turn to purchasing a COTS (Commercial, off-the-shelf) framework or developing one themselves if the business requirements are too bespoke to warrant going the commercial route. However, for quick projects with small amount of data, or even as a test/POC solution, we can just as easily create a Linked Server connection to the source database (if available) and build a simple acquisition pipeline to speed up and automate the whole process.
This code, run on schedule or in on-demand fashion, relies on the control (meta)data created as part of Problem 2 outline, acquiring source data in parallel, spooling multiple SQL Server Agent jobs. It is comprised of two separate stored procedures: (1) Parent module responsible for the metadata management and spawning SQL Server Agent Jobs and (2) Worker module which does the heavy-lifting i.e. inserts data into the target object based on metadata information passed down from its parent.
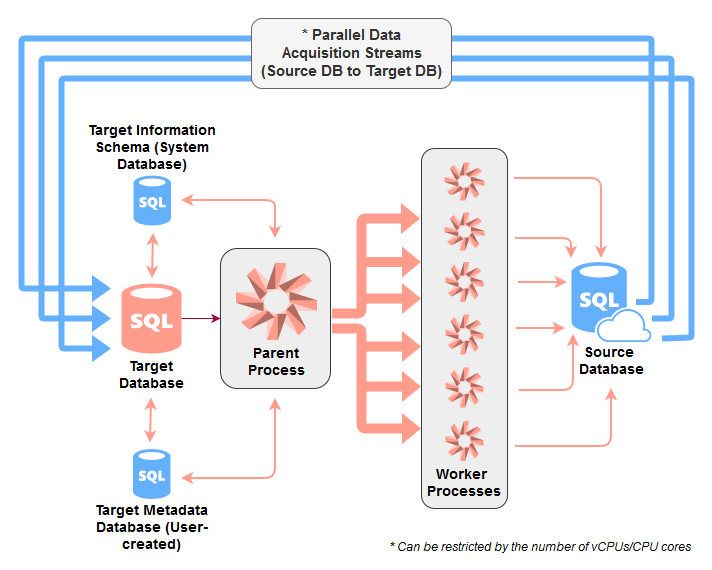
The number of jobs can be determined by the count of vCPUs/CPU cores available on the host machine and can even be further partitioned to ‘break-up’ individual objects using additional logic e.g. in case of very large tables, those can be broken up into smaller ‘chunks’ of data (using numeric value primary key filed) and SELECTED/INSERTED in parallel. Below is a sample logic to split a table’s data into 10 evenly-distributed blocks in T-SQL and Python.
--Create dynamic SQL
DECLARE @SQL NVARCHAR(MAX)
DECLARE @PK_Col_Name VARCHAR (100) = 'id'
DECLARE @Target_DB_Object_Name VARCHAR(1000) = 'Target_Object'
DECLARE @Proc_Exec_No INT = 10
DECLARE @Remote_Server_Name VARCHAR (100) = 'Source_Server_Name'

SET @SQL =				'DECLARE @R1 INT = (SELECT id FROM OPENQUERY ('+@Remote_Server_Name+', '	+CHAR(13)
SET @SQL = @SQL +		'''SELECT MIN('+@PK_Col_Name+') as id from '+@Target_DB_Object_Name+''')) '	+CHAR(13)
SET @SQL = @SQL +		'DECLARE @R2 BIGINT = (SELECT id FROM OPENQUERY ('+@Remote_Server_Name+', '	+CHAR(13)
SET @SQL = @SQL +		'''SELECT (MAX('+@PK_Col_Name+')-MIN('+@PK_Col_Name+')+1)'					+CHAR(13)
SET @SQL = @SQL +		'/'+CAST(@Proc_Exec_No AS VARCHAR(10))+' as id FROM'						+CHAR(13)
SET @SQL = @SQL +		''+@Target_DB_Object_Name+'''))'											+CHAR(13)
SET @SQL = @SQL +		'DECLARE @R3 BIGINT = (SELECT id FROM OPENQUERY ('+@Remote_Server_Name+', '	+CHAR(13)
SET @SQL = @SQL +		'''SELECT MAX('+@PK_Col_Name+') as id from '+@Target_DB_Object_Name+''')) '	+CHAR(13)
SET @SQL = @SQL +		'INSERT INTO #Ids_Range'													+CHAR(13)
SET @SQL = @SQL +		'(range_FROM, range_to)'													+CHAR(13)
SET @SQL = @SQL +		'SELECT @R1, @R1+@R2'														+CHAR(13)
SET @SQL = @SQL +		'DECLARE @z INT = 1'														+CHAR(13)
SET @SQL = @SQL +		'WHILE @z <= '+CAST(@Proc_Exec_No AS VARCHAR(10))+'-1'					   +CHAR(13)
SET @SQL = @SQL +		'BEGIN'																		+CHAR(13)
SET @SQL = @SQL +		'INSERT INTO #Ids_Range (range_FROM, range_TO) '							+CHAR(13)
SET @SQL = @SQL +		'SELECT LAG(range_TO,0) OVER (ORDER BY id DESC)+1, '						+CHAR(13)
SET @SQL = @SQL +		'CASE WHEN LAG(range_TO,0) OVER (ORDER BY id DESC)+@R2+1 >= @R3'			   +CHAR(13)
SET @SQL = @SQL +		'THEN @R3 ELSE LAG(range_TO,0) OVER (ORDER BY id DESC)+@R2+1 END'			+CHAR(13)
SET @SQL = @SQL +		'FROM tempdb..#Ids_Range WHERE @z = id'										+CHAR(13)
SET @SQL = @SQL +		'SET @z = @z+1'																+CHAR(13)
SET @SQL = @SQL +		'END'
PRINT (@SQL)

--Take printed dynamic SQL and generate ranges (stored in a temporary table)
IF OBJECT_ID('tempdb..#Ids_Range') IS NOT NULL
BEGIN
    DROP TABLE #Ids_Range;
END;
CREATE TABLE #Ids_Range
(
    id SMALLINT IDENTITY(1, 1),
    range_FROM BIGINT,
    range_TO BIGINT
);

DECLARE @R1 INT =
        (
            SELECT id
            FROM OPENQUERY
                 (Source_Server_Name, 'SELECT MIN(id) as id from Target_Object')
        );
DECLARE @R2 BIGINT =
        (
            SELECT id
            FROM OPENQUERY
                 (Source_Server_Name, 'SELECT (MAX(id)-MIN(id)+1)
/10 as id FROM
Target_Object')
        );
DECLARE @R3 BIGINT =
        (
            SELECT id
            FROM OPENQUERY
                 (Source_Server_Name, 'SELECT MAX(id) as id from Target_Object')
        );
INSERT INTO #Ids_Range
(
    range_FROM,
    range_TO
)
SELECT @R1,
       @R1 + @R2;
DECLARE @z INT = 1;
WHILE @z <= 10 - 1
BEGIN
    INSERT INTO #Ids_Range
    (
        range_FROM,
        range_TO
    )
    SELECT LAG(range_TO, 0) OVER (ORDER BY id DESC) + 1,
           CASE
               WHEN LAG(range_TO, 0) OVER (ORDER BY id DESC) + @R2 + 1 >= @R3 THEN
                   @R3
               ELSE
                   LAG(range_TO, 0) OVER (ORDER BY id DESC) + @R2 + 1
           END
    FROM tempdb..#Ids_Range
    WHERE @z = id;
    SET @z = @z + 1;
END;

SELECT * FROM #Ids_Range
def split_into_ranges(start, end, parts):
    ranges = []
    x = round((end - start) / parts)
    for _ in range(parts):
        ranges.append([start, start + x])
        start = start + x + 1
        if end - start <= x:
            remainder = end - ranges[-1][-1]
            ranges.append([ranges[-1][-1] + 1, ranges[-1][-1] + remainder])
            break
    return ranges
Problem 5
Capture stored procedure/SSIS package execution errors and exceptions information for analysis.
SQL Server comes with a built-in mechanism to capture various levels of information and metadata on SSIS package execution. However, since my preference has mostly been to use SSIS as an orchestration engine, executing finely tuned and optimized SQL code, and not relying on ‘black box’ SSIS transformations, I needed to devise a way to capture and persist execution errors and related data in a central place which can be reported out of. Since I have already written about this at length in my other two blog posts, mainly HERE and HERE, for brevity, I won’t be repeating this information again. All the code (two stored procedures – one for creating and one for updating database objects) can be found HERE. The schema created by the script is as per below and the way to reference and integrate other code against it can be found in my two previous posts: PART 1 and PART 2.
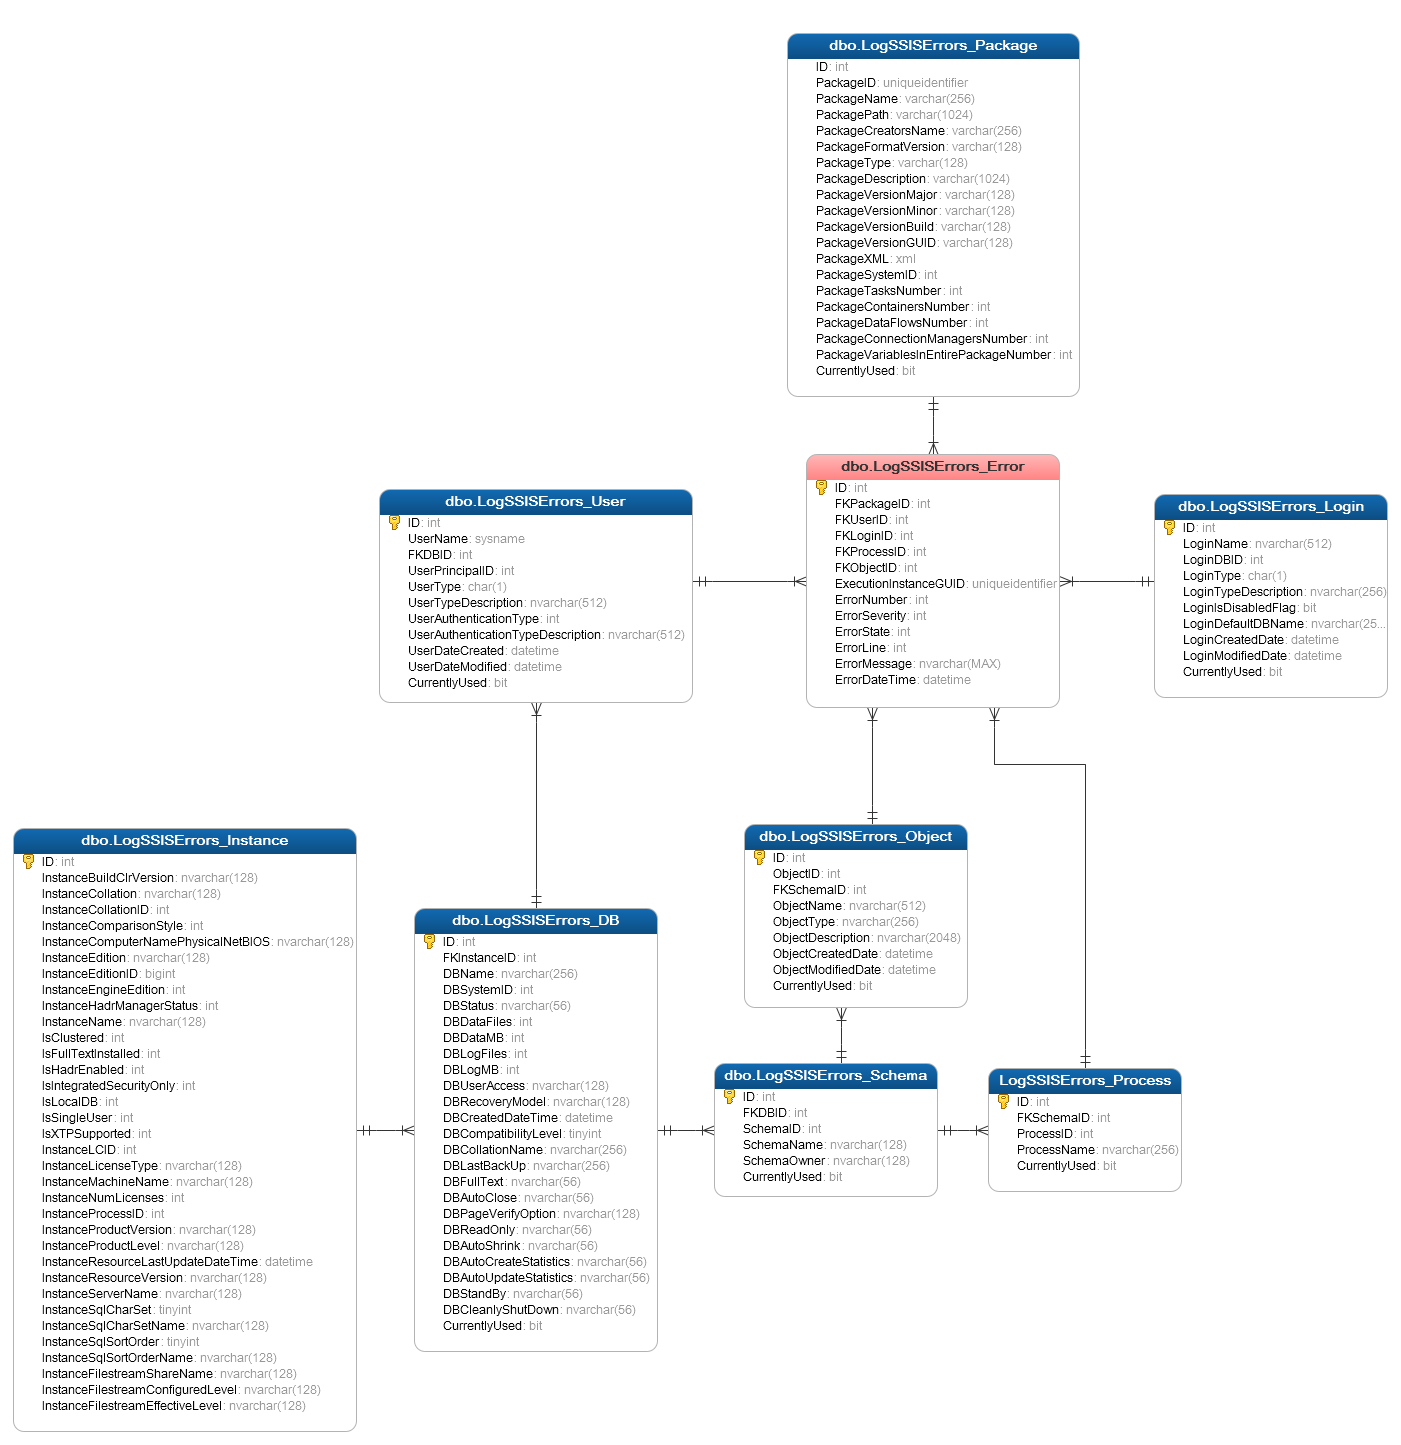
Once populated with target instance metadata, captured errors can be visualized and analyzed. The following image depicts a simple dashboard outlining various error metrics and their associated attributes.

Problem 6
Persist and historize data changes across all objects and attributes.
Old-school approach to ensuring that source data changes e.g. deletion, updates etc. are captured and stored in the data warehouse rely heavily on the concept on Slowly Changing Dimension (SCD). Depending on which SCD type is used (more on this topic can be read in the Wikipedia article HERE), data changes do not overwrite the initial value(s) but create a separate record or column to persist any modifications on the nominated set of attributes. This operation is typically reserved for dimensions as facts are transactional in nature thus not subjected to changes. The problem with this approach is that data is required to be shaped and molded in a very specific way, sometimes loosing some of its ‘raw’ value along the way in favor of adhering to a specific modelling methodology. Sometimes it would be great to re-delegate history persistence functionality to the ‘area’ responsible for staging source system data, across all objects and fields. I have already written a post on building relational data lake (link HERE) so reiterating this content is out of scope but it’s fair to say that with ever-changing landscape for how data is captured and stored, allowing for the maximum flexibility in how it can be modeled should be paramount.
There are many patterns which can facilitate implementing relational data lake but this simple design allows for a clever way of persisting all application data changes (one the core requirements of any data warehouse, irrespective of modelling approach taken) along with providing robust foundations for provisioning virtual data marts to satisfy reporting and analytical data needs. The virtual data marts can be easily implemented as views, with the required business rules embedded inside the SQL statements and, if required for performance reasons, materialized or physically persisted on disk or in memory.
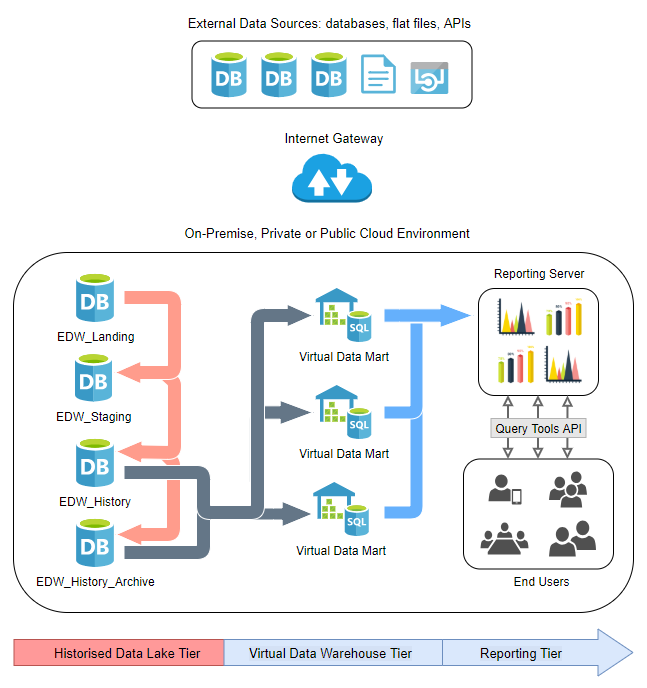
This framework relies on creating a custom, performance-optimized data flow logic along with four databases which together handle transient application data (as acquired from the source system), staged data and finally data containing all transitional changes (inserts, deletes and updates) across all history. Again, repeating my previous post outlining all the details is out of scope here so for a comprehensive overview of how this method works for history persistence and performantly handling data changes across large systems please refer to the previous post HERE.
Problem 7
Use metadata-driven approach for indexes creation and dropping.
If a large number of indexes is required to be created on the nominated objects (or dropped prior to data load execution to speed up the process), it is nice to have a way to store it as a metadata, which in turn can be referenced in an automated fashion. Again, this type of requirement can be addressed in a number of ways but probably the simplest solution would be to have a piece of code which can do it for us on demand, relying on metadata stored in dedicated objects (as per Problem 2), where number of values can be passed as parameters to target specific use case e.g. drop/create indexes using same codebase, do it across the whole schema or just individual objects etc.
The code (downloadable from HERE) can be used as part of the ETL logic to either DROP or CREATE indexes on one or more tables in the nominated database and schema. It does not cater for indexes rebuilt or reorganization (I may add this functionality to a later version) but it simplifies indexes management and can be used for automation.
Problem 8
Use metadata-driven approach for foreign keys constraints creation and dropping.
As it is the case with Problem 6, providing metadata-driven approach to any repeatably-executed operation may be a good investment in time taken to initially develop the code. This SQL can be taken and plugged into a new or existing ETL process if referential integrity across facts and dimensions is required. It relies on the ‘control’ database table entries which makes it easy to reference without having to hard-code individual SQL statements and can be used for both: dropping and creating foreign key constraints. The code is published HERE.
Problem 9
Check data acquisition status and validate record count.
Finally, if we need to ensure that no errors were raised during data acquisition (logged in AdminDBA table as per Problem 5 description) and check if all records were copied successfully (this only relies on record count and does not take changes/alterations into consideration so use with caution) we can use the solution I outlined previously HERE and a small piece of SQL for record count comparison. The SQL part is very straightforward (this implementation relies on MSSQL to MSSQL comparison) and relies on a static threshold value of 0.001% permissible variance between source and target across all tables. This is so that when sourcing data from a ‘live’ system, where data is being subjected to standard CRUD operations, small differences i.e. smaller than 0.001% of all record count do not raise exceptions or errors. There’s also an option to get source record counts from two different places: the ‘Control’ database created earlier as per Problem 2 outline or the actual source system. The C# code on the other hand is an SSIS package implementation and relies on the output from both: msdb database and error logging database (AdminDBA) for acquisition job execution status. The stored procedure can be downloaded from HERE whereas a full description of the SSIS code can be viewed HERE.
Problem 10
Notify administrator(s) on execution failure
As with a lot of solutions in this space, there is nearly an infinite amount of ways one could create a process of notifications and alerts. For larger projects this is usually the ETL framework’s core functionality and most well-respected and popular tools, cloud or on-premise, do it to some extent. For small projects e.g. where a small data mart is populated using SSIS or SQL, I usually plug-in a small stored procedure which wraps some extra functionality around the SQL Server’s native msdb.dbo.sp_send_dbmail process. Providing the Database Mail has been enabled on the target instance (beyond the content of this post), a small piece of code can send out an e-mail message containing key pieces of data on what exactly failed, along with some peripheral information helping administrator(s) identify and troubleshoot a problem. Most developers these days also like Slack or other IM applications integration but for a small project with infrequent level of alerting, email notification is still the best way to raise potential issues.
Below is a sample email sent out by the ETL pipeline containing a small snippet of HTML code (click on image to enlarge). It provides a simple template for outlining all necessary pieces of data required to identify the problem e.g. affected object name, process name, executed package name, date and tie of the event as well as a link to the report which one can access to gain the ‘big picture’ view from the AdminDBA database as per what’s outlined in Problem 5.
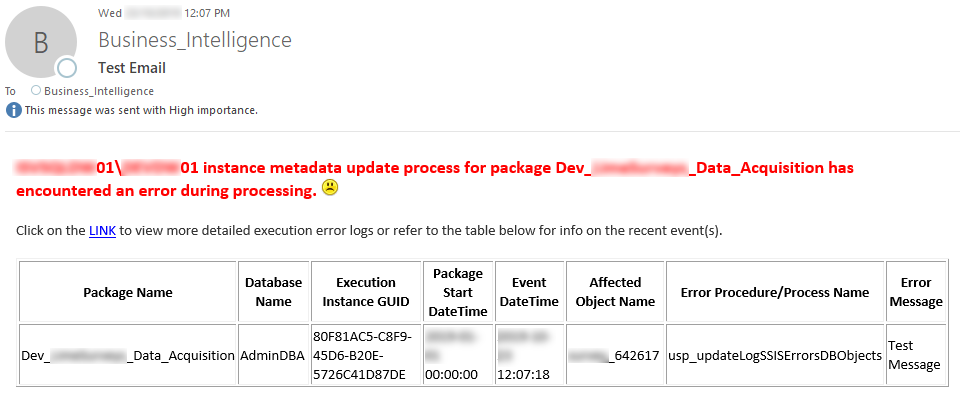
The stored procedure execution can be triggered by the output parameter of another task (a simple IF…THEN logic) and relies on a number of parameters typically passed as values from a SSIS package. It’s execution is also preceded by running a function responsible for acquiring individual e-mail addresses of individuals required to be notified (these are stored in the AdminDBA database as per Problem 5 description). In this way multiple administrators can be notified of an issue. All other parameters’ values are derived or come from the SSIS package itself. And again, all this code (including the aforementioned function) can be downloaded from my OneDrive folder HERE.
There you go – a simple list of ten potential problems and corresponding solutions one may face and need to resolve when provisioning a data mart or data warehouse on a SQL Server environment.
Posted in: SQL, SQL Server, SSIS
Tags: Data Warehouse, Microsoft, SQL, SQL Server
February 6th, 2019 / 11 Comments » / by admin
Problem Statement
Data warehouse modelling techniques have largely been left unchanged for decades and most of common methodologies and patterns which were prevalent when I was starting my career in Business Intelligence are still applicable to most projects. In the early days, Inmon created the accepted definition of what a data warehouse is – a subject-oriented, non-volatile, integrated, time-variant collection of data in support of management’s decisions. Inmon approach to enterprise data warehousing assumes that tables are grouped together by subject areas that reflect general data categories (e.g. data on customers, products, finance, etc.). The normalized structure divides data into entities, which creates several tables in a relational database. When applied in large enterprises the result is dozens of tables that are linked together by a web of joins, with departmental data marts created for ease of use. His approach was often criticized for being top-heavy, complex to execute and generally requiring a lot more planning and up-front work. Ralph Kimbal, another prolific figure and the author of Kimbal approach to data warehouse architecture advocated for a simplified approach, where only denormalised data marts were created to satisfy business requirements which carried the benefit of being easier to understand, set-up and develop. However, just as Inmon methodology was often criticized, Kimbal’s approach was not without its faults e.g. data redundancy and maintaining integrity of facts and dimensions can be a challenge. Over the last decade, a third approach to data warehouse modelling started to make inroads. Data vault, a hybrid paradigm that combines the best of 3rd Normal Form (3NF) and dimension modeling, was conceived to address agility, flexibility, and scalability problems found in the other main stream data modelling approaches. It simplifies the data ingestion process, removes the cleansing requirement of a Star Schema, puts the focus on the real problem instead of programming around it and finally, it allows for the addition of new data sources integration without disruption to existing schema. However, as with other two modelling approaches, Data Vault has its fair share of disadvantages and it is not a panacea for all business data needs e.g. increase number of joins, not intended for ad-hoc end user access (including BI tools and OLAP), higher than average number of database and ETL objects etc.
The main issue with data being modelled in a very specific way is that organisations have to undergo a very rigorous and comprehensive scoping exercise to ensure that either of the three modelling methodologies disadvantages will not prohibit them from extracting intelligence out of the data they collect and allow for the most flexible, scalable and long-term support for their analytical platform they provisioning. Data warehouse projects, particularly the enterprise-wide ones, are an expensive and risky endeavour, often taking large amount of resources and years to complete. Even the most data-literate, mature and information management-engaged organizations embarking on the data warehouse built journey often fall prey to constraining themselves to structure their critical data assets in a very prescriptive and rigid way. As a result, once their enterprise data has been structured and formatted according to a specific methodology, it becomes very hard to go back to data’s ‘raw’ state. This often means a compromised and biased view of the business functions which does not fully reflect the answers the business is trying to find. This myopic portrayal of the data, in best case scenarios leads to creating other, disparate and siloed data sources (often by shadow BI/IT or untrusting end-users), whereas in extreme cases, the answers provided are unreliable and untrustworthy.
As such, over the last few years I have observed more and more business taking a completely different approach and abandon or at least minimise data warehouse-specific modelling techniques in favour of maintaining a historised data lake and creating a number of virtual data marts on top of it to satisfy even the most bespoke business requirements. With on-demand cloud computing becoming more prevalent and very powerful hardware able to crunch even copious amounts of raw data in seconds, the need for meticulously designed star or snowflake schema is slowly becoming secondary to how quickly organisations can get access to their data. With in-memory caching, solid state storage and distributed computing, for the first time ever we are witnessing old application design patterns and data modelling techniques becoming the bottleneck for the speed at which data can be processed. Also, with the ever-growing number of data sources to integrate with and data volumes, velocity and variety on the increase, data warehouse modelling paradigms are becoming more of a hindrance, constricting organisations to follow a standard or convention designed decades ago. As a result, what we’re witnessing is the following two scenarios for corporate data management playing out with more frequency:
- Enterprises looking for providing federation capabilities to support Logical Data Warehouse architecture across multiple platforms without having to move data and deal with complexities such as different technologies, formats, schemas, security protocols, locations etc.
- Enterprises looking for consolidating all their data sources in a single place with the speed and agility required to move at a quicker pace, without the constrain of modelling data in a prescriptive, narrow and methodical way as to not throw away the richness of the narrative the raw data may provide long-term
Implementation
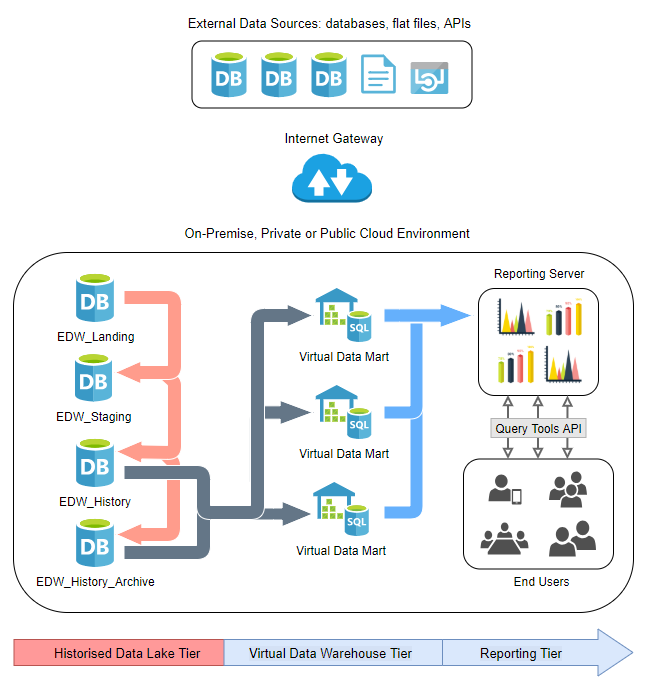
There are many patterns which can facilitate implementing the data lake but in this post we will look at creating four databases which together will handle transient application data (as acquired from the source system), staged data and finally data containing all transitional changes (inserts, deletes and updates) across all history. This design allows for a clever way of persisting all application data changes (one the core requirements of any data warehouse, irrespective of modelling approach taken) along with providing robust foundations for provisioning virtual data marts to satisfy reporting and analytical data needs. The virtual data marts can be easily implemented as views, with the required business rules embedded inside the SQL statements and, if required for performance reasons, materialised or physically persisted on disk or in memory.
The following diagram depicts the high-level architecture used in this scenario and the logical placement of EDW_Landing database used for initial data load, EDW_Staging database used for storing all changes, EDW_History database storing current view of the data and finally EDW_History_Archive storing all history.
To provide a tangible case scenario, let’s create a sample environment with the after mentioned database using Microsoft SQL Server platform. The following script can be used to create the required data stores along with all the objects and dummy data.
/*========================================================================================================
STEP 1
Create EDW_Landing, EDW_Staging, EDW_History, EDW_History_Archive databases on the local instance
========================================================================================================*/
SET NOCOUNT ON;
GO
USE master;
GO
IF EXISTS (SELECT name FROM sys.databases WHERE name = N'EDW_Landing')
BEGIN
    -- Close connections to the EDW_Landing database
    ALTER DATABASE EDW_Landing SET SINGLE_USER WITH ROLLBACK IMMEDIATE;
    DROP DATABASE EDW_Landing;
END;
GO
-- Create SampleDB database and log files
CREATE DATABASE EDW_Landing
ON PRIMARY
       (
           NAME = N'EDW_Landing',
           FILENAME = N'D:\Program Files\Microsoft SQL Server\MSSQL13.HNODWDEV\MSSQL\DATA\EDW_Landing.mdf',
           SIZE = 10MB,
           MAXSIZE = 1GB,
           FILEGROWTH = 10MB
       )
LOG ON
    (
        NAME = N'EDW_Landing_log',
        FILENAME = N'D:\Program Files\Microsoft SQL Server\MSSQL13.HNODWDEV\MSSQL\DATA\EDW_Landing_log.ldf',
        SIZE = 1MB,
        MAXSIZE = 1GB,
        FILEGROWTH = 10MB
    );
GO
--Assign database ownership to login SA
EXEC EDW_Landing.dbo.sp_changedbowner @loginame = N'SA', @map = false;
GO
--Change the recovery model to BULK_LOGGED
ALTER DATABASE EDW_Landing SET RECOVERY SIMPLE;
GO


IF EXISTS (SELECT name FROM sys.databases WHERE name = N'EDW_Staging')
BEGIN
    -- Close connections to the EDW_Staging database
    ALTER DATABASE EDW_Staging SET SINGLE_USER WITH ROLLBACK IMMEDIATE;
    DROP DATABASE EDW_Staging;
END;
GO
-- Create EDW_Staging database and log files
CREATE DATABASE EDW_Staging
ON PRIMARY
       (
           NAME = N'EDW_Staging',
           FILENAME = N'D:\Program Files\Microsoft SQL Server\MSSQL13.HNODWDEV\MSSQL\DATA\EDW_Staging.mdf',
           SIZE = 10MB,
           MAXSIZE = 1GB,
           FILEGROWTH = 10MB
       )
LOG ON
    (
        NAME = N'EDW_Staging_log',
        FILENAME = N'D:\Program Files\Microsoft SQL Server\MSSQL13.HNODWDEV\MSSQL\DATA\EDW_Staging_log.ldf',
        SIZE = 1MB,
        MAXSIZE = 1GB,
        FILEGROWTH = 10MB
    );
GO
--Assign database ownership to login SA
EXEC EDW_Staging.dbo.sp_changedbowner @loginame = N'SA', @map = false;
GO
--Change the recovery model to BULK_LOGGED
ALTER DATABASE EDW_Staging SET RECOVERY SIMPLE;
GO


IF EXISTS (SELECT name FROM sys.databases WHERE name = N'EDW_History')
BEGIN
    -- Close connections to the EDW_History database
    ALTER DATABASE EDW_History SET SINGLE_USER WITH ROLLBACK IMMEDIATE;
    DROP DATABASE EDW_History;
END;
GO
-- Create EDW_History database and log files
CREATE DATABASE EDW_History
ON PRIMARY
       (
           NAME = N'EDW_History',
           FILENAME = N'D:\Program Files\Microsoft SQL Server\MSSQL13.HNODWDEV\MSSQL\DATA\EDW_History.mdf',
           SIZE = 10MB,
           MAXSIZE = 1GB,
           FILEGROWTH = 10MB
       )
LOG ON
    (
        NAME = N'EDW_History_log',
        FILENAME = N'D:\Program Files\Microsoft SQL Server\MSSQL13.HNODWDEV\MSSQL\DATA\EDW_History_log.ldf',
        SIZE = 1MB,
        MAXSIZE = 1GB,
        FILEGROWTH = 10MB
    );
GO
--Assign database ownership to login SA
EXEC EDW_History.dbo.sp_changedbowner @loginame = N'SA', @map = false;
GO
--Change the recovery model to BULK_LOGGED
ALTER DATABASE EDW_History SET RECOVERY SIMPLE;
GO


IF EXISTS
(
    SELECT name
    FROM sys.databases
    WHERE name = N'EDW_History_Archive'
)
BEGIN
    -- Close connections to the EDW_History_Archive database
    ALTER DATABASE EDW_History_Archive
    SET SINGLE_USER
    WITH ROLLBACK IMMEDIATE;
    DROP DATABASE EDW_History_Archive;
END;
GO
-- Create EDW_History database and log files
CREATE DATABASE EDW_History_Archive
ON PRIMARY
       (
           NAME = N'EDW_History_Archive',
           FILENAME = N'D:\Program Files\Microsoft SQL Server\MSSQL13.HNODWDEV\MSSQL\DATA\EDW_History_Archive.mdf',
           SIZE = 10MB,
           MAXSIZE = 1GB,
           FILEGROWTH = 10MB
       )
LOG ON
    (
        NAME = N'EDW_History_Archive_log',
        FILENAME = N'D:\Program Files\Microsoft SQL Server\MSSQL13.HNODWDEV\MSSQL\DATA\EDW_History_Archive_log.ldf',
        SIZE = 1MB,
        MAXSIZE = 1GB,
        FILEGROWTH = 10MB
    );
GO
--Assign database ownership to login SA
EXEC EDW_History_Archive.dbo.sp_changedbowner @loginame = N'SA',
                                              @map = false;
GO
--Change the recovery model to BULK_LOGGED
ALTER DATABASE EDW_History_Archive SET RECOVERY SIMPLE;
GO


/*========================================================================================================
STEP 2
Create 'testapp' schema on all 4 databases created in Step 1
========================================================================================================*/
IF OBJECT_ID('tempdb..##dbs ') IS NOT NULL
BEGIN
    DROP TABLE ##dbs;
END;
CREATE TABLE ##dbs
(
    db VARCHAR(128),
    dbid SMALLINT
);
INSERT INTO ##dbs
(
    db,
    dbid
)
SELECT name,
       database_id
FROM sys.databases;

EXEC dbo.sp_MSforeachdb @command1 = 'IF DB_ID(''?'') in (SELECT dbid from ##dbs where db in(''EDW_Landing'', ''EDW_Staging'',''EDW_History'', ''EDW_History_Archive'')) BEGIN USE ? EXEC(''CREATE SCHEMA testapp'') END';


/*========================================================================================================
STEP 3
Create three tables - Table1, Table2 & Table3 across all 4 databases on the testapp schema.
Note: Depending on which database each table is created, its schema may vary slightly.
========================================================================================================*/
USE EDW_Landing;
GO
CREATE TABLE testapp.Table1
(
    id INT NOT NULL,
    transaction_key UNIQUEIDENTIFIER NOT NULL,
    sale_price DECIMAL(10, 2) NOT NULL,
    customer_id INT NOT NULL,
    sale_datetime DATETIME NOT NULL,
    etl_batch_datetime DATETIME2 NOT NULL,
    etl_event_datetime DATETIME2 NOT NULL,
    etl_cdc_operation VARCHAR(56) NOT NULL,
    etl_row_id INT IDENTITY(1, 1) NOT NULL,
    CONSTRAINT pk_testapp_table1_id
        PRIMARY KEY CLUSTERED (id ASC)
        WITH (PAD_INDEX = OFF, STATISTICS_NORECOMPUTE = OFF, IGNORE_DUP_KEY = OFF, ALLOW_ROW_LOCKS = ON,
              ALLOW_PAGE_LOCKS = ON
             ) ON [PRIMARY]
) ON [PRIMARY];


USE EDW_Landing;
GO
CREATE TABLE testapp.Table2
(
    id INT NOT NULL,
    transaction_key UNIQUEIDENTIFIER NOT NULL,
    sale_price DECIMAL(10, 2) NOT NULL,
    customer_id INT NOT NULL,
    sale_datetime DATETIME NOT NULL,
    etl_Batch_datetime DATETIME2 NOT NULL,
    etl_Event_datetime DATETIME2 NOT NULL,
    etl_cdc_operation VARCHAR(56) NOT NULL,
    etl_row_id INT IDENTITY(1, 1) NOT NULL,
    CONSTRAINT pk_testapp_table2_id
        PRIMARY KEY CLUSTERED (id ASC)
        WITH (PAD_INDEX = OFF, STATISTICS_NORECOMPUTE = OFF, IGNORE_DUP_KEY = OFF, ALLOW_ROW_LOCKS = ON,
              ALLOW_PAGE_LOCKS = ON
             ) ON [PRIMARY]
) ON [PRIMARY];


USE EDW_Landing;
GO
CREATE TABLE testapp.Table3
(
    id INT NOT NULL,
    transaction_key UNIQUEIDENTIFIER NOT NULL,
    sale_price DECIMAL(10, 2) NOT NULL,
    customer_id INT NOT NULL,
    sale_datetime DATETIME NOT NULL,
    etl_batch_datetime DATETIME2 NOT NULL,
    etl_event_dateTime DATETIME2 NOT NULL,
    etl_cdc_operation VARCHAR(56) NOT NULL,
    etl_row_id INT IDENTITY(1, 1) NOT NULL,
    CONSTRAINT pk_testapp_table3_id
        PRIMARY KEY CLUSTERED (id ASC)
        WITH (PAD_INDEX = OFF, STATISTICS_NORECOMPUTE = OFF, IGNORE_DUP_KEY = OFF, ALLOW_ROW_LOCKS = ON,
              ALLOW_PAGE_LOCKS = ON
             ) ON [PRIMARY]
) ON [PRIMARY];


USE EDW_Staging;
GO
CREATE TABLE testapp.Table1
(
    id INT NULL,
    transaction_key UNIQUEIDENTIFIER NULL,
    sale_price DECIMAL(10, 2) NULL,
    customer_id INT NULL,
    sale_datetime DATETIME NULL,
    etl_batch_datetime DATETIME2 NOT NULL,
    etl_event_datetime DATETIME2 NOT NULL,
    etl_cdc_operation VARCHAR(56) NOT NULL,
    etl_row_id INT IDENTITY(1, 1) NOT NULL,
    etl_hash_full_record VARCHAR(512)
) ON [PRIMARY];


USE EDW_Staging;
GO
CREATE TABLE testapp.Table2
(
    id INT NULL,
    transaction_key UNIQUEIDENTIFIER NULL,
    sale_price DECIMAL(10, 2) NULL,
    customer_id INT NULL,
    sale_datetime DATETIME NULL,
    etl_batch_datetime DATETIME2 NOT NULL,
    etl_event_datetime DATETIME2 NOT NULL,
    etl_cdc_operation VARCHAR(56) NOT NULL,
    etl_row_id INT IDENTITY(1, 1) NOT NULL,
    etl_hash_full_record VARCHAR(512)
) ON [PRIMARY];


USE EDW_Staging;
GO
CREATE TABLE testapp.Table3
(
    id INT NULL,
    transaction_key UNIQUEIDENTIFIER NULL,
    sale_price DECIMAL(10, 2) NULL,
    customer_id INT NULL,
    sale_datetime DATETIME NULL,
    etl_batch_datetime DATETIME2 NOT NULL,
    etl_event_datetime DATETIME2 NOT NULL,
    etl_cdc_operation VARCHAR(56) NOT NULL,
    etl_row_id INT IDENTITY(1, 1) NOT NULL,
    etl_hash_full_record VARCHAR(512)
) ON [PRIMARY];


USE EDW_History;
GO
CREATE TABLE testapp.Table1
(
    hist_testapp_table1_sk CHAR(40) NOT NULL,
    id INT NULL,
    transaction_key UNIQUEIDENTIFIER NULL,
    sale_price DECIMAL(10, 2) NULL,
    customer_id INT NULL,
    sale_datetime DATETIME NULL,
    etl_batch_datetime DATETIME2 NOT NULL,
    etl_event_datetime DATETIME2 NOT NULL,
    etl_cdc_operation VARCHAR(56) NOT NULL,
    etl_row_id INT NOT NULL,
    etl_hash_full_record VARCHAR(512) NOT NULL,
    CONSTRAINT pk_hist_testapp_table1
        PRIMARY KEY CLUSTERED (
                                  hist_testapp_table1_sk DESC,
                                  etl_event_datetime ASC,
                                  etl_row_id ASC
                              )
        WITH (PAD_INDEX = OFF, STATISTICS_NORECOMPUTE = OFF, IGNORE_DUP_KEY = OFF, ALLOW_ROW_LOCKS = ON,
              ALLOW_PAGE_LOCKS = ON, FILLFACTOR = 90
             ) ON [PRIMARY]
) ON [PRIMARY];
GO


USE EDW_History;
GO
CREATE TABLE testapp.Table2
(
    hist_testapp_table2_sk CHAR(40) NOT NULL,
    id INT NULL,
    transaction_key UNIQUEIDENTIFIER NULL,
    sale_price DECIMAL(10, 2) NULL,
    customer_id INT NULL,
    sale_datetime DATETIME NULL,
    etl_batch_datetime DATETIME2 NOT NULL,
    etl_event_datetime DATETIME2 NOT NULL,
    etl_cdc_operation VARCHAR(56) NOT NULL,
    etl_row_id INT NOT NULL,
    etl_hash_full_record VARCHAR(512) NOT NULL,
    CONSTRAINT pk_hist_testapp_table2
        PRIMARY KEY CLUSTERED (
                                  hist_testapp_table2_sk DESC,
                                  etl_event_datetime ASC,
                                  etl_row_id ASC
                              )
        WITH (PAD_INDEX = OFF, STATISTICS_NORECOMPUTE = OFF, IGNORE_DUP_KEY = OFF, ALLOW_ROW_LOCKS = ON,
              ALLOW_PAGE_LOCKS = ON, FILLFACTOR = 90
             ) ON [PRIMARY]
) ON [PRIMARY];
GO


USE EDW_History;
GO
CREATE TABLE testapp.Table3
(
    hist_testapp_table3_sk CHAR(40) NOT NULL,
    id INT NULL,
    transaction_key UNIQUEIDENTIFIER NULL,
    sale_price DECIMAL(10, 2) NULL,
    customer_id INT NULL,
    sale_datetime DATETIME NULL,
    etl_batch_datetime DATETIME2 NOT NULL,
    etl_event_datetime DATETIME2 NOT NULL,
    etl_cdc_operation VARCHAR(56) NOT NULL,
    etl_row_id INT NOT NULL,
    etl_hash_full_record VARCHAR(512) NOT NULL,
    CONSTRAINT pk_hist_testapp_table3
        PRIMARY KEY CLUSTERED (
                                  hist_testapp_table3_sk DESC,
                                  etl_event_datetime ASC,
                                  etl_row_id ASC
                              )
        WITH (PAD_INDEX = OFF, STATISTICS_NORECOMPUTE = OFF, IGNORE_DUP_KEY = OFF, ALLOW_ROW_LOCKS = ON,
              ALLOW_PAGE_LOCKS = ON, FILLFACTOR = 90
             ) ON [PRIMARY]
) ON [PRIMARY];
GO


USE EDW_History_Archive;
GO
CREATE TABLE testapp.Table1
(
    hist_testapp_table1_sk CHAR(40) NOT NULL,
    id INT NULL,
    transaction_key UNIQUEIDENTIFIER NULL,
    sale_price DECIMAL(10, 2) NULL,
    customer_id INT NULL,
    sale_datetime DATETIME NULL,
    etl_batch_datetime DATETIME2 NOT NULL,
    etl_event_datetime DATETIME2 NOT NULL,
    etl_cdc_operation VARCHAR(56) NOT NULL,
    etl_row_id INT NOT NULL,
    etl_hash_full_record VARCHAR(512) NOT NULL,
    CONSTRAINT pk_hist_testapp_table1
        PRIMARY KEY CLUSTERED (
                                  hist_testapp_table1_sk DESC,
                                  etl_event_datetime ASC,
                                  etl_row_id ASC
                              )
        WITH (PAD_INDEX = OFF, STATISTICS_NORECOMPUTE = OFF, IGNORE_DUP_KEY = OFF, ALLOW_ROW_LOCKS = ON,
              ALLOW_PAGE_LOCKS = ON, FILLFACTOR = 90
             ) ON [PRIMARY]
) ON [PRIMARY];
GO


USE EDW_History_Archive;
GO
CREATE TABLE testapp.Table2
(
    hist_testapp_table2_sk CHAR(40) NOT NULL,
    id INT NULL,
    transaction_key UNIQUEIDENTIFIER NULL,
    sale_price DECIMAL(10, 2) NULL,
    customer_id INT NULL,
    sale_datetime DATETIME NULL,
    etl_batch_datetime DATETIME2 NOT NULL,
    etl_event_datetime DATETIME2 NOT NULL,
    etl_cdc_operation VARCHAR(56) NOT NULL,
    etl_row_id INT NOT NULL,
    etl_hash_full_record VARCHAR(512) NOT NULL,
    CONSTRAINT pk_hist_testapp_table2
        PRIMARY KEY CLUSTERED (
                                  hist_testapp_table2_sk DESC,
                                  etl_event_datetime ASC,
                                  etl_row_id ASC
                              )
        WITH (PAD_INDEX = OFF, STATISTICS_NORECOMPUTE = OFF, IGNORE_DUP_KEY = OFF, ALLOW_ROW_LOCKS = ON,
              ALLOW_PAGE_LOCKS = ON, FILLFACTOR = 90
             ) ON [PRIMARY]
) ON [PRIMARY];
GO


USE EDW_History_Archive;
GO
CREATE TABLE testapp.Table3
(
    hist_testapp_table3_sk CHAR(40) NOT NULL,
    id INT NULL,
    transaction_key UNIQUEIDENTIFIER NULL,
    sale_price DECIMAL(10, 2) NULL,
    customer_id INT NULL,
    sale_datetime DATETIME NULL,
    etl_batch_datetime DATETIME2 NOT NULL,
    etl_event_datetime DATETIME2 NOT NULL,
    etl_cdc_operation VARCHAR(56) NOT NULL,
    etl_row_id INT NOT NULL,
    etl_hash_full_record VARCHAR(512) NOT NULL,
    CONSTRAINT pk_hist_testapp_table3
        PRIMARY KEY CLUSTERED (
                                  hist_testapp_table3_sk DESC,
                                  etl_event_datetime ASC,
                                  etl_row_id ASC
                              )
        WITH (PAD_INDEX = OFF, STATISTICS_NORECOMPUTE = OFF, IGNORE_DUP_KEY = OFF, ALLOW_ROW_LOCKS = ON,
              ALLOW_PAGE_LOCKS = ON, FILLFACTOR = 90
             ) ON [PRIMARY]
) ON [PRIMARY];
GO


/*========================================================================================================
STEP 4
Seed EDW_Landing database with dummy data
========================================================================================================*/
USE EDW_Landing;
GO
DECLARE @dt DATETIME = SYSDATETIME();
DECLARE @ct INT;
SET @ct = 0;
WHILE @ct < 1000
BEGIN
    INSERT INTO testapp.Table1
    (
        id,
        transaction_key,
        sale_price,
        customer_id,
        sale_datetime,
        etl_batch_datetime,
        etl_event_datetime,
        etl_cdc_operation
    )
    SELECT @ct + 1,
           CONVERT(VARCHAR(255), NEWID()),
           ROUND(RAND(CHECKSUM(NEWID())) * (100), 2),
           CAST(RAND() * 1000000 AS INT),
           DATEADD(DAY, (ABS(CHECKSUM(NEWID())) % 3650) * -1, GETDATE()),
           @dt,
           SYSDATETIME(),
           'Insert';

    INSERT INTO testapp.Table2
    (
        id,
        transaction_key,
        sale_price,
        customer_id,
        sale_datetime,
        etl_batch_datetime,
        etl_event_datetime,
        etl_cdc_operation
    )
    SELECT @ct + 1,
           CONVERT(VARCHAR(255), NEWID()),
           ROUND(RAND(CHECKSUM(NEWID())) * (100), 2),
           CAST(RAND() * 1000000 AS INT),
           DATEADD(DAY, (ABS(CHECKSUM(NEWID())) % 3650) * -1, GETDATE()),
           @dt,
           SYSDATETIME(),
           'Insert';

    INSERT INTO testapp.Table3
    (
        id,
        transaction_key,
        sale_price,
        customer_id,
        sale_datetime,
        etl_batch_datetime,
        etl_event_datetime,
        etl_cdc_operation
    )
    SELECT @ct + 1,
           CONVERT(VARCHAR(255), NEWID()),
           ROUND(RAND(CHECKSUM(NEWID())) * (100), 2),
           CAST(RAND() * 1000000 AS INT),
           DATEADD(DAY, (ABS(CHECKSUM(NEWID())) % 3650) * -1, GETDATE()),
           @dt,
           SYSDATETIME(),
           'Insert';
    SET @ct = @ct + 1;
END;


SELECT t.TABLE_CATALOG,
       t.TABLE_SCHEMA,
       t.TABLE_NAME,
       c.COLUMN_NAME,
       c.IS_NULLABLE,
       c.DATA_TYPE,
       c.ORDINAL_POSITION,
       c.CHARACTER_MAXIMUM_LENGTH
FROM EDW_Landing.INFORMATION_SCHEMA.TABLES t
    JOIN EDW_Landing.INFORMATION_SCHEMA.COLUMNS c
        ON t.TABLE_SCHEMA = c.TABLE_SCHEMA
           AND t.TABLE_CATALOG = c.TABLE_CATALOG
           AND t.TABLE_NAME = c.TABLE_NAME
WHERE c.TABLE_NAME = 'Table1';

SELECT TOP 5
       *
FROM EDW_Landing.testapp.Table1;
Once executed (allowing for any environment adjustments on your side), all four databases should be present on the instance and three tables containing dummy data created on each of those. I will not go over the source to target data acquisition part as I have already covered a few different methods and frameworks which may be used for this purpose, mainly HERE and HERE. Therefore, assuming our data has already been copied across in its raw form into EDW_Landing database, let’s focus on how to we can utilise this framework to reconcile row-level changes across all tables using this methodology.
This architecture can be used across many different scenarios but it is most applicable in cases where the source table does not have a reliable method to determine which records have undergone changes since the previous execution of this process, therefore making it the Data Warehouse responsibility to derive the delta. By design, this architecture accomplishes this by comparing the current source data set with the previous snapshot as maintained in the Data Lake by executing full outer join between the source data set and the equivalent copy of the data in the Data Lake (EDW_History database). Any deleted records i.e. keys which exists in EDW_History tables but do not exists in the source will be merged into the EDW_Staging dataset with the CDC operation field value set to ‘D’ (delete). The following diagram depicts the pattern used to derive all changes across source and target data sets based on hashed keys comparison (click on image to enlarge).
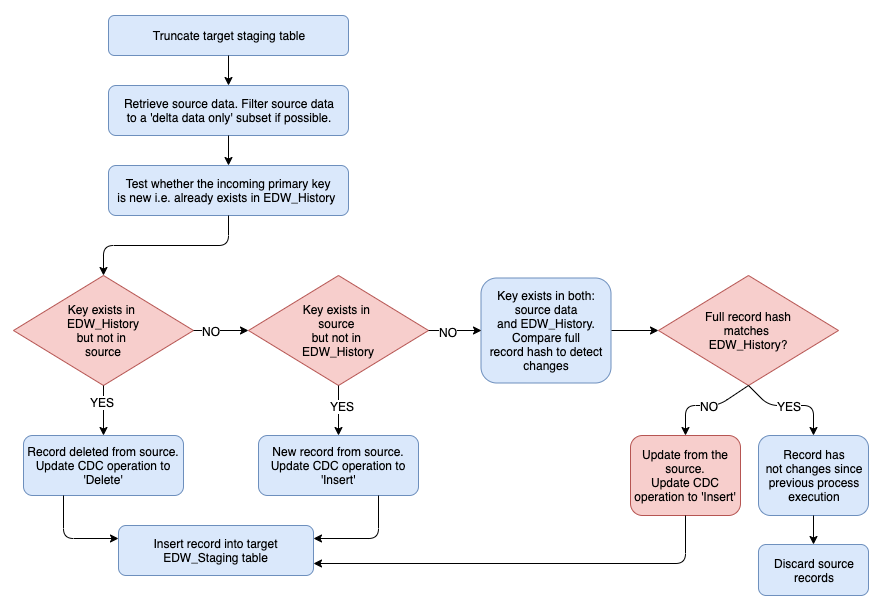
What is important to notice is the way record-level comparison is accomplished. On larger datasets e.g. over 100 million rows, comparing each value in each column across all records would yield significant performance issues. To speed up values matching across source and target data sets, a hash key is computed, concatenating all values in the tuple and hashing those to a single block of bytes using HASHBYTES() SQL Server function. Comparing hashed values in a single column (especially when indexed) makes for an easy and flexible way of comparing large datasets quickly. The following code depicts the actual implementation of this architecture, comparing EDW_Landing data with the EDW_History data and staging changed data in EDW_Staging database based on the environment and data created by the previous script.
;WITH lnd
AS (SELECT id,
           transaction_key,
           sale_price,
           customer_id,
           sale_datetime,
           etl_batch_datetime,
           CAST(ROW_NUMBER() OVER (PARTITION BY id ORDER BY etl_event_datetime, etl_row_id) AS INT) AS source_row_number,
           CONVERT(
                      VARCHAR(40),
                      HASHBYTES(
                                   'SHA1',
                                   UPPER(ISNULL(RTRIM(CONVERT(VARCHAR(200), transaction_key)), 'NA') + '|'
                                         + ISNULL(RTRIM(CONVERT(VARCHAR(20), sale_price)), 'NA') + '|'
                                         + ISNULL(RTRIM(CONVERT(NVARCHAR(100), customer_id)), 'NA') + '|'
                                         + ISNULL(RTRIM(CONVERT(VARCHAR(20), id)), 'NA')
                                         + ISNULL(RTRIM(CONVERT(VARCHAR(20), etl_cdc_operation)), 'NA') + '|' + '|'
                                        )
                               ),
                      2
                  ) AS etl_hash_full_record
    FROM EDW_Landing.testapp.Table1),
      hist
AS (SELECT hist.id,
           hist.transaction_key,
           hist.sale_price,
           hist.customer_id,
           hist.sale_datetime,
           hist.etl_hash_full_record,
           CONVERT(
                      VARCHAR(40),
                      HASHBYTES(
                                   'SHA1',
                                   UPPER(ISNULL(RTRIM(CONVERT(VARCHAR(200), hist.transaction_key)), 'NA') + '|'
                                         + ISNULL(RTRIM(CONVERT(VARCHAR(20), hist.sale_price)), 'NA') + '|'
                                         + ISNULL(RTRIM(CONVERT(NVARCHAR(100), hist.customer_id)), 'NA')
                                         + ISNULL(RTRIM(CONVERT(VARCHAR(20), hist.id)), 'NA')
                                         + ISNULL(RTRIM(CONVERT(VARCHAR(20), 'Delete')), 'NA') + '|' + '|'
                                        )
                               ),
                      2
                  ) AS etl_hash_full_record_delete
    FROM EDW_History.testapp.Table1 hist
        JOIN
        (
            SELECT id,
                   MAX(etl_event_datetime) AS etl_event_datetime
            FROM EDW_History.testapp.Table1
            GROUP BY id
        ) sub
            ON hist.id = sub.id
               AND hist.etl_event_datetime = sub.etl_event_datetime)
INSERT INTO EDW_Staging.testapp.Table1
(
    id,
    transaction_key,
    sale_price,
    customer_id,
    sale_datetime,
    etl_batch_datetime,
    etl_event_datetime,
    etl_cdc_operation,
    etl_hash_full_record
)
SELECT COALESCE(lnd.id, hist.id),
       COALESCE(lnd.transaction_key, hist.transaction_key),
       COALESCE(lnd.sale_price, hist.sale_price),
       COALESCE(lnd.customer_id, hist.customer_id),
       COALESCE(lnd.sale_datetime, hist.sale_datetime),
       COALESCE(lnd.etl_batch_datetime, GETDATE()),
       GETDATE(),
       CASE
           WHEN lnd.id IS NOT NULL THEN
               'Insert'
           WHEN hist.id IS NOT NULL THEN
               'Delete'
           ELSE
               NULL
       END,
       COALESCE(lnd.etl_hash_full_record, hist.etl_hash_full_record_delete)
FROM lnd
    FULL OUTER JOIN hist
        ON lnd.id = hist.id
WHERE hist.id IS NULL
      OR lnd.id IS NULL
      OR hist.etl_hash_full_record <> lnd.etl_hash_full_record;
Once newly arrived or changed data has been staged in EDW_Staging database we can move it to EDW_History database. As EDW_Staging database is truncated every time a load is executed, EDW_History is responsible for storing the most current version of the data along with EDW_History_Archive which is used for persisting of all previous versions of the record. As with the previous pattern of loading EDW_Staging database, history is derived based on hash keys comparison for any changed records as well as hash and primary keys comparison for new data. The following diagram depicts the change detection pattern used in populating EDW_History database.
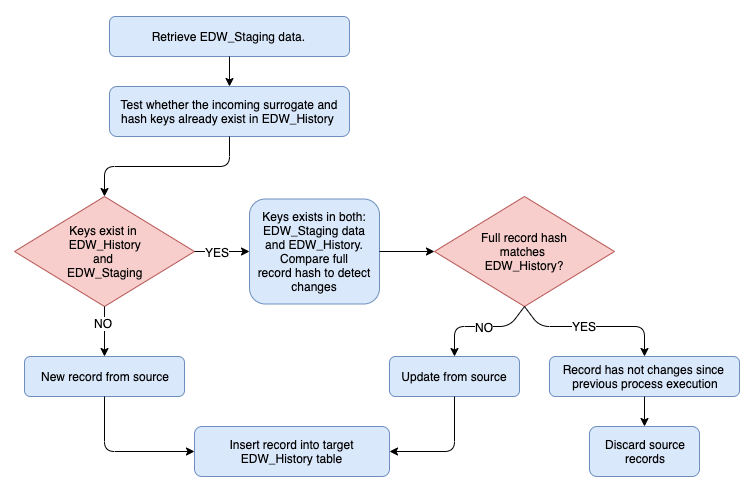
Looking at how this architecture can be achieved using SQL on the dummy data which was created previously, the following script implements historical data loading into EDW_History database.
;WITH stg
AS (SELECT CONVERT(VARCHAR(40), HASHBYTES('SHA1', ISNULL(RTRIM(CONVERT(VARCHAR(MAX), id)), 'NA')), 2) AS stg_testapp_table1_sk,
           transaction_key,
           sale_price,
           customer_id,
           sale_datetime,
           etl_batch_datetime,
           etl_hash_full_record,
           etl_event_datetime,
           etl_cdc_operation,
           id,
           CAST(ROW_NUMBER() OVER (PARTITION BY id ORDER BY etl_event_datetime, etl_row_id) AS INT) AS rn
    FROM EDW_Staging.testapp.Table1),
      hist
AS (SELECT hist.hist_testapp_table1_sk,
           hist.etl_event_datetime,
           hist.etl_hash_full_record,
           hist.etl_row_id
    FROM EDW_History.testapp.Table1 hist
        INNER JOIN EDW_Staging.testapp.Table1 stg
            ON hist.id = stg.id)
INSERT INTO EDW_History.testapp.Table1
(
    hist_testapp_table1_sk,
    id,
    transaction_key,
    sale_price,
    customer_id,
    sale_datetime,
    etl_batch_datetime,
    etl_event_datetime,
    etl_cdc_operation,
    etl_hash_full_record,
    etl_row_id
)
SELECT stg.stg_testapp_table1_sk,
       stg.id,
       stg.transaction_key,
       stg.sale_price,
       stg.customer_id,
       stg.sale_datetime,
       stg.etl_batch_datetime,
       stg.etl_event_datetime,
       stg.etl_cdc_operation,
       stg.etl_hash_full_record,
       stg.rn
FROM stg
    LEFT JOIN hist
        ON stg.stg_testapp_table1_sk = hist.hist_testapp_table1_sk
           AND stg.etl_event_datetime = hist.etl_event_datetime
WHERE hist.hist_testapp_table1_sk IS NULL
      OR hist.etl_hash_full_record IS NULL
UNION ALL
SELECT stg.stg_testapp_table1_sk,
       stg.id,
       stg.transaction_key,
       stg.sale_price,
       stg.customer_id,
       stg.sale_datetime,
       stg.etl_batch_datetime,
       stg.etl_event_datetime,
       stg.etl_cdc_operation,
       stg.etl_hash_full_record,
       stg.rn
FROM stg
    JOIN hist
        ON stg.stg_testapp_table1_sk = hist.hist_testapp_table1_sk
           AND stg.etl_event_datetime = hist.etl_event_datetime
WHERE stg.etl_hash_full_record <> hist.etl_hash_full_record;
Finally, the last piece of the puzzle is to archive off all historised data into its own dedicated database – EDW_History_Archive – which stores all previous version of the record. Using a dedicated database for this ensures that current version of the data in EDW_History stays lean and is easy to query to get the most up-to-date information without the need to filter data based on dates or flags indicating record currency. EDW_History_Archive is designed to house all previous record versions based on changes introduced.
To achieve this, we will need to do it as a two-stage process i.e. insert data into EDW_History_Archive database and delete any non-current record from EDW_History database. The following diagram and SQL code depicts the logic used for this process.
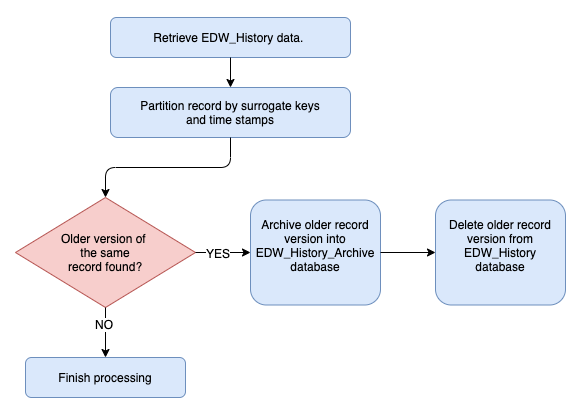
INSERT INTO EDW_History_Archive.testapp.Table1
(
    hist_testapp_table1_sk,
    id,
    transaction_key,
    sale_price,
    customer_id,
    sale_datetime,
    etl_batch_datetime,
    etl_event_datetime,
    etl_cdc_operation,
    etl_hash_full_record,
    etl_row_id
)
SELECT hist.hist_testapp_table1_sk,
       hist.id,
       hist.transaction_key,
       hist.sale_price,
       hist.customer_id,
       hist.sale_datetime,
       hist.etl_batch_datetime,
       hist.etl_event_datetime,
       hist.etl_cdc_operation,
       hist.etl_hash_full_record,
       hist.etl_row_id
FROM EDW_History.testapp.Table1 hist
    INNER JOIN
    (
        SELECT B.hist_testapp_table1_sk,
               B.etl_event_datetime AS max_etl_event_datetime,
               B.etl_row_id AS max_etl_row_id,
               ROW_NUMBER() OVER (PARTITION BY B.hist_testapp_table1_sk
                                  ORDER BY B.etl_event_datetime DESC,
                                           B.etl_row_id DESC
                                 ) AS row_no
        FROM EDW_History.testapp.Table1 B
            INNER JOIN EDW_Staging.testapp.Table1 STG
                ON B.id = STG.id
                   AND B.etl_event_datetime = STG.etl_event_datetime
                   AND B.etl_row_id = STG.etl_row_id
    ) z
        ON hist.hist_testapp_table1_sk = z.hist_testapp_table1_sk
           AND CONCAT(hist.etl_event_datetime, hist.etl_row_id) <> CONCAT(z.max_etl_event_datetime, z.max_etl_row_id)
           AND z.row_no = 1;

DELETE hist
FROM EDW_History.testapp.Table1 hist
    INNER JOIN
    (
        SELECT B.hist_testapp_table1_sk,
               B.etl_event_datetime AS max_etl_event_datetime,
               B.etl_row_id AS max_etl_row_id,
               ROW_NUMBER() OVER (PARTITION BY B.hist_testapp_table1_sk
                                  ORDER BY B.etl_event_datetime DESC,
                                           B.etl_row_id DESC
                                 ) AS row_no
        FROM EDW_History.testapp.Table1 B
            INNER JOIN EDW_Staging.testapp.Table1 stg
                ON B.id = stg.id
                   AND B.etl_event_datetime = stg.etl_event_datetime
                   AND B.etl_row_id = stg.etl_row_id
    ) z
        ON hist.hist_testapp_table1_sk = z.hist_testapp_table1_sk
           AND CONCAT(hist.etl_event_datetime, hist.etl_row_id) <> CONCAT(z.max_etl_event_datetime, z.max_etl_row_id)
           AND z.row_no = 1;
In order to merge historical data (EDW_History_Archive) as well as the most current record (EDW_History), we can UNION same objects based on a combination of keys and ids e.g. if we require to expose the full transactional history of a record which has undergone changes (updates, deletes) than we can combine its surrogate key with the business key (in case of Table1 dummy data these are hist_testapp_table1_sk and id) and optionally sort it by etl_batch_datetime to view its lifecycle across the history.
Now that we have the conceptual understanding of how this paradigm can be applied to ‘data lake’ creation, it is worth highlighting that all the scripts depicting the above architecture can be fully managed via the metadata-driven design. Rather than hard-coding all objects’ and attributes’ names, we can build those queries on the fly based on SQL Server metadata stored across its system catalog schema views and tables. As with any data warehouse design robust enough to respond to schema and data changes with little interference from developers, most simple logic following designated patterns should be derived from the information saved in the data store itself. With that approach, we can create a simple looping mechanism to run the metadata-based queries for each stage of the process, for each object being processed. Below is a sample code which builds the query used in populating EDW_Staging database (as per the SQL above) on the fly. We can then take this code and execute it inside a stored procedure or an ETL job without the need of hard-coding anything besides the names of the databases used (not bound to value changes).
IF OBJECT_ID('tempdb..##t_metadata') IS NOT NULL
BEGIN
DROP TABLE ##t_metadata;
END;
CREATE TABLE tempdb..##t_metadata
(
db_name VARCHAR(256),
table_name VARCHAR(256),
column_name VARCHAR(256),
schema_name VARCHAR(128),
ordinal_position INT,
is_nullable BIT,
data_type VARCHAR(256),
character_maximum_length BIGINT,
numeric_scale SMALLINT,
numeric_precision SMALLINT,
is_primary_key BIT,
cast_data_type VARCHAR(256)
);
DECLARE @command VARCHAR(MAX);
SELECT @command
= 'IF DB_ID(''?'') IN
(
SELECT dbid
FROM ##dbs
WHERE db IN ( ''EDW_Landing'',
''EDW_Staging'',
''EDW_History'',
''EDW_History_Archive'')
)
BEGIN
USE ?
EXEC(
''INSERT INTO ##t_metadata
(
db_name,
table_name,
column_name,
schema_name,
ordinal_position,
is_nullable,
data_type,
character_maximum_length,
numeric_scale,
numeric_precision,
is_primary_key,
cast_data_type
)
SELECT
DB_NAME() AS db_name,
t.name AS table_name ,
c.name AS column_name ,
ss.name as schema_name,
c.column_id AS ordinal_position ,
c.is_nullable ,
tp.name AS data_type ,
c.max_length AS character_maximum_length ,
c.scale AS numeric_scale ,
c.precision AS numeric_precision ,
ISNULL(idx.pk_flag,0) as ''''is_primary_key'''',
NULL AS cast_data_type
FROM sys.tables t
JOIN sys.columns c ON t.object_id = c.object_id
JOIN sys.types tp ON c.user_type_id = tp.user_type_id
JOIN sys.objects so ON so.object_id = t.object_id
JOIN sys.schemas ss ON so.schema_id = ss.schema_id
LEFT JOIN
(SELECT i.name as index_name,
i.is_primary_key as pk_flag,
OBJECT_NAME(ic.OBJECT_ID) AS table_name,
s.name AS schema_name,
COL_NAME(ic.OBJECT_ID,ic.column_id) AS column_name
FROM sys.indexes AS i
JOIN sys.index_columns AS ic
ON i.OBJECT_ID = ic.OBJECT_ID
AND i.index_id = ic.index_id
JOIN sys.objects o
ON o.object_id = i.object_id
JOIN sys.schemas s
ON o.schema_id = s.schema_id
WHERE i.is_primary_key = 1) idx
ON idx.table_name = t.name
AND idx.column_name = c.name
AND idx.schema_name = ss.name'')
END';
EXEC sp_MSforeachdb @command;
UPDATE ##t_metadata
SET cast_data_type = CASE
WHEN data_type IN ( 'char', 'varchar' ) THEN
CASE
WHEN character_maximum_length < 0 THEN
'VARCHAR (MAX)'
WHEN character_maximum_length <= 100 THEN
'VARCHAR (100)'
WHEN character_maximum_length > 100
AND character_maximum_length <= 1000 THEN
'VARCHAR (1000)'
WHEN character_maximum_length > 1000
AND character_maximum_length <= 4000 THEN
'VARCHAR (4000)'
WHEN character_maximum_length > 4000
AND character_maximum_length <= 8000 THEN
'VARCHAR (8000)'
ELSE
'VARCHAR (' + CAST(character_maximum_length AS VARCHAR(100)) + ')'
END
WHEN data_type IN ( 'nchar', 'nvarchar' ) THEN
CASE
WHEN character_maximum_length < 0 THEN
'NVARCHAR (MAX)'
WHEN character_maximum_length <= 100 THEN
'NVARCHAR (100)'
WHEN character_maximum_length > 100
AND character_maximum_length <= 1000 THEN
'NVARCHAR (1000)'
WHEN character_maximum_length > 1000
AND character_maximum_length <= 4000 THEN
'NVARCHAR (4000)'
WHEN character_maximum_length > 4000
AND character_maximum_length <= 8000 THEN
'NVARCHAR (8000)'
ELSE
'VARCHAR (' + CAST(character_maximum_length AS VARCHAR(100)) + ')'
END
WHEN data_type IN ( 'smalldatetime', 'datetime', 'datetime2', 'Timestamp' ) THEN
'VARCHAR(4000)'
WHEN data_type IN ( 'int', 'smallint', 'mediumint', 'tinyint', 'bit' ) THEN
'VARCHAR(4000)'
WHEN data_type IN ( 'bigint' ) THEN
'VARCHAR(4000)'
WHEN data_type IN ( 'decimal', 'number', 'float', 'real', 'numeric' ) THEN
'VARCHAR(4000)'
WHEN data_type IN ( 'uniqueidentifier' ) THEN
'VARCHAR(4000)'
WHEN data_type IN ( 'tinyblob' ) THEN
'VARCHAR(4000)'
WHEN data_type IN ( 'date' ) THEN
'VARCHAR(4000)'
WHEN data_type IN ( 'datetimeoffset' ) THEN
'VARCHAR(4000)'
WHEN data_type IN ( 'timestamp' ) THEN
'VARCHAR(4000)'
WHEN data_type IN ( 'long', 'long raw' ) THEN
'VARCHAR (MAX)'
WHEN data_type IN ( 'time' ) THEN
'VARCHAR(4000)'
ELSE
''
END;
IF OBJECT_ID('tempdb..##t_sql') IS NOT NULL
BEGIN
DROP TABLE ##t_sql;
END;
SELECT DISTINCT
t.table_name,
'WITH lnd AS ('
+ REVERSE(STUFF(
REVERSE('SELECT ' + STUFF(
(
SELECT ', ' + '[' + C.column_name + ']'
FROM ##t_metadata AS C
WHERE C.schema_name = t.schema_name
AND C.table_name = t.table_name
AND C.db_name = 'EDW_Landing'
ORDER BY C.ordinal_position
FOR XML PATH('')
),
1,
2,
''
) + ', CAST(ROW_NUMBER() OVER (PARTITION BY ' + a.column_name
+ ' ORDER BY
etl_event_datetime, etl_row_id) AS INT) AS source_row_number,
CONVERT(VARCHAR(40), HASHBYTES(''SHA1'', UPPER('
+ STUFF(
(
SELECT 'ISNULL(RTRIM(LTRIM(CONVERT(' + cast_data_type + ', ' + '[' + column_name
+ ']))), ''NA'') + ''|'' + '
FROM ##t_metadata z
WHERE z.table_name = t.table_name
AND z.db_name = 'EDW_Landing'
ORDER BY z.ordinal_position
FOR XML PATH('')
),
1,
0,
''
)
),
1,
8,
''
)
) + '+''|''+''|'')),2) AS etl_hash_full_record FROM EDW_Landing.' + t.schema_name + '.' + t.table_name
+ '),' AS lnd_query,
'hist AS ('
+ REVERSE(STUFF(
REVERSE('SELECT ' + STUFF(
(
SELECT ', ' + 'hist.[' + C.column_name + ']'
FROM ##t_metadata AS C
WHERE C.schema_name = t.schema_name
AND C.table_name = t.table_name
AND C.db_name = 'EDW_History'
ORDER BY C.ordinal_position
FOR XML PATH('')
),
1,
2,
''
) + ', CONVERT(VARCHAR(40),HASHBYTES(''SHA1'',UPPER('
+ STUFF(
(
SELECT 'ISNULL(RTRIM(LTRIM(CONVERT(' + cast_data_type + ', ' + 'hist.['
+ column_name + ']))), ''NA'') + ''|'' + '
FROM ##t_metadata z
WHERE z.table_name = t.table_name
AND z.db_name = 'EDW_History'
ORDER BY z.ordinal_position
FOR XML PATH('')
),
1,
0,
''
)
),
1,
8,
''
)
) + '+''|''+''|'')),2) AS etl_hash_full_record_delete
FROM EDW_History.' + t.schema_name + '.' + t.table_name
+ ' hist JOIN
(
SELECT id,
MAX(etl_event_datetime) AS etl_event_datetime
FROM EDW_History.' + t.schema_name + '.' + a.table_name
+ '
GROUP BY id
) sub
ON hist.' + a.column_name + ' = sub.' + a.column_name
+ '
AND hist.etl_event_datetime = sub.etl_event_datetime)' AS hist_query,
'INSERT INTO EDW_Staging.' + t.schema_name + '.' + t.table_name + ' ('
+ STUFF(
(
SELECT ', ' + '[' + C.column_name + ']'
FROM ##t_metadata AS C
WHERE C.schema_name = t.schema_name
AND C.table_name = t.table_name
AND C.column_name <> 'etl_row_id'
AND C.db_name = 'EDW_Staging'
ORDER BY C.ordinal_position
FOR XML PATH('')
),
1,
2,
''
) + ')' + ' SELECT '
+ STUFF(
(
SELECT CASE
WHEN C.column_name = 'etl_event_datetime' THEN
', GETDATE()'
WHEN C.column_name = 'etl_batch_datetime' THEN
', COALESCE(l.' + C.column_name + ', GETDATE())'
WHEN C.column_name = 'etl_cdc_operation' THEN
', CASE WHEN l.id IS NOT NULL THEN ''INSERT''
WHEN h.id IS NOT NULL THEN ''DELETE''
ELSE NULL
END'
ELSE
', ' + 'COALESCE(l.[' + C.column_name + '], h.[' + C.column_name + '])'
END
FROM ##t_metadata AS C
WHERE C.schema_name = t.schema_name
AND C.column_name <> 'etl_row_id'
AND C.table_name = t.table_name
AND C.db_name = 'EDW_Staging'
ORDER BY C.ordinal_position
FOR XML PATH('')
),
1,
2,
''
) + +' FROM lnd l
FULL OUTER JOIN hist h ON l.' + a.column_name + ' = h.' + a.column_name + '
WHERE h.' + a.column_name + ' IS NULL
OR l.' + a.column_name + ' IS NULL
OR h.etl_hash_full_record <> l.etl_hash_full_record;' AS insert_query
INTO ##t_sql
FROM ##t_metadata t
CROSS APPLY
(
SELECT DISTINCT
m.table_name,
m.column_name
FROM ##t_metadata m
WHERE m.table_name = t.table_name
AND m.column_name = t.column_name
AND m.is_primary_key = 1
AND m.db_name = 'EDW_Landing'
) a;
SELECT CONCAT(lnd_query, hist_query, insert_query) AS full_sql
FROM ##t_sql
ORDER BY table_name ASC;
Conclusion
So, there you go. A simple and efficient framework for designing and implementing a historised relational ‘data lake’ which can then be built upon to include virtual data marts with business-specific rules and definitions as well as a presentation layer for reporting needs.
In my personal experience as the information architect, the most mundane, exhaustive and repetitive activities I have seen most developers struggling with on any BI/analytics project were building data acquisitions pipelines and managing data’s history. Likewise, for most business trying to uplift their analytics capability through running data-related projects, those two tasks provide very little tangible value. By providing access to the integrated and historised data which any business can utilize to answer pressing questions and improve their competitive advantage in little time and with high accuracy, the need for meticulous, domain-specific modelling is diminished and users can start turning data into information with greater speed and efficiency.
It is also worth pointing out that I am not against data modelling in general as all the previously mentioned techniques and paradigms have greatly contributed to reducing risks, increasing performance and defining business processes through a set of concepts and rules tightly coupled to the models which reflect them. However, oftentimes, when organisations struggle with time-to-market and scope creep based on data complexities and the lack of structural independence and agility, it is worth exploring alternative approaches which may deliver 20% of functionality, yet providing 80% of value.
Posted in: Data Modelling, SQL, SQL Server
Tags: Data Modelling, Data Warehouse, SQL, SQL Server


Never thought Polybase could be used in this capacity and don't think Microsoft advertised this feature (off-loading DB data as…