How To Build A Data Mart Using Microsoft BI Stack Part 6 – Refining SSAS Data Warehouse Dimensions
In the PREVIOUS POST I started exploring the concept of using SQL Server Analysis Services as a storage engine for our dimensional data and outlined how to start building a simple SSAS project with Data Source View and SASS dimensions defined. In this post I will continue to refine our SSAS project and go over the concepts of the dimension properties and hierarchies that still require attention before cube creation and deployment process.
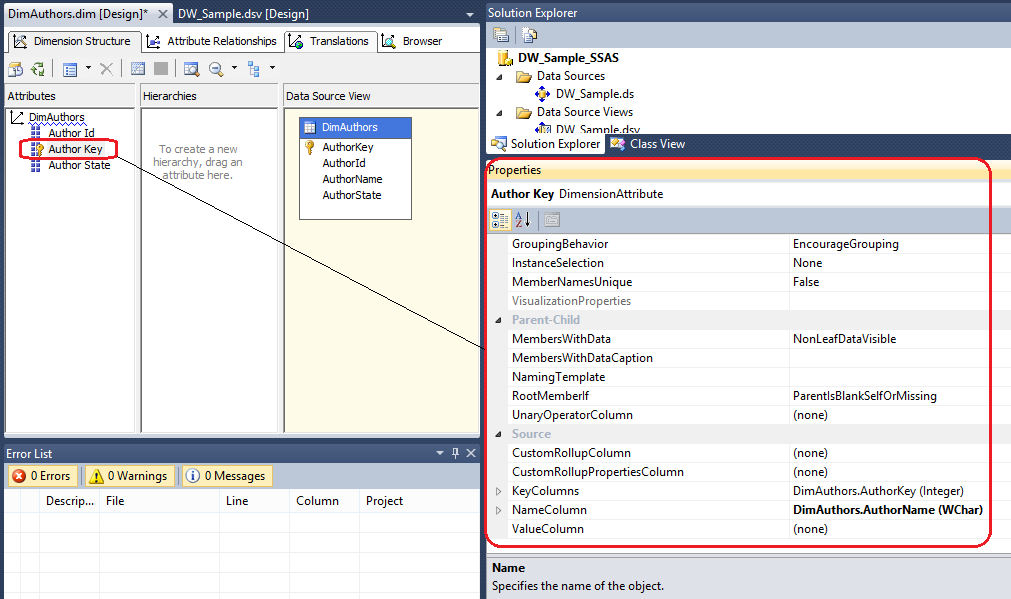
Now that we have our dimensions defined, we will continue with further configuration steps. First, a little bit of theory. Each dimension attribute has a set of properties defined against it which can be adjusted in the Properties pane (bottom-right corner).
The most commonly adjusted attributes are:
- KeyColumns – A collection of one or more columns uniquely identifying one row from another in the dimension tableName – The logical name of an attribute
- Name – The logical name of an attribute
- NameColumn – The values that are displayed in the client application when a particular attribute is selected
- Type – The type of data the attribute represents (for example, day, month, or year)
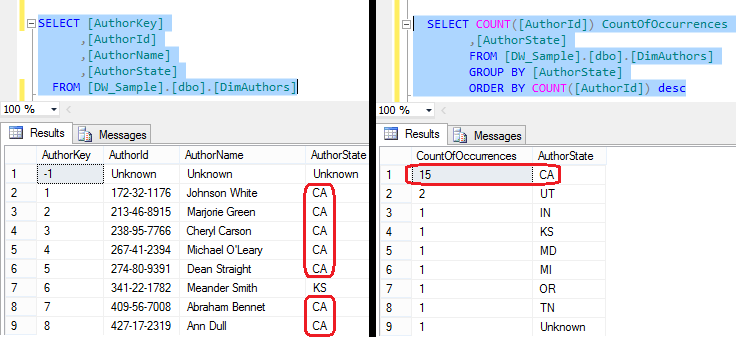
Another important concept when configuring dimensions is setting up hierarchies. When we first create a dimension, each of the attributes is independent of each other, but user hierarchies allow you to group attributes into one or more parent-child relationships. Each relationship forms a new level of the hierarchy and provides reporting software with a way to browse data as a collection of levels-based attributes. Let’s take a specific dimension’s data as an example (DimAuthors) and look at table content. The data coming from DimAuthors can be rolled up or down based on AuthorState column. The partial output from two different queries below shows that many authors can come from the same state, therefore there is a parent-child relationship between AuthorState attribute and AuthorID and AuthorName. This is good candidate for a hierarchy if end users would like to, for example, group SalesQuantity measure based state.
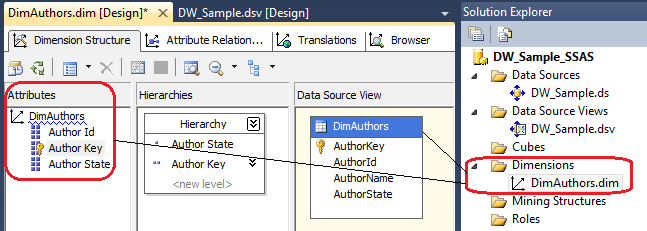
The act of creating a hierarchy is quite simple. All we do is drag and drop the attribute into the Hierarchies section, and the hierarchy will be created automatically. Below is an example of DimAuthors dimension with the hierarchy created based on AutorState and AuthorKey attributes.
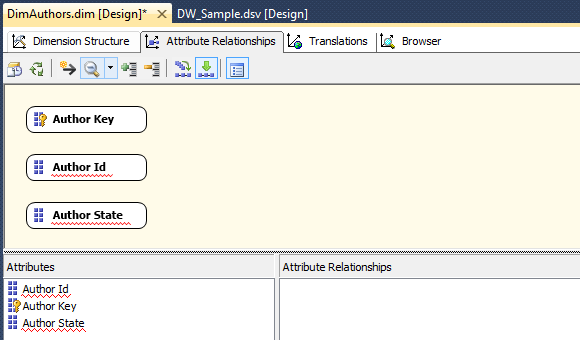
Once we finish defining hierarchies, we still need to create associations between attributes. If we go to Attribute Relationships pane (next to Dimension Structure) this is where we can set up the relationships between individual attributes. When you create a dimension with the wizard, it tries to implicitly map the relationships for you. But more often than not, we will have to adjust them ourselves. To adjust the relationships, begin by removing the incorrect ones on the Attribute Relationships tab. Next, locate the Attribute Relationships pane at the bottom portion of Visual Studio, highlight the existing relationships, right-click, and select Delete from the context menu. Once the relationships are removed, the Attribute Relationships tab will look as per image below, where the attributes are shown independent of each other.
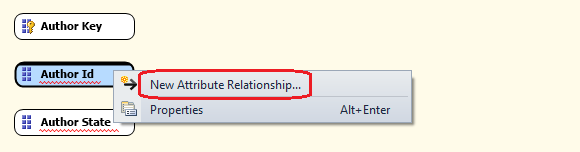
Now our job is to map the relationships correctly. A simple way to accomplish this is to right-click a child attribute and then click the New Attribute Relationship option from the context menu as per image below.
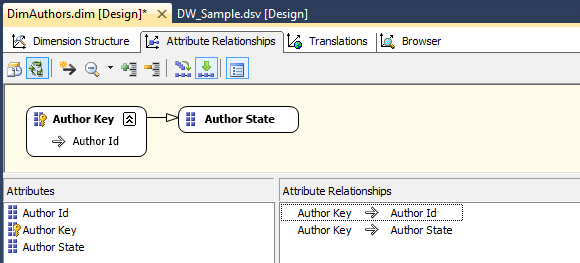
A new dialogue window will appear allowing you to map the relationship child to a parent. To map the relationship, we select the related attribute in the Name drop-down box and then determine whether the relationship is expected to change over time or whether it should be considered an inflexible (aka rigid) relationship. Clicking OK will configure the relationship. Next we can define associations so that the finished relationships pane will look as per below.
Coming back to the Dimension Structure pane we can see a blue squiggly line highlighting DimAuthors dimension name. This is because the implied individual hierarchy exists even after we create our own user-defined attribute hierarchies. In our example, we have three attributes and have added a user-defined hierarchy, so we now have four hierarchies total. Below image is a conceptual depiction of this concept.
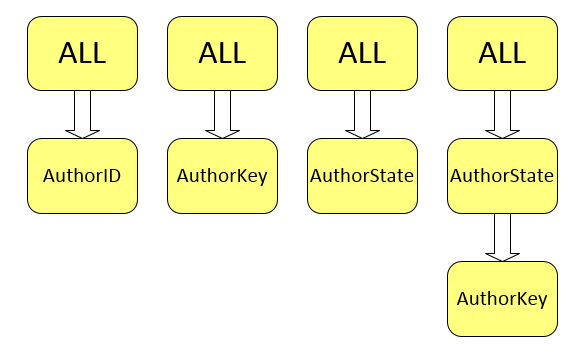
The attributes AuthorID, AuthorKey, and AuthorState still form their own hierarchical parent-child relationship with the All attribute. Microsoft calls these Attribute Hierarchies in contrast to the term User Hierarchies. Microsoft recommends hiding attribute hierarchies if you will not use them independently in your reporting applications. They can be hidden by setting the AttributeHierarchyVisible property to False, as per image below.
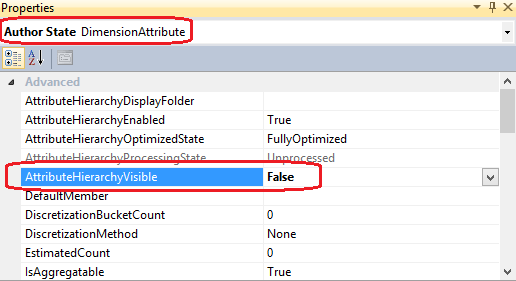
In that way in Microsoft Excel, the AuthorState and AuthorKey attributes will no longer be displayed independently of the AuthorState. This is Microsoft’s recommended approach, however, bear in mind that sometimes end users will prefer more options so hiding Attribute Hierarchies is not always recommended and you typically should proceed by what project requirements dictate versus application recommendations.
Finally, let’s step through all dimensions defined in previous posts to this series, configuring names, keys and hierarchies as per the document which you can access from HERE. It has all the necessary steps to configure this projects dimensions in order to create a cube.
This concludes this post. Most of the hard work is done and even though getting through all project aspects can be a bit of a toll, we nearly covered the key concepts and principles of how to build a data mart from scratch. As usual, the code used in this series as well as solution files for this SSAS project can be found and downloaded from HERE. In the NEXT ITERATION to the series I will be describing the concepts of SSAS solution deployment and cube creation as well as go through some basic validation techniques to ensure that our data mart has correct data in it before it can be reported out of.
Please also check other posts from this series:
- How To Build A Data Mart Using Microsoft BI Stack Part 1 – Introduction And OLTP Database Analysis
- How To Build A Data Mart Using Microsoft BI Stack Part 2 – OLAP Database Objects Modelling
- How To Build A Data Mart Using Microsoft BI Stack Part 3 – Data Mart Load Approach And Coding
- How To Build A Data Mart Using Microsoft BI Stack Part 4 – Data Mart Load Using SSIS
- How To Build A Data Mart Using Microsoft BI Stack Part 5 – Defining SSAS Project And Its Dimensions
- How To Build A Data Mart Using Microsoft BI Stack Part 7 – Cube Creation, Cube Deployment And Data Validation
- How To Build A Data Mart Using Microsoft BI Stack Part 8 – Creating Sample SSRS Report
All SQL code and solution files can be found and downloaded from HERE.
http://scuttle.org/bookmarks.php/pass?action=addThis entry was posted on Monday, September 16th, 2013 at 4:42 am and is filed under Data Modelling, How To's, SSAS. You can follow any responses to this entry through the RSS 2.0 feed. You can leave a response, or trackback from your own site.


Hello Kind of what I've been looking for - thanks for posting. I don't use Snowflake but gives me an…