Kicking the Tires on Airflow, Apache’s workflow management platform – Architecture Overview, Installation and sample Azure Cloud Deployment Pipeline in Python (Part 1)
Note: Part 2 can be found HERE and all files used in this tutorial can be downloaded from HERE.
Ever since I can remember, most of ETL or ELT jobs I was tasked with architecting and/or developing were based on batch processing. Nowadays, the trend is leaning heavily towards streaming or semi-real time processing where possible, but the complex nature of those systems and the relative immaturity of the ecosystems they promote still means that most business are reluctant to transition away from an old-school batch processing. The last few years have seen more of a Lambda deployment (hybrid of real-time and batch workloads) but most business requirements for data availability in SMB scenarios hardly go beyond ‘next day is fine’ approach. This, however, does not mean that the platforms themselves have not evolved and that the tooling around how these pipelines are structured have not moved on with time. Most GUI based applications e.g. SSIS, Pentaho, Talend etc. are evolving and morphing into cloud-first solutions and major vendors are launching new features to keep up with the insatiable need for speed of major cloud behemoths. Also, the design patterns and ways which ETL/ELT is architected is undergoing a major transformation, with code and configuration-based deployment taking over drag-and-drop and point-and-click applications. Graphical interface-based tools are arguably easier to debug but with a plethora of new data sources to integrate with, tools like Amazon’s Glue or Apache Airflow are slowly emerging as favourites with the new breed of data engineers and analytics-driven companies alike.
In spite of Airflow being only few years old (project was open-sourced in 2015), it has become Apache’s Top Level Project a year later, with over 1K contributors, 15K stars on Github and close to 10K commits. Airflow has been used successfully in production by both: countless number of smaller startups and big corporations alike (AirBnB, Slack, Square, Robinhood) and its popularity even kickstrated Google to create a managed version called Cloud Composer, running on GCP. Airflow’s versatility and flexibility also allows it to be used for workloads not associated with building ETL/ELT data pipelines e.g. automating DevOps operations, machine learning pipelines, scheduler replacement etc.
Some of the main reasons why Airflow has been gaining momentum across data engineering communities and is slowly superseding tools such as Apache Oozie or Luigi include the following:
- Airflow is dynamic – DAGs in Airflow are dynamic and flexible in nature. As Airflow pipelines are configured as code (Python), many knobs and switches are available to its developers and nearly any aspect of the pipeline development can be customised and tuned. Also, DAGs provide a nice abstraction to a series of operations
- Airflow is extensible – Airflow provides large number of operators and executors thus allowing any tasks (not just ETL) to be scheduled and executed. In case a specific operator/executor is not available out of the box, Airflow extensible architecture allows defining your own with relative ease
- Airflow is scalable – Airflow modular architecture, built-in provisions for configuring a choice of different message queueing systems and executors e.g. RabbitMQ, Celery, Dask, Mesos, multi-node cluster configuration and Kubernetes-based tasks execution model allow for tasks to be deployed and run across number of machines/VMs/containers. While Airflow is not designed to perform any computation itself and tasks can be executed in a sequential manner, Airflow is designed to spread the workloads and maximise computation resources availability
- Airflow has a good monitoring and management interface – Airflow provides a monitoring and managing interface, where it is possible to have a quick overview of the status of the different tasks, as well as have the possibility to trigger and clear tasks or DAGs runs
- Airflow is open source – due to the fact that Airflow is not a commercial product and Airflow’s community is very active, the tool receives a steady stream of updates and code contributions, further extending its functionality
Airflow Architecture
Apache Airflow is an open-source workflow management platform. It started at Airbnb in October 2014 as a solution to manage the company’s increasing complex workflows. Creating Airflow allowed Airbnb to programmatically author and schedule their workflows and monitor them via the built-in Airflow user interface. From the beginning, the project was made open source, becoming an Apache Incubator project in March 2016 and a Top-Level Apache Software Foundation project in January 2019.
Building on the popularity of Python as the de facto programming language for data, Airflow is written in Python and workflows are created via Python scripts. Airflow is designed under the principle of “configuration as code” where the Airflow scheduler periodically checks whether or not criteria for running tasks have been met, have other conditions for execution been met etc. according to the dependencies defined in directed acyclic graphs (DAGs). Once all criteria have been met, this fact is recorded in the database and Airflow worker pick up and run jobs with their loads properly balanced. Depending on the choice of setup this worker process can be a single process on a single machine, multiple processes on a single machine or multiple processes distributed across multiple machines. All job information is stored in the meta DB, which is updated in a timely manner. The users can monitor their jobs via a shiny Airflow web UI and/or the logs. A sample Airflow architecture with all its key components and services is as per the image below.

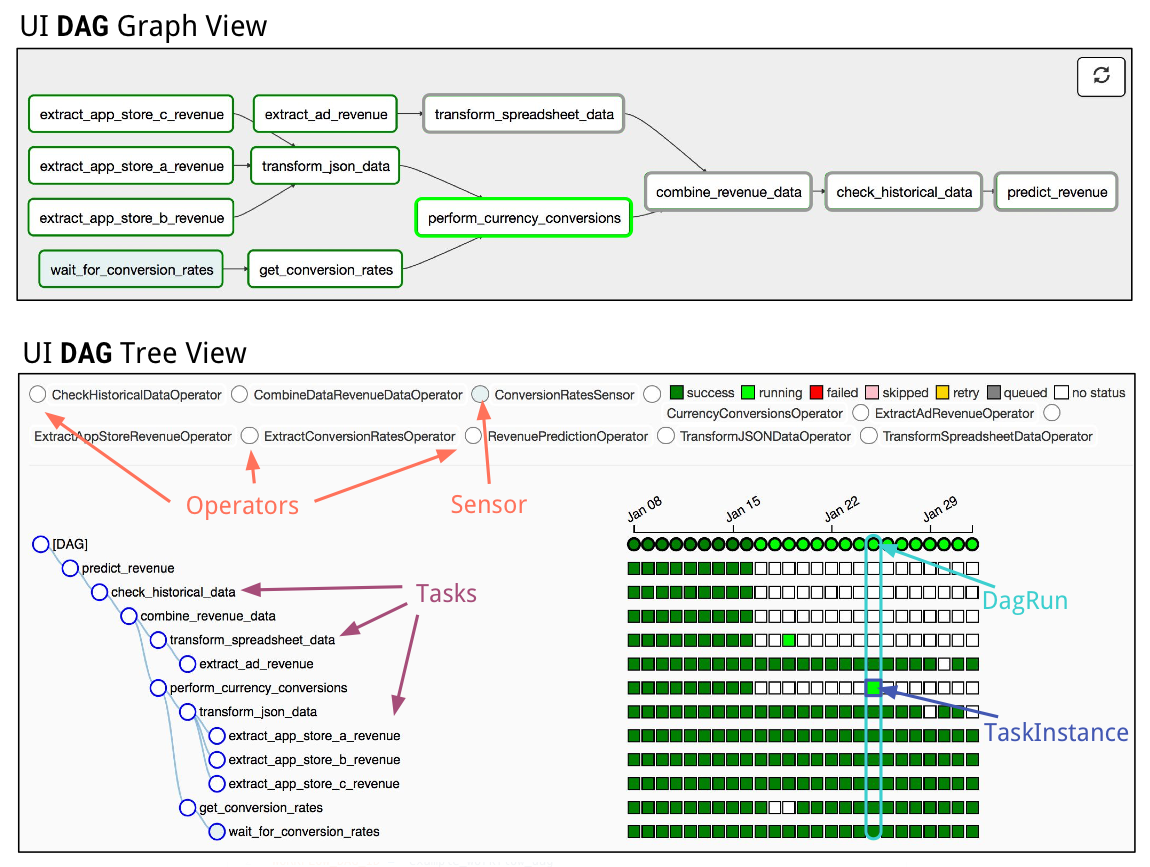
In Airflow, a DAG – or a Directed Acyclic Graph – is a collection of all the tasks you want to run, organized in a way that reflects their relationships and dependencies. For example, a simple DAG could consist of three tasks: A, B, and C. It could say that A has to run successfully before B can run, but C can run anytime. It could say that task A times out after 5 minutes, and B can be restarted up to 5 times in case it fails. It might also say that the workflow will run every night at 10pm, but shouldn’t start until a certain date. In this way, a DAG describes how you want to carry out your workflow; but notice that we haven’t said anything about what we actually want to do! A, B, and C could be anything. Maybe A prepares data for B to analyze while C sends an email. Or perhaps A monitors your location so B can open your garage door while C turns on your house lights. The important thing is that the DAG isn’t concerned with what its constituent tasks do; its job is to make sure that whatever they do happens at the right time, or in the right order, or with the right handling of any unexpected issues. DAGs are defined in standard Python files that are placed in Airflow’s ‘dags’ folder. Airflow will execute the code in each file to dynamically build the DAG objects. You can have as many DAGs as you want, each describing an arbitrary number of tasks. In general, each one should correspond to a single logical workflow.
Installing Airflow
There are a lot of really detailed and comprehensive posts on the internet describing step-by-step process for Airflow installation across various platforms so in this post I will refrain from looking into all the different ways Airflow can be deployed. For the purpose of this demo, I will spin up Ubuntu micro VM on the Henzner VPS, install Anaconda Python distribution and PostgreSQL database (used for Airflow metadata). The process is fairly straightforward, and all these tasks can be accomplished using your favorite terminal with just a few commands.
#create 'airflow' user
sudo adduser airflow
sudo usermod -aG sudo airflow
su - airflow

#download and install Anaconda and PostgreSQL
curl -O https://repo.anaconda.com/archive/Anaconda3-2019.10-Linux-x86_64.sh
bash Anaconda3-2019.10-Linux-x86_64.sh
conda install -c conda-forge azure-cli-core
sudo apt-get update --fix-missing
sudo apt-get install build-essential autoconf
sudo apt-get install postgresql postgresql-contrib
sudo service postgresql start

#set up database user, database and its permissions
sudo -u postgres psql
CREATE USER airflow PASSWORD 'YourTopSecretPassword';
CREATE DATABASE airflow;
GRANT ALL PRIVILEGES ON ALL TABLES IN SCHEMA public TO airflow;

#change PostgreSQL config to accept Airflow connections
sudo nano /etc/postgresql/10/main/pg_hba.conf

#change 'IPv4 local connections' value to the following:
host all all 0.0.0.0/0 trust
sudo nano /etc/postgresql/10/main/postgresql.conf

#change listen_addresses = 'localhost' to the following value:
listen_addresses = '*'

#restart PostgreSQL service
sudo service postgresql restart

#install Airflow and its packages
export AIRFLOW_HOME=~/airflow
pip install "apache-airflow[postgres]"
airflow initdb

#update airflow config values
cd airflow
sudo nano airflow.cfg

#change default value for the executor (SequentialExecutor) to the following value:
executor = LocalExecutor

#change default value for sql_alchemy_conn to the following value:
sql_alchemy_conn = postgresql+psycopg2://airflow@localhost:5432/airflow

#ensure that the following connection pooling parameter is set to True:
sql_alchemy_pool_enabled = True

#change from default Sqlite database to PostgreSQL
airflow initdb

#start Airflow services
airflow webserver
airflow scheduler
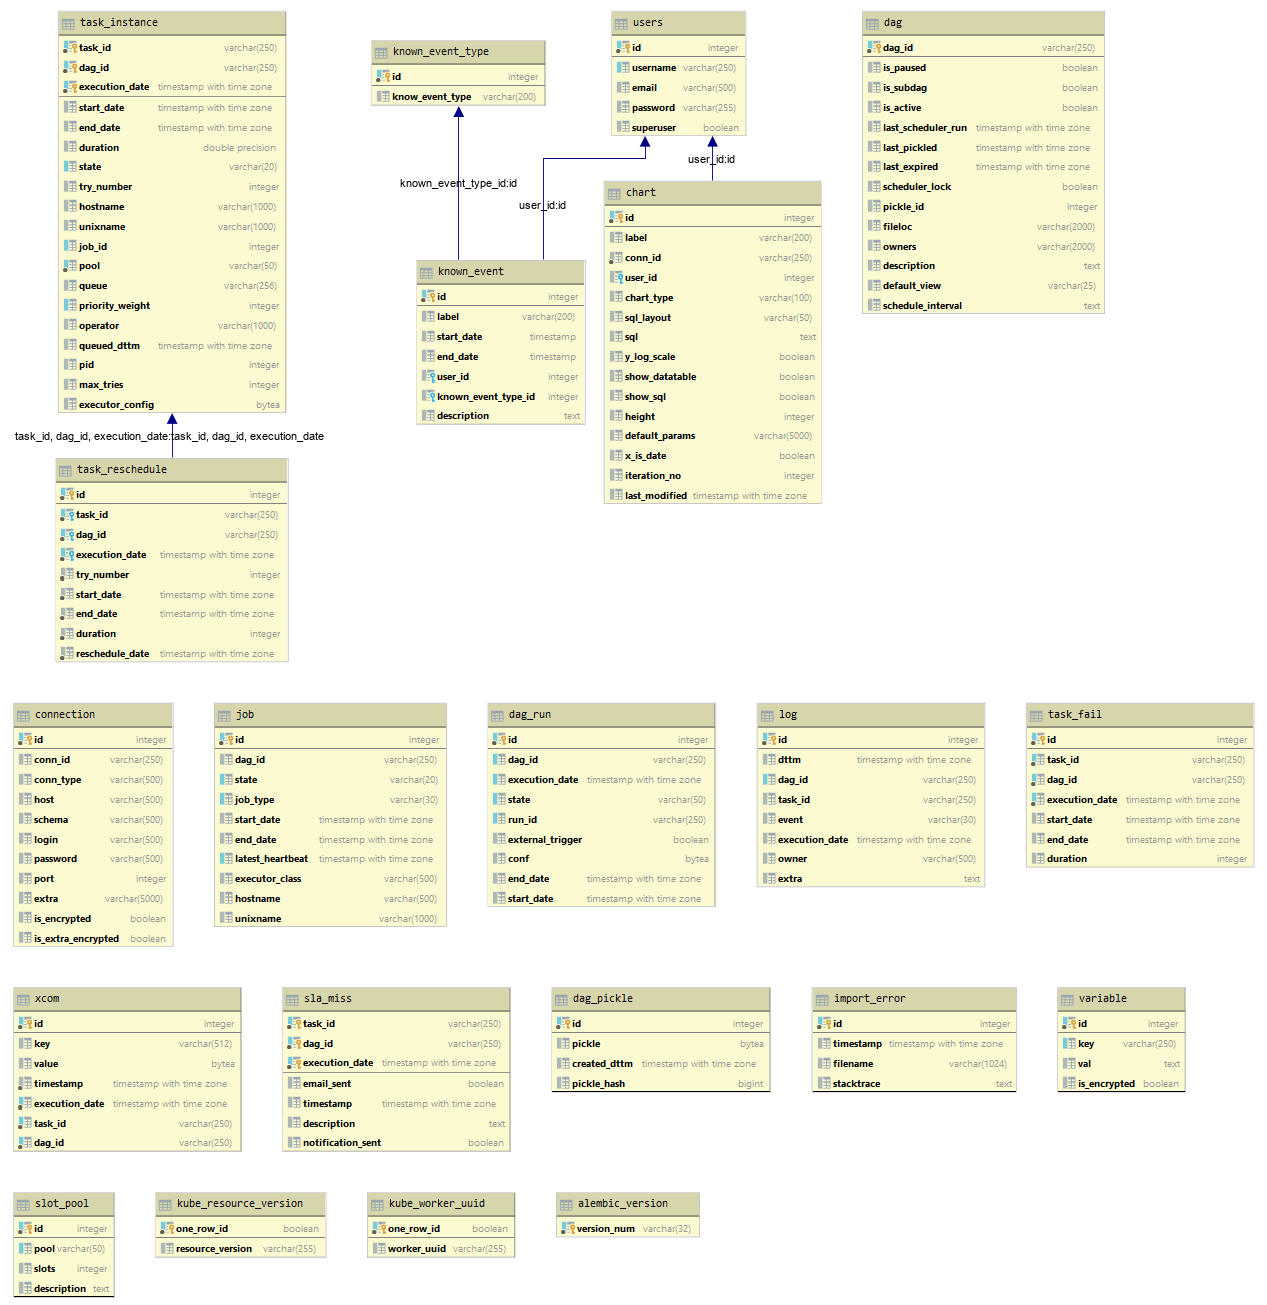
Once completed and web server is up and running, we should be able to access Airflow admin panel accessing the following URL: your_server_up_address:8080/admin. This process runs a simple Flask application which reads the state of all tasks from the metadata database and renders these states for the Web UI. Also, given that the default Sqlite metadata database has been replaced with a more robust PostgreSQL instance, the following airflow schema was generated (click on image to enlarge).
To demonstrate the internal working of Airflow and some of its key architectural principles it’s probably best to create a simple, multi-task workflow. In this two-part post I will be creating two separate DAGs – one to provide a brief overview of the DAG file template in its simplest form and another one which will include a more comprehensive workflow interacting with a public cloud resources as well as local data.
Airflow Sample Workflow – Basic DAG
Let’s start with the most basic workflow and introduce the anatomy of the pipeline creation, DAG definition file and individual tasks. One thing to remember is that this Airflow Python script is just a configuration file specifying the DAG’s structure as code. The actual tasks defined here will run in a different context from the context of this script. Different tasks run on different workers at different points in time, which means that this script cannot be used to cross communicate between tasks (with the exception of Xcom – a more advanced Airflow concept). An Airflow pipeline is just a Python script that happens to define an Airflow DAG object. Let’s start by importing the libraries we will need.
# The DAG object; we'll need this to instantiate a DAG
from airflow import DAG

# Operators; we need this to operate!
from airflow.operators.bash_operator import BashOperator
When creating a DAG and some tasks, we have the choice to explicitly pass a set of arguments to each task’s constructor (which would become redundant), or (better!) we can define a dictionary of default parameters that we can use when creating tasks.
from datetime import datetime, timedelta

default_args = {
    'owner': 'Airflow',
    'depends_on_past': False,
    'start_date': datetime(2020, 1, 30),
    'email': ['airflow@example.com'],
    'email_on_failure': False,
    'email_on_retry': False,
    'retries': 1,
    'retry_delay': timedelta(minutes=5),
    # 'queue': 'bash_queue',
    # 'pool': 'backfill',
    # 'priority_weight': 10,
    # 'end_date': datetime(2020, 1, 30),
}
We’ll need a DAG object to nest our tasks into. Here we pass a string that defines the dag_id, which serves as a unique identifier for your DAG. We also pass the default argument dictionary that we just defined and define a schedule_interval of 1 day for the DAG.
dag = DAG(
    'tutorial', default_args=default_args, schedule_interval=timedelta(days=1))
Tasks are generated when instantiating operator objects. An object instantiated from an operator is called a constructor. The first argument task_id acts as a unique identifier for the task.
t1 = BashOperator(
    task_id='print_date',
    bash_command='date',
    dag=dag)

t2 = BashOperator(
    task_id='sleep',
    bash_command='sleep 5',
    retries=3,
    dag=dag)
Notice how we pass a mix of operator specific arguments (bash_command) and an argument common to all operators (retries) inherited from BaseOperator to the operator’s constructor. This is simpler than passing every argument for every constructor call. Also, notice that in the second task we override the retries parameter with 3.
Airflow leverages the power of Jinja Templating and provides the pipeline author with a set of built-in parameters and macros. Airflow also provides hooks for the pipeline author to define their own parameters, macros and templates. This tutorial barely scratches the surface of what you can do with templating in Airflow, but the goal of this section is to let you know this feature exists, get you familiar with double curly brackets, and point to the most common template variable: {{ ds }} (today’s “date stamp”).
templated_command = """
    {% for i in range(5) %}
        echo "{{ ds }}"
        echo "{{ macros.ds_add(ds, 7) }}"
        echo "{{ params.my_param }}"
    {% endfor %}
"""

t3 = BashOperator(
    task_id='templated',
    bash_command=templated_command,
    params={'my_param': 'Parameter I passed in'},
    dag=dag)
Notice that the templated_command contains code logic in {% %} blocks, references parameters like {{ ds }}, calls a function as in {{ macros.ds_add(ds, 7)}}, and references a user-defined parameter in {{ params.my_param }}. The params hook in BaseOperator allows you to pass a dictionary of parameters and/or objects to your templates. Files can also be passed to the bash_command argument, like bash_command=’templated_command.sh’, where the file location is relative to the directory containing the pipeline file. This may be desirable for many reasons, like separating your script’s logic and pipeline code, allowing for proper code highlighting in files composed in different languages, and general flexibility in structuring pipelines. It is also possible to define your template_searchpath as pointing to any folder locations in the DAG constructor call. Using that same DAG constructor call, it is possible to define user_defined_macros which allow you to specify your own variables. For example, passing dict(foo=’bar’) to this argument allows you to use {{ foo }} in your templates. Moreover, specifying user_defined_filters allow you to register you own filters. For example, passing dict(hello=lambda name: ‘Hello %s’ % name) to this argument allows you to use {{ ‘world’ | hello }} in your templates.
Now that we have tasks t1, t2 and t3 that do not depend on each other we need to define a chain of dependencies between them. The following example shows few different ways this can be achieved by.
t1.set_downstream(t2)

# This means that t2 will depend on t1
# running successfully to run.
# It is equivalent to:
t2.set_upstream(t1)

# The bit shift operator can also be
# used to chain operations:
t1 >> t2

# And the upstream dependency with the
# bit shift operator:
t2 << t1 # Chaining multiple dependencies becomes # concise with the bit shift operator: t1 >> t2 >> t3

# A list of tasks can also be set as
# dependencies. These operations
# all have the same effect:
t1.set_downstream([t2, t3])
t1 >> [t2, t3]
[t2, t3] << t1
Note that when executing your script, Airflow will raise exceptions when it finds cycles in your DAG or when a dependency is referenced more than once. At this point our code should look something like this.
from airflow import DAG
from airflow.operators.bash_operator import BashOperator
from datetime import datetime, timedelta


default_args = {
    'owner': 'Airflow',
    'depends_on_past': False,
    'start_date': datetime(2015, 6, 1),
    'email': ['airflow@example.com'],
    'email_on_failure': False,
    'email_on_retry': False,
    'retries': 1,
    'retry_delay': timedelta(minutes=5),
    # 'queue': 'bash_queue',
    # 'pool': 'backfill',
    # 'priority_weight': 10,
    # 'end_date': datetime(2016, 1, 1),
}

dag = DAG(
    'tutorial', default_args=default_args, schedule_interval=timedelta(days=1))

# t1, t2 and t3 are examples of tasks created by instantiating operators
t1 = BashOperator(
    task_id='print_date',
    bash_command='date',
    dag=dag)

t2 = BashOperator(
    task_id='sleep',
    bash_command='sleep 5',
    retries=3,
    dag=dag)

templated_command = """
    {% for i in range(5) %}
        echo "{{ ds }}"
        echo "{{ macros.ds_add(ds, 7)}}"
        echo "{{ params.my_param }}"
    {% endfor %}
"""

t3 = BashOperator(
    task_id='templated',
    bash_command=templated_command,
    params={'my_param': 'Parameter I passed in'},
    dag=dag)

t2.set_upstream(t1)
t3.set_upstream(t1)
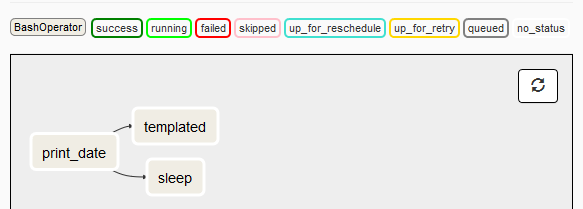
Finally, when our DAG file is saved into the default folder location, Airflow scheduler should pick it up and display its graph view (showing all its dependencies) as per the image below.
This concludes a brief Airflow architecture overview and a sample pipeline built tutorial. For information on more complex DAGs e.g. involving dynamic provisioning of Azure cloud services (Citus database cluster) please refer to the second part of this post HERE.
http://scuttle.org/bookmarks.php/pass?action=addThis entry was posted on Monday, April 13th, 2020 at 11:23 am and is filed under Azure, Cloud Computing, MPP RDBMS, Programming, SQL. You can follow any responses to this entry through the RSS 2.0 feed. You can leave a response, or trackback from your own site.


