SQL Server Hash-Partitioned Parallel Data Acquisition – How to Accelerate Your ‘E’ in ELT/ETL Using a Simple T-SQL Framework
Introduction
Note: All artifacts used in this demo can be downloaded from my shared OneDrive folder HERE.
Big part of Data Warehouse development has always been tied to structuring data acquisition pipelines before more rigid modelling takes place and data is wrangled (most likely) using the most the venerable methodologies today: Data Vault, Kimbal or Inmon. I have covered data acquisition topic in a number of previous posts (mainly HERE and HERE), but would like to further expand on this subject with a short post on how to enhance this process (using a simplified example) and enable hash-partitioning on individual tables. Having concurrent executions i.e. a number of loads running in parallel, one for every source table, is fairly straightforward to achieve using SQL Server platform and a little bit of T-SQL. There are certainly more elegant approaches which enable turning sequential loads into a parallel ones, but with a little bit of elbow grease one can script out a batch of good, old-fashioned SQL Server Agent jobs with ease to be spun up and run simultaneously (example HERE). However, in some cases, source tables can be quite large and having a single transaction responsible for the insertion of the whole table’s content into a target object can be quite time-consuming. The situation can be further exacerbated if the primary key on the source table is a composite one or not of a numeric type.
One of the clients I worked with a few years ago had this problem. They needed to reload the entire content of a few source tables on a nightly schedule and the framework they used was up to the task until data stored in those objects grew by a large margin. Those tables contained a lot of text data i.e. email, chat and telephone transcripts so many of the fields were quite wide. As the acquisition framework they used dynamically generated BIML scrips and SSIS packages, there was very little one could do to tune or modify the logic due to the proprietary nature of the framework’s design. Data volumes increased exponentially and over time packages responsible for objects with very wide attributes started timing out, requiring expensive, bespoke development. Another, much more recent case, involved my current employer’s choice of survey software. If you’ve ever used LimeSurvey, you will know that each survey’s data is stored in a single, very wide table (think hundreds of attributes), with a dedicated column assigned to each question. That’s not a big issue, especially that MySQL (database used in LimeSurvey) has a row limit of 65,535 bytes, however, this schema architecture enabled objects with very wide rows and shallow row count to be proliferated across the database. Extracting this data, particularly when lots of textual values are involved, can be quite slow when thousands of tables are involved.
To demonstrate how to mitigate this type of problem, I will create a simple scenario where a source system table acquisition job can be run across multiple, hash-partitioned ‘chunks’ concurrently. Based on a distinct primary (single column or composite) key, we will be able to distribute the table content across multiple, consistent and non-blocking streams of data, thus providing a significant acceleration of data movement and cutting the time dedicated to ‘E’ (out of ELT/ETL) by a large margin. I will also compare the time it takes to load this data using variable number of streams i.e. between 2 and 8, to demonstrate how this framework can be tuned to enable accelerated performance.
The framework’s simplified architecture view can be depicted as per the diagram below.
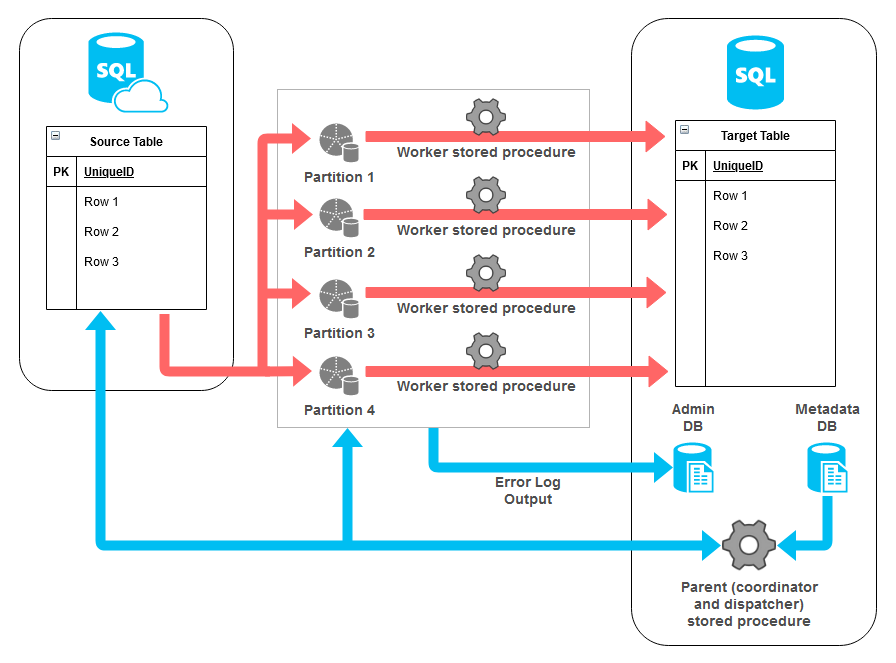
On the left we have our source system (augmented by the system metadata stored in a separate database) and a ‘parent’ process used for jobs coordination and dispatching. In the middle we have individual ‘workers’ operating on a hash-defined partition of source data. Finally, on the right we have our target system where it all gets assembled into a mirror copy of the source table. I will go over how all this ‘hangs together’ in more details in the section below.
Azure Source Database and Dummy Data Setup
First, let’s create all required resources on Azure. The following Python script is used to generate Azure resource group, Azure SQL server and an empty database. You can easily replace it with a different self-hosted SQL Server instance (it doesn’t need to live in Azure).
from azure.common.client_factory import get_client_from_cli_profile
from azure.mgmt.resource import ResourceManagementClient
from azure.mgmt.sql import SqlManagementClient
from msrestazure.azure_exceptions import CloudError
from os import popen
import pyodbc

RESOURCE_GROUP = 'Test_Resource_Group'
LOCATION = 'australiasoutheast'
SQL_SERVER = 'sourceserver2020'
SQL_DB = 'sourcedb'
USERNAME = 'testusername'
PASSWORD = 'MyV3ry$trongPa$$word'
DRIVER = '{ODBC Driver 17 for SQL Server}'
external_IP = popen("curl -s ifconfig.me").readline()


def create_resource_group(resource_client, RESOURCE_GROUP, LOCATION):
    print("\nCreating Azure RG {rg_name}...".format(
        rg_name=RESOURCE_GROUP), end="", flush=True)
    try:
        resource_client.resource_groups.create_or_update(
            RESOURCE_GROUP, {'location': LOCATION})
    except CloudError as e:
        print(e)
    rg = [g.name for g in resource_client.resource_groups.list()]
    if RESOURCE_GROUP in rg:
        print('OK')


def create_sql_server(sql_client, RESOURCE_GROUP, SQL_SERVER, LOCATION, USERNAME, PASSWORD):
    print("Creating Azure SQL Server {ssvr_name}...".format(
        ssvr_name=SQL_SERVER), end="", flush=True)
    try:
        sql_server = sql_client.servers.begin_create_or_update(
            RESOURCE_GROUP,
            SQL_SERVER,
            {
                'location': LOCATION,
                'version': '12.0',
                'administrator_login': USERNAME,
                'administrator_login_password': PASSWORD
            }
        )
        sql_server.wait()
    except CloudError as e:
        print(e)
    ssvr = [i.name for i in sql_client.servers.list_by_resource_group(
        RESOURCE_GROUP)]
    if SQL_SERVER in ssvr:
        print('OK')


def create_sql_db(sql_client, RESOURCE_GROUP, SQL_SERVER, SQL_DB, LOCATION):
    print("Creating Azure SQL Database {db_name}...".format(
        db_name=SQL_DB), end="", flush=True)
    try:
        sql_db = sql_client.databases.begin_create_or_update(
            RESOURCE_GROUP,
            SQL_SERVER,
            SQL_DB,
            {
                'location': LOCATION,
                'collation': 'SQL_Latin1_General_CP1_CI_AS',
                'create_mode': 'default',
                'requested_service_objective_name': 'Basic'
            }
        )
        sql_db.wait()
    except CloudError as e:
        print(e)
    dbs = [i.name for i in sql_client.databases.list_by_server(
        RESOURCE_GROUP, SQL_SERVER)]
    if SQL_DB in dbs:
        print('OK')


def configure_firewall(sql_client, DRIVER, RESOURCE_GROUP, SQL_SERVER, SQL_DB, USERNAME, PASSWORD, external_IP):
    print("Configuring Azure SQL Server Firewall Settings...", end="", flush=True)
    try:
        sql_client.firewall_rules.create_or_update(
            RESOURCE_GROUP,
            SQL_SERVER,
            "firewall_rule_name_" + external_IP,
            {
                "startIpAddress": external_IP,
                "endIpAddress": external_IP
            }
        )
    except CloudError as e:
        print(e)
    SQL_SERVER = SQL_SERVER + '.database.windows.net'
    with pyodbc.connect('DRIVER='+DRIVER+';SERVER='+SQL_SERVER+';PORT=1433;DATABASE='+SQL_DB+';UID='+USERNAME+';PWD=' + PASSWORD) as conn:
        with conn.cursor() as cursor:
            cursor.execute("SELECT @@version")
            row = cursor.fetchone()
    if row:
        print('OK')


def main():
    # create resource client
    resource_client = get_client_from_cli_profile(ResourceManagementClient)
    create_resource_group(resource_client, RESOURCE_GROUP, LOCATION)
    # create sql client
    sql_client = get_client_from_cli_profile(SqlManagementClient)
    # create sql server
    create_sql_server(sql_client, RESOURCE_GROUP, SQL_SERVER,
                      LOCATION, USERNAME, PASSWORD)
    # create sql db in the basic tier
    create_sql_db(sql_client, RESOURCE_GROUP, SQL_SERVER, SQL_DB, LOCATION)
    # configure firewall
    configure_firewall(sql_client, DRIVER, RESOURCE_GROUP,
                       SQL_SERVER, SQL_DB, USERNAME, PASSWORD, external_IP)


if __name__ == "__main__":
    main()
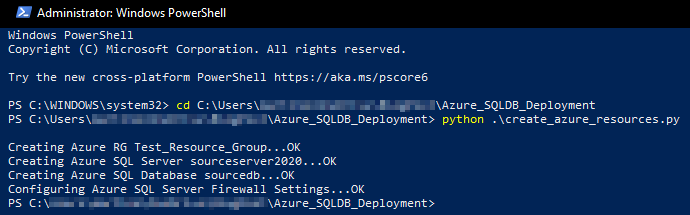
Providing all necessary Azure SDK for Python modules were installed and referenced correctly and we’ve signed in using Azure CLI, we should see the following status output at the end of script execution.
Next, let’s generate some mock data. This is required to simulate the scenario I was referring to before i.e. a table with a large number of columns and variable-length text data which we will try to acquire as efficiently and quickly as possible. The following script creates a small stored procedure used to generate dummy data, Dummy_Table object and finally, it assigns ID column as a primary key on the newly populated table.
from pathlib import PureWindowsPath
import pyodbc

SQL_SERVER = 'sourceserver2020.database.windows.net'
SQL_DB = 'sourcedb'
USERNAME = 'testusername'
PASSWORD = 'MyV3ry$trongPa$$word'
DRIVER = '{ODBC Driver 17 for SQL Server}'


sql_file = PureWindowsPath(
    '/Path/Azure_SQLDB_Deployment/SQL/create_wide_tbl.sql')

with open(sql_file, "r") as f:
    sqlFile = f.read()

sql = sqlFile.rstrip('\n')

try:
    with pyodbc.connect('DRIVER='+DRIVER+';SERVER='+SQL_SERVER+';PORT=1433;DATABASE='+SQL_DB+';UID='+USERNAME+';PWD=' + PASSWORD) as conn:
        with conn.cursor() as cursor:
            cursor.execute('DROP PROCEDURE IF EXISTS usp_generate_dummy_data')
            cursor.execute(sql)
            cursor.execute('EXEC dbo.usp_generate_dummy_data')
            cursor.execute('SELECT TOP (1) 1 FROM dbo.Dummy_Table')
            rows = cursor.fetchone()
            if rows:
                print('All Good!')
            else:
                raise ValueError(
                    'No data generated in the source table. Please troubleshoot!'
                )
except pyodbc.Error as ex:
    sqlstate = ex.args[1]
    print(sqlstate)
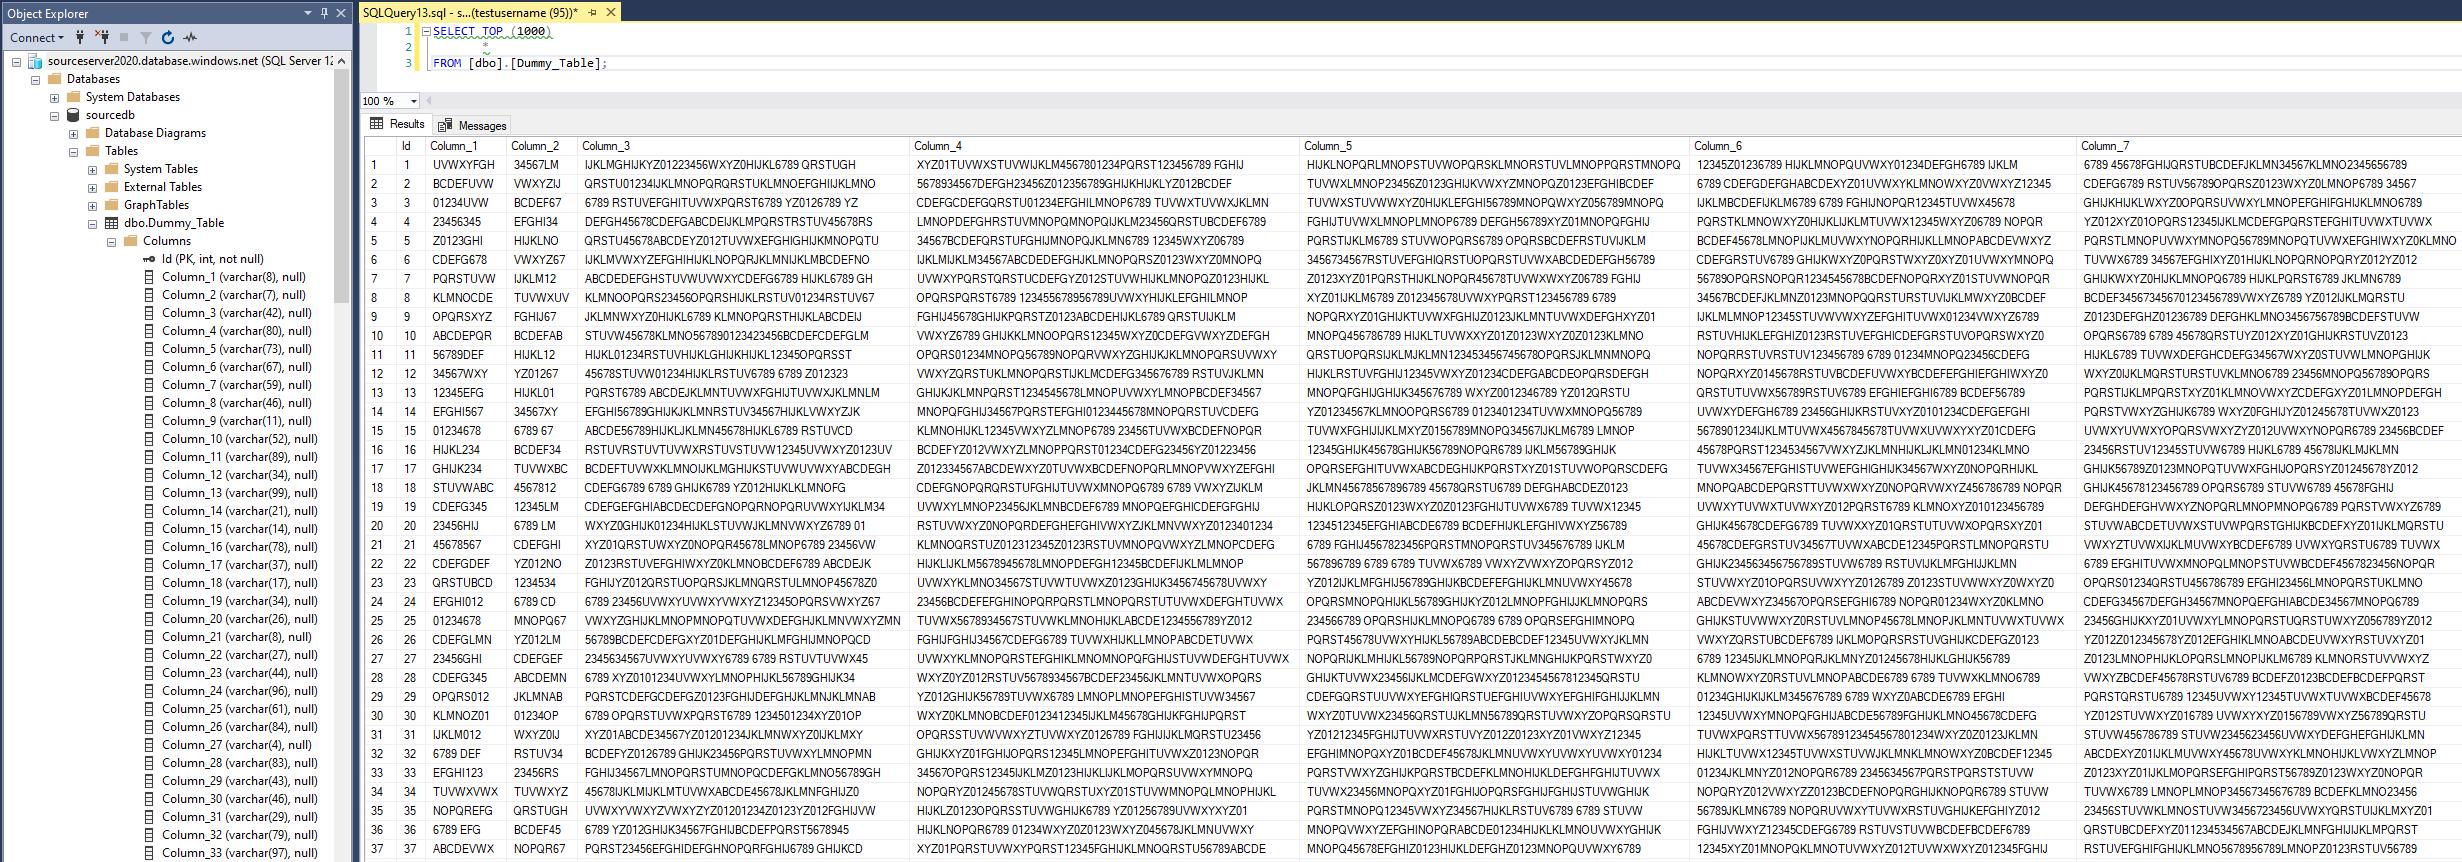
The stored procedure (code below) is configured to create 300 columns across 100000 rows of dense, text data. When finished (executed for approx. 20min with the default configuration of data volume and Azure resources specified in the script above), the very wide table schema as well as synthetically created data will look similar to the one in the image below (click on image to enlarge).
CREATE PROCEDURE usp_generate_dummy_data
AS
BEGIN
    SET NOCOUNT ON;
    DECLARE @wide INT = 100;
    DECLARE @deep INT = 100000;
    DECLARE @allchars VARCHAR(100) = 'ABCDEFGHIJKLMNOPQRSTUVWXYZ0123456789 ';
    DECLARE @target_table_name VARCHAR(56) = 'Dummy_Table';

    DROP TABLE IF EXISTS ##metadata;
    CREATE TABLE ##metadata
    (
        ID INT IDENTITY(1, 1),
        Column_Name VARCHAR(256),
        Data_Type VARCHAR(56),
        Column_Size VARCHAR(56)
    );


    DECLARE @count INT = 1;
    WHILE @count <= @wide
    BEGIN
        INSERT INTO ##metadata
        (
            Column_Name,
            Data_Type,
            Column_Size
        )
        SELECT 'Column_' + CAST(@count AS VARCHAR(56)),
               'varchar',
               CEILING(RAND() * 100);

        SET @count = @count + 1;
    END;

    DECLARE @SQL VARCHAR(MAX);
    SELECT @SQL
        = 'DROP TABLE IF EXISTS ' + @target_table_name + '; CREATE TABLE ' + @target_table_name
          + ' (Id INT IDENTITY(1,1),' + STRING_AGG(Column_Name + ' ' + Data_Type + '(' + Column_Size + ')', ',') + ')'
    FROM ##metadata;
    EXEC (@SQL);

    SET @count = 1;
    WHILE @count <= @deep
    BEGIN
        DECLARE @vals VARCHAR(MAX);
        SELECT @vals
            = STRING_AGG(
                            CAST(QUOTENAME(
                                              SUBSTRING(
                                                           RIGHT(LEFT(@allchars, ABS(BINARY_CHECKSUM(NEWID()) % 35) + 5), 5)
                                                           + RIGHT(LEFT(@allchars, ABS(BINARY_CHECKSUM(NEWID()) % 35)
                                                                                   + 5), 5)
                                                           + RIGHT(LEFT(@allchars, ABS(BINARY_CHECKSUM(NEWID()) % 35)
                                                                                   + 5), 5)
                                                           + RIGHT(LEFT(@allchars, ABS(BINARY_CHECKSUM(NEWID()) % 35)
                                                                                   + 5), 5)
                                                           + RIGHT(LEFT(@allchars, ABS(BINARY_CHECKSUM(NEWID()) % 35)
                                                                                   + 5), 5)
                                                           + RIGHT(LEFT(@allchars, ABS(BINARY_CHECKSUM(NEWID()) % 35)
                                                                                   + 5), 5)
                                                           + RIGHT(LEFT(@allchars, ABS(BINARY_CHECKSUM(NEWID()) % 35)
                                                                                   + 5), 5)
                                                           + RIGHT(LEFT(@allchars, ABS(BINARY_CHECKSUM(NEWID()) % 35)
                                                                                   + 5), 5)
                                                           + RIGHT(LEFT(@allchars, ABS(BINARY_CHECKSUM(NEWID()) % 35)
                                                                                   + 5), 5)
                                                           + RIGHT(LEFT(@allchars, ABS(BINARY_CHECKSUM(NEWID()) % 35)
                                                                                   + 5), 5),
                                                           1,
                                                           CAST(Column_Size AS INT)
                                                       ),
                                              ''''
                                          ) AS NVARCHAR(MAX)),
                            ','
                        )
        FROM ##metadata;
        SELECT @SQL
            = 'INSERT INTO ' + @target_table_name + '(' + STRING_AGG(Column_Name, ',') + ') SELECT ' + @vals + ''
        FROM ##metadata;
        EXEC (@SQL);
        SET @count = @count + 1;
    END;

    ALTER TABLE dbo.Dummy_Table
    ADD PRIMARY KEY (ID);

    DROP TABLE IF EXISTS ##metadata;
END;
Next, I will create a linked server connection from my on-premise SQL Server instance to the one I’ve just provisioned in Azure and recreate the source Dummy_Table schema in the target database.
USE [master]
GO
EXEC master.dbo.sp_addlinkedserver @server = N'AZURESOURCELINKEDSVR', @srvproduct=N'', @provider=N'SQLNCLI', @datasrc=N'sourceserver2020.database.windows.net', @catalog=N'sourcedb'
GO
EXEC master.dbo.sp_addlinkedsrvlogin @rmtsrvname=N'AZURESOURCELINKEDSVR',@useself=N'False',@locallogin=NULL,@rmtuser=N'testusername',@rmtpassword='MyV3ry$trongPa$$word'
GO
EXEC master.dbo.sp_serveroption @server=N'AZURESOURCELINKEDSVR', @optname=N'collation compatible', @optvalue=N'false'
GO
EXEC master.dbo.sp_serveroption @server=N'AZURESOURCELINKEDSVR', @optname=N'data access', @optvalue=N'true'
GO
EXEC master.dbo.sp_serveroption @server=N'AZURESOURCELINKEDSVR', @optname=N'dist', @optvalue=N'false'
GO
EXEC master.dbo.sp_serveroption @server=N'AZURESOURCELINKEDSVR', @optname=N'pub', @optvalue=N'false'
GO
EXEC master.dbo.sp_serveroption @server=N'AZURESOURCELINKEDSVR', @optname=N'rpc', @optvalue=N'true'
GO
EXEC master.dbo.sp_serveroption @server=N'AZURESOURCELINKEDSVR', @optname=N'rpc out', @optvalue=N'true'
GO
EXEC master.dbo.sp_serveroption @server=N'AZURESOURCELINKEDSVR', @optname=N'sub', @optvalue=N'false'
GO
EXEC master.dbo.sp_serveroption @server=N'AZURESOURCELINKEDSVR', @optname=N'connect timeout', @optvalue=N'0'
GO
EXEC master.dbo.sp_serveroption @server=N'AZURESOURCELINKEDSVR', @optname=N'collation name', @optvalue=NULL
GO
EXEC master.dbo.sp_serveroption @server=N'AZURESOURCELINKEDSVR', @optname=N'lazy schema validation', @optvalue=N'false'
GO
EXEC master.dbo.sp_serveroption @server=N'AZURESOURCELINKEDSVR', @optname=N'query timeout', @optvalue=N'0'
GO
EXEC master.dbo.sp_serveroption @server=N'AZURESOURCELINKEDSVR', @optname=N'use remote collation', @optvalue=N'true'
GO
EXEC master.dbo.sp_serveroption @server=N'AZURESOURCELINKEDSVR', @optname=N'remote proc transaction promotion', @optvalue=N'false'
GO
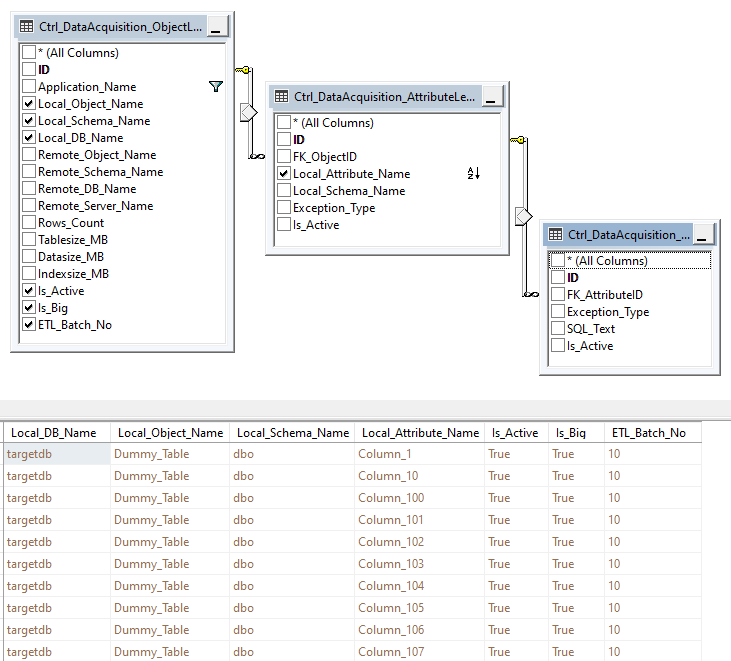
Finally, in this example I will also be useing two small databases (EDW_Control and AdminDBA) which contain metadata information on the object(s) I will be processing and error logs for loads which fail to run correctly. The structure of EDW_Control database is pretty straightforward – it uses a collection of tables to track things like source and target schema names, record counts, table and indexes size etc. The important part is the fields called ‘Is_Big’ and ‘ETL_Batch_No’ which dictate whether the nominated object should be hash-partitioned and if so, into how many batches/streams. I wrote more about how these tables are structured in one of my previous blog post HERE. Details on how to build and deploy AdminDBA database can be found in my previous posts HERE and HERE. For reference, the EDW_Control database schema and a snapshot of metadata I will be processing looks as per below.
Hash-Partitioned Data Acquisition
Now that we’re all set up let’s explore the main code base behind the process responsible for all the heavy lifting. This acquisition method is based on two different stored procedures: one which handles metadata, processes coordination and jobs assignment and the second one which builds the actual SQL statements responsible for data insertion. You can download all the code from my OneDrive folder HERE so I will only go over some of the more interesting aspects of these stored procedures and finally provide a quick demo depicting runtime behavior and a short summary of its performance.
As mentioned, the magic sauce which allows for building reliable concurrent acquisition job is the hash-partitioning which converts single or composite primary key into a hash string, dynamically building self-contained stream of data. We can specify as many partitions as we want (no greater than the number of rows) which can be further scaled back based on the number of CPU cores available e.g. in the demo below I will be partitioning the source table into 8 partitions. We can also have the process determine the number of partitions (when run for multiple tables) based on the metadata collected e.g. row counts, data size etc. by assigning the value of 1 to ‘@Concurrent_Batch_No_Override’ parameter. The main functionality, however, is tied to the following bit of code which creates even ‘chunks’ of target data based on the sorted hash values.
SET @SQL = 'DECLARE @R1 INT = (SELECT  MIN(id) from #Hash_Temp)'										+CHAR(13);
SET @SQL = @SQL + 'DECLARE @R1_Hash VARCHAR(128) = (SELECT hash_key FROM #Hash_Temp WHERE id = @R1)'	+CHAR(13);
SET @SQL = @SQL + 'DECLARE @R2 BIGINT = (SELECT (MAX(id)-MIN(id)+1)'									+CHAR(13);
SET @SQL = @SQL + '/'+CAST(@etl_batch_no AS VARCHAR(10))+' as id FROM #Hash_Temp)'						+CHAR(13);
SET @SQL = @SQL + 'DECLARE @R2_Hash VARCHAR (128) = (SELECT hash_key FROM #Hash_Temp WHERE id = @R2)'	+CHAR(13);
SET @SQL = @SQL + 'DECLARE @R3 BIGINT = (SELECT MAX(id) from #Hash_Temp)'								+CHAR(13);
SET @SQL = @SQL + 'DECLARE @R3_Hash VARCHAR(128) = (SELECT hash_key FROM #Hash_Temp WHERE id = @R3)'	+CHAR(13);
SET @SQL = @SQL + 'INSERT INTO #Ids_Range'																+CHAR(13);
SET @SQL = @SQL + '(range_FROM, range_TO, hash_FROM, hash_TO) '											+CHAR(13);
SET @SQL = @SQL + 'SELECT @R1, @R1+@R2, @R1_Hash,(SELECT hash_key FROM #Hash_Temp WHERE id =@R1+@R2)'	+CHAR(13);
SET @SQL = @SQL + 'DECLARE @z INT = 1'																	+CHAR(13);
SET @SQL = @SQL + 'WHILE @z <= '+CAST(@etl_batch_no AS VARCHAR(10))+'-1'								   +CHAR(13);
SET @SQL = @SQL + 'BEGIN'																				+CHAR(13);
SET @SQL = @SQL + 'INSERT INTO #Ids_Range (Range_FROM, Range_TO, Hash_FROM, Hash_TO)'					+CHAR(13);
SET @SQL = @SQL + 'SELECT LAG(Range_TO,0) OVER (ORDER BY id DESC)+1, '									+CHAR(13);
SET @SQL = @SQL + 'CASE WHEN LAG(Range_TO,0) OVER (ORDER BY id DESC)+@R2+1 >= @R3'					   +CHAR(13);
SET @SQL = @SQL + 'THEN @R3 ELSE LAG(Range_TO,0) OVER (ORDER BY id DESC)+@R2+1 END,'					+CHAR(13);
SET @SQL = @SQL + '(SELECT hash_key FROM #Hash_Temp WHERE id =(SELECT LAG(Range_TO,0) '					+CHAR(13);
SET @SQL = @SQL + 'OVER (ORDER BY id DESC)+1 FROM #Ids_Range WHERE @z = id)),'							+CHAR(13);
SET @SQL = @SQL + '(SELECT Hash_key FROM #Hash_Temp WHERE id =(SELECT'									+CHAR(13);
SET @SQL = @SQL + 'CASE WHEN LAG(Range_TO,0) OVER (ORDER BY id DESC)+@R2+1 >= @R3'					   +CHAR(13);
SET @SQL = @SQL + 'THEN @R3 ELSE LAG(Range_TO,0) OVER (ORDER BY id DESC)+@R2+1 END'					    +CHAR(13);
SET @SQL = @SQL + 'FROM #Ids_Range WHERE @z = id))'														+CHAR(13);
SET @SQL = @SQL + 'FROM #Ids_Range WHERE @z = id'														+CHAR(13);
SET @SQL = @SQL + 'SET @z = @z+1'																		+CHAR(13);
SET @SQL = @SQL + 'END'																					+CHAR(13);
EXEC(@SQL)
This code creates uniform ‘slices’ of source table’s data using metadata information stored in Hash_Temp temp table. This metadata is created using HASHBYTES() function with SHA1 algorithm allowing for efficient values indexation and sorting, which in turn allows for partition ranges creation. For wide objects with small number of rows i.e. less than 1 million this should work relatively speedy, however, for bigger tables you may want to move some of this logic into a memory-optimized table. Given that my source data set is quite small (100K rows), I did not encounter any performance bottlenecks with TempDB-stored tables in this set up. Additionally, this stored procedure acts as a coordinator/dispatcher, ensuring that all conditions are validated, the number of concurrent streams does not exceed number of CPU cores, the runtime (checked every 5 seconds and capped at 200 lookups) does not go over this limit, in which case any outstanding jobs are terminated.
Finally, a self-contained SQL Server agent job is instantiated, calling the second stored procedure which is responsible for data insertion based on the partition number and hash values boundaries.
DECLARE @sql_job		NVARCHAR(MAX)	=
'USE [targetdb]
EXEC	[dbo].['+@Worker_Proc_Name+']
@Source_Server_Name = '+@Source_Server_Name+',
@Source_Server_DB_Name = '''''+@Source_Server_DB_Name+''''',
@Source_Server_Schema_Name = '''''+@Source_Server_Schema_Name+''''',
@Source_Server_Object_Name = '''''+@table+''''',
@Target_Server_DB_Name = N'''''+@Target_Server_DB_Name+''''',
@Target_Server_Schema_Name = '''''+@Target_Server_Schema_Name+''''',
@Hash_SQL = N'''''+@hash_SQL+''''',
@Hash_FROM = N'''''+@hash_FROM+''''',
@Hash_TO = N'''''+@hash_TO+''''',
@Is_Big = N'''''+CAST(@is_big AS CHAR(1))+''''',
@Col_List_MSSQL = N'''''+@Col_List_MSSQL+''''',
@Target_Server_Object_Name = '''''+@table+''''',
@Exec_Instance_GUID	='''''+CAST(@Exec_Instance_GUID AS VARCHAR(128))+''''',
@Package_Name='''''+@Package_Name+''''' '


SET @SQL =			'IF EXISTS'
SET @SQL = @SQL +	'(SELECT TOP 1 1 FROM msdb..sysjobs_view job JOIN msdb.dbo.sysjobactivity activity '					+CHAR(13)
SET @SQL = @SQL +	'ON job.job_id = activity.job_id WHERE job.name = N'''+@job+''''										+CHAR(13)
SET @SQL = @SQL +	'AND job.date_created IS NOT NULL AND activity.stop_execution_date IS NULL)'							+CHAR(13)
SET @SQL = @SQL +	'BEGIN'																									+CHAR(13)
SET @SQL = @SQL +	'EXEC msdb..sp_stop_job @job_name=N'''+@job+''';'														+CHAR(13)
SET @SQL = @SQL +	'EXEC msdb..sp_delete_job @job_name=N'''+@job+''', @delete_unused_schedule=1'							+CHAR(13)
SET @SQL = @SQL +	'END'																									+CHAR(13)
SET @SQL = @SQL +	'IF EXISTS'																								+CHAR(13)
SET @SQL = @SQL +	'(SELECT TOP 1 1 FROM msdb..sysjobs_view job JOIN msdb.dbo.sysjobactivity activity'						+CHAR(13)
SET @SQL = @SQL +	'ON job.job_id = activity.job_id WHERE job.name = N'''+@job+''''										+CHAR(13)
SET @SQL = @SQL +	'AND job.date_created IS NULL AND activity.stop_execution_date IS NOT NULL)'							+CHAR(13)
SET @SQL = @SQL +	'BEGIN'																									+CHAR(13)
SET @SQL = @SQL +	'EXEC msdb..sp_delete_job @job_name=N'''+@job+''', @delete_unused_schedule=1'							+CHAR(13)
SET @SQL = @SQL +	'END'																									+CHAR(13)
SET @SQL = @SQL +	'IF EXISTS'																								+CHAR(13)
SET @SQL = @SQL +	'(SELECT TOP 1 1 FROM msdb..sysjobs_view job WHERE job.name = N'''+@job+''')'							+CHAR(13)
SET @SQL = @SQL +	'BEGIN'																									+CHAR(13)
SET @SQL = @SQL +	'EXEC msdb..sp_delete_job @job_name=N'''+@job+''', @delete_unused_schedule=1'							+CHAR(13)
SET @SQL = @SQL +	'END'																									+CHAR(13)
SET @SQL = @SQL +	'EXEC msdb..sp_add_job '''+@job+''', @owner_login_name= '''+@job_owner+''';'							+CHAR(13)
SET @SQL = @SQL +	'EXEC msdb..sp_add_jobserver @job_name= '''+@job+''';'													+CHAR(13)
SET @SQL = @SQL +	'EXEC msdb..sp_add_jobstep @job_name='''+@job+''', @step_name= ''Step1'', '								+CHAR(13)
SET @SQL = @SQL +	'@command = '''+@sql_job+''', @database_name = '''+@Target_Server_DB_Name+''', @on_success_action = 3;'	+CHAR(13)
SET @SQL = @SQL +	'EXEC msdb..sp_add_jobstep @job_name = '''+@job+''', @step_name= ''Step2'','							+CHAR(13)
SET @SQL = @SQL +   '@command = '''+@delete_job_sql+''''																	+CHAR(13)
SET @SQL = @SQL +	'EXEC msdb..sp_start_job @job_name= '''+@job+''', @output_flag = 0'
The short footage below demonstrates how our target Dummy_Table data is loaded using this architecture.
It is also worth highlighting that this code can run acquisitions for tables which are not hash-partitioned, in which case it will still create multiple parallel streams, providing a significant boost in comparison to sequential loads. As such we can mix and match objects which need to be broken into multiple streams i.e. large tables, as well as stand-alone loads which can move data across in a single transaction. Another interesting feature is the ability to ‘throttle’ the number of concurrent streams using the @Queue_Size parameter, which is set to the number of cores allocated to a SQL Server instance this process is executing on or a number we can specify. As such, even when we partition a large table into a number of streams which exceed that of the available cores, the queue size will always stay consistent and not outgrow the maximum number of concurrent streams allowed. This enables the process to ‘nibble’ at the queue (queue size check set to 1 second interval), maximizing resources utilization and ensuring that we have an optimal number of jobs running concurrently.
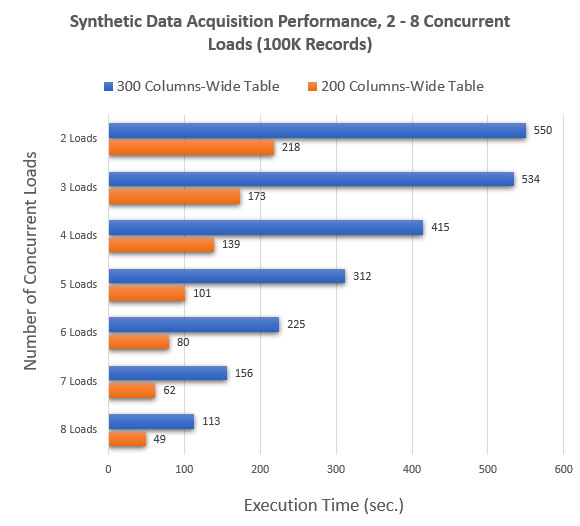
Sample Data Testing Results
Now that I’ve demonstrated how this technique can increase the performance of moving data, let’s look at some concrete numbers. I re-run the code for two small samples of data i.e. tables with 200 columns and 300 columns, across 100K rows of synthetic data and the results clearly demonstrated that even with the additional overhead of calculating hash values on primary keys, it is possible to achieve at least 4x performance boost with this architecture. Even on my old-ish E5-2670 v3 rig clocked at 2.3GHz with SAN storage attached we can observe a significant speed increase, with Azure SQL DB CPU not exceeding 15% utilization at any time. The rule of diminishing results will most likely kick in when a hash value for a very long composite primary key will need to be calculated. Likewise, I would expect this solution to regress in performance if long tables e.g. 10M+ rows are involved. To prevent this, it may be possible that with enough network throughput and a well optimized source table we can re-factor this code to transition the disk-based temporary hash table (as it’s implemented in this demo) to memory-optimized table, but I have not tried it myself.
My testing machine had only 4 cores at its disposal so I had limited resources available, however, with 32 core machines becoming the norm these days, with the right application I would expect those numbers to be significantly better. As a matter of fact, transitioning to this method yielded 8-10x performance increase for few tables sourced from Dynamics365 schema using more powerful hardware on my current project.
Naturally, the overall performance will depend heavily on the number of factors e.g. network and storage speed, CPU specs, schema structure, data types etc. but when possible (and applicable) one could improve data acquisition performance without resorting to bespoke frameworks, on a single machine and all using T-SQL/SQL Server Agent functionality as the underlining technology.
http://scuttle.org/bookmarks.php/pass?action=addThis entry was posted on Tuesday, June 1st, 2021 at 9:15 am and is filed under Azure, Programming, SQL, SQL Server. You can follow any responses to this entry through the RSS 2.0 feed. You can leave a response, or trackback from your own site.


admin January 28th, 2021 at 11:13 am
Thanks Depesh
Did not notice any major storage spikes in TempDB using this solution. As a matter of fact, when using SSIS for this sort of jobs we had to purge SSISDB data with increased frequency as the bloat was very pronounced. Again, it depends what you’re using it for and how you apply it across your specific data and problems you’re trying to solve.