Tackling Data-Intensive Workloads with Azure Batch – Elastic, On-Demand and Cloud-Scale Compute For The Masses
Introduction
As a data domain architect (amongst many other hats I wear these days), I sometimes find it difficult to recommend a public cloud service which can fulfill all my clients’ needs without any compromises and drawbacks. Bespoke development is always an option but with the speed at which this industry is moving, chances are that someone has already encountered and solved the problem using off-the-shelf technology. As cloud vendors learn to adapt and expand on their offering, the lines between different methodologies and tools to accomplish the same result have become more blurred and it’s not always easy to discern which is the cheapest, most performant, quickest to implement etc. Take compute as an example – gone are the days where buying dedicated hardware was the only option as virtualization, containerization and serverless have become the de facto standards for many workloads. Stateless architecture is the new norm and there is no going back unless you have deep pockets and require a deep level of isolation.
Using Microsoft Azure one can conduct both: large scale, batch-style, parallelized high-performance computing (HPC) or, in case of lightweight, ‘chatty’ rather than ‘chunky’ workloads, end users can opt for more scalable, elastic and ops-free services e.g. Azure Logic Apps, Azure Functions etc. The choices are plentiful and chances are Azure has all your compute needs covered. In one of my previous posts HERE I already outlined how to implement Azure Functions so in this post I will turn my attention to the more ‘heavy-duty’ service offering – Azure Batch.
To adequately define how Azure Batch differs from other compute services offered by Microsoft on their public cloud we will build a small POC used to generate TPC-DS benchmark data. For a more detailed primer on how to generate TPC-DS data please visit my previous post HERE, so to keep things concise I will only skim over what TPC-DS benchmark is. TPC-DS utility is mainly used for mock data (flat files) generation which in turn is used for big data benchmarking. As creating those files is a time-consuming and compute-intensive process, particularly when specifying large scale factors, we will try to use Azure Batch to expedite this process. To achieve this using Azure Python SDK and Azure Batch service, we will create all Azure infrastructure scaffolding, clone TPC-DS repository containing the dsdgen utility used to create the aforementioned flat files, run the data generating process using a simple bash command and finally upload the files created into our blob storage account.
The following is high-level Azure Batch service overview from Microsoft, outlining the intended purpose and some of its functionality.
Azure Batch Service Quick Primer
Azure Batch is used to run large-scale parallel and high-performance computing (HPC) batch jobs efficiently in Azure. Azure Batch creates and manages a pool of compute nodes (virtual machines), installs the applications you want to run, and schedules jobs to run on the nodes. There’s no cluster or job scheduler software to install, manage, or scale. Instead, you use Batch APIs and tools, command-line scripts, or the Azure portal to configure, manage, and monitor your jobs.
Developers can use Batch as a platform service to build SaaS applications or client apps where large-scale execution is required. Those applications can involve VFX and 3D image rendering, image analysis and processing, genetic sequence analysis or even data ingestion, processing, and ETL operations.
Batch works well with intrinsically parallel (also known as ‘embarrassingly parallel’) workloads. These workloads have applications which can run independently, with each instance completing part of the work. When the applications are executing, they might access some common data, but they do not communicate with other instances of the application. Intrinsically parallel workloads can therefore run at a large scale, determined by the amount of compute resources available to run applications simultaneously. Some examples of intrinsically parallel workloads you can bring to Batch include financial risk modelling, software tests execution or media transcoding. You can also use Batch to execute tightly coupled workloads, where the applications you run need to communicate with each other, rather than running independently. Tightly coupled applications normally use the Message Passing Interface (MPI) API. You can run your tightly coupled workloads with Batch using Microsoft MPI or Intel MPI. Improve application performance with specialized HPC and GPU-optimized VM sizes e.g. fluid dynamics or multi-node AI training.
Batch Application Example – Generating TPC-DS Benchmark Data
In the following example I will outline how one can use the power of Batch service and associated compute capacity to generate TPC-DS benchmark data. You can find a lot of literature and blog posts describing this process in detail on the internet (including my blog post HERE) so I will skip over the nitty gritty. The only thing worth mentioning is that the utility used to create flat files used to load those into the TPC-DS database schema is both compute and time-intensive and therefore lends itself to being executed on the high-performing compute instances. This is particularly applicable when the scaling factor indicating the volume of data generated is set to a high number e.g. 10s of terabytes. Using Python SDK for Azure we will provision a pool of Batch compute nodes (virtual machines), create a job that runs tasks to generate output files in the pool using shell commands and dsdgen utility and finally upload the newly created files to the nominated Azure storage account using between one and four compute nodes.
The following image depicts a high-level architecture behind this process.
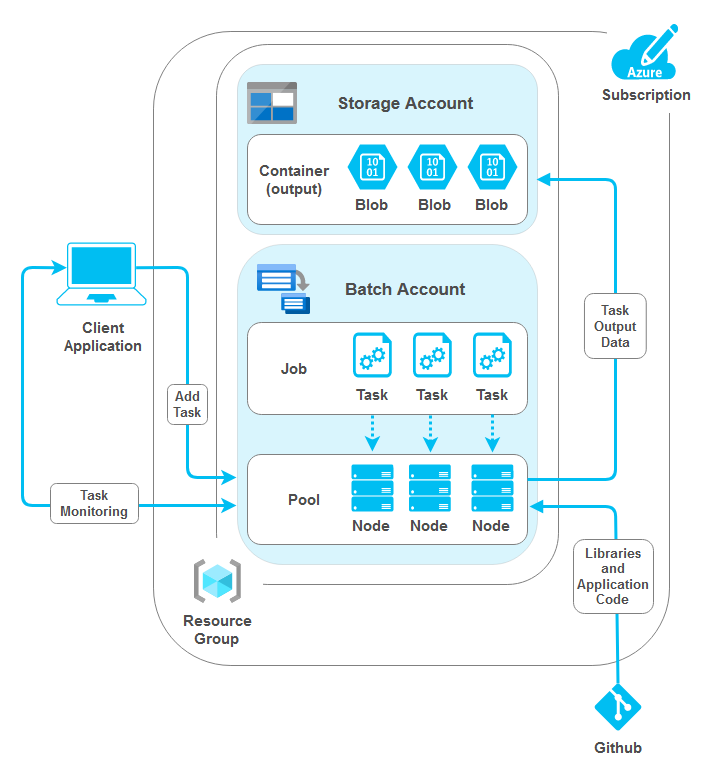
With that in mind, let’s start by creating the underlying infrastructure on Azure. The following Python script is responsible for creating Azure Resource Group, Storage Account and Storage Container. The Storage Container will be used in the subsequent script to house flat files generated by the dsdgen utility (part of TPC-DS benchmark suite of tools) as blobs.
from azure.identity import AzureCliCredential
from azure.mgmt.resource import ResourceManagementClient
from azure.mgmt.storage import StorageManagementClient
from azure.storage.blob import BlobServiceClient
from msrestazure.azure_exceptions import CloudError


_RESOURCE_GROUP_NAME = 'batchtestresourcegroup'
_RESOURCE_GROUP_LOCATION = 'australiasoutheast'
_STORAGE_ACCOUNT_NAME = 'batchdemo2021'
_STORAGE_CONTAINER_NAME = 'outputfiles'
_SUBSCRIPTION_ID = 'YourAzureSubscriptionID'


# Create resource group
def create_resource_group(resource_client, _RESOURCE_GROUP_NAME, _LOCATION):
    print("\nCreating Azure Resource Group {rg_name}...".format(
        rg_name=_RESOURCE_GROUP_NAME), end="", flush=True)
    try:
        resource_client.resource_groups.create_or_update(
            _RESOURCE_GROUP_NAME, {'location': _LOCATION})
    except CloudError as e:
        print(e)
    rg = [g.name for g in resource_client.resource_groups.list()]
    if _RESOURCE_GROUP_NAME in rg:
        print('OK')


# Create storage account in the nominated resource group
def create_storage_account(storage_client, _STORAGE_ACCOUNT_NAME, _RESOURCE_GROUP_NAME, _RESOURCE_GROUP_LOCATION):
    print("Creating Azure Storage Account {st_acct}...".format(
        st_acct=_STORAGE_ACCOUNT_NAME), end="", flush=True)
    try:
        availability_result = storage_client.storage_accounts.check_name_availability(
            {'name': _STORAGE_ACCOUNT_NAME})
        if not availability_result.name_available:
            print('storage name {st_acct} is already in use. Try another name.'.format(
                st_acct=_STORAGE_ACCOUNT_NAME))
            exit()
        poller = storage_client.storage_accounts.begin_create(_RESOURCE_GROUP_NAME, _STORAGE_ACCOUNT_NAME,
                                                              {
                                                                  "location": _RESOURCE_GROUP_LOCATION,
                                                                  "kind": "StorageV2",
                                                                  "sku": {"name": "Standard_LRS"}
                                                              })
        account_result = poller.result()
        if account_result.name == _STORAGE_ACCOUNT_NAME:
            print('OK')
    except CloudError as e:
        print(e)


# Create storage container in the nominated resource group
def create_blob_storage(storage_client, _STORAGE_CONTAINER_NAME, _RESOURCE_GROUP_NAME, _STORAGE_ACCOUNT_NAME):
    print("Creating Azure Storage Container {st_blob}...".format(
        st_blob=_STORAGE_CONTAINER_NAME), end="", flush=True)
    storage_client.blob_containers.create(
        _RESOURCE_GROUP_NAME, _STORAGE_ACCOUNT_NAME, _STORAGE_CONTAINER_NAME, {})
    keys = storage_client.storage_accounts.list_keys(
        _RESOURCE_GROUP_NAME, _STORAGE_ACCOUNT_NAME)
    conn_string = f"DefaultEndpointsProtocol=https;EndpointSuffix=core.windows.net;AccountName={_STORAGE_ACCOUNT_NAME};AccountKey={keys.keys[0].value}"
    blob_service = BlobServiceClient.from_connection_string(
        conn_str=conn_string)
    containers = [i.name for i in blob_service.list_containers()]
    if _STORAGE_CONTAINER_NAME in containers:
        print('OK\n')


if __name__ == '__main__':
    credential = AzureCliCredential()
    storage_client = StorageManagementClient(credential, _SUBSCRIPTION_ID)
    resource_client = ResourceManagementClient(credential, _SUBSCRIPTION_ID)

    create_resource_group(
        resource_client, _RESOURCE_GROUP_NAME, _RESOURCE_GROUP_LOCATION)
    create_storage_account(storage_client, _STORAGE_ACCOUNT_NAME,
                           _RESOURCE_GROUP_NAME, _RESOURCE_GROUP_LOCATION)
    create_blob_storage(storage_client, _STORAGE_CONTAINER_NAME,
                        _RESOURCE_GROUP_NAME, _STORAGE_ACCOUNT_NAME)
Once the supporting infrastructure is in place we can go ahead and create Azure Batch account. The easiest way to do it is by logging into Azure Portal and from the ‘Create a Resource’ blade select Batch Service as per the image below.
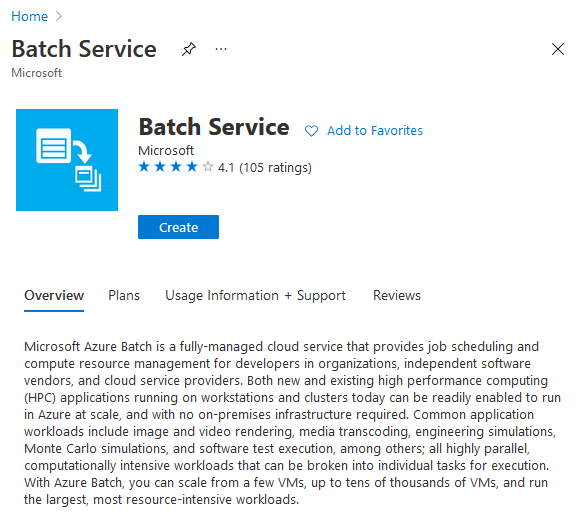
When completed, the three values we will need are a Storage Account Name, a Storage Account Key and finally a Storage Container Name. These values will need to be specified in the below script before executing.
Next, let’s look at the final snippet of code used to stand up Azure Batch pool, create the Job and associated Tasks and finally do all the heavy lifting regarding TPC-DS data generation and transfer into the nominated storage container. The below script, implemented mainly as a collection of functions for readability, is responsible for the following:
- Create pool resource running on a Linux (Ubuntu) server with a single node. A pool is the collection of nodes that applications runs on. A node is an Azure virtual machine (VM) or cloud service VM that is dedicated to processing a portion of the application’s workload. The size of a node determines the number of CPU cores, memory capacity, and local file system size that is allocated to the node. On node creation, a pre-deployment shell scrip is run to install required packages, download the azcopy utility (used for files transfer), cloning Github repo containing TPC-DS tools and compiling it in the destination directory.
- Create a Batch job. A job is a collection of tasks. It manages how computation is performed by its tasks on the compute nodes in a pool.
- Create a series of tasks (defined by the number of flat files/tables specified in the ‘export_files’ variable). A task is a unit of computation that is associated with a job. It runs on a node. Tasks are assigned to a node for execution, or are queued until a node becomes free. Put simply, a task runs one or more programs or scripts on a compute node to perform the work you need done. In this demo each task is responsible for executing the dsdgen utility for the specified table/file and copying the output into the nominated storage account.
- Monitor the progress of the instantiated job.
- Delete the pool and the job on tasks completion. Deleting job also deletes individual tasks assigned to it.
To highlight some of the more important sections we can see that the lines 105-112 and 156-165 (see highlighted sections) are where the shell commands are defined. The first section installs required TPC-DS repo libraries, downloads azcopy utility and compiles it. There is also an interesting use of $AZ_BATCH_NODE_SHARED_DIR runtime variable which denotes the full path of the shared directory on the node. All tasks that execute on the node have read/write access to this directory. Moving on to the second section, the shell script executes dsdgen utility with a scaling factor of 1 (1 GB), outputting flat files into $AZ_BATCH_TASK_WORKING_DIR location. This variable denotes the full path of the task working directory on the node. This section also triggers the azcopy utility used for transferring newly created flat files into the Azure blob storage container.
from datetime import datetime, timedelta
from timeit import default_timer as timer
from humanfriendly import format_timespan
import os
import itertools
import sys
import time

from azure.storage.blob import BlobServiceClient, generate_container_sas, AccountSasPermissions
import azure.batch._batch_service_client as batch
import azure.batch.batch_auth as batch_auth
import azure.batch.models as batchmodels


_BATCH_ACCOUNT_NAME = 'batchdemo'
_BATCH_ACCOUNT_KEY = 'YourBatchAccountKey'
_BATCH_ACCOUNT_URL = 'https://batchdemo.australiasoutheast.batch.azure.com'

_STORAGE_ACCOUNT_NAME = 'batchdemo2021'
_STORAGE_ACCOUNT_KEY = 'YourStorageAccountKey'
_STORAGE_CONTAINER_NAME = 'outputfiles'


_POOL_ID = 'PythonTutorialPool'
_POOL_NODE_COUNT = 1
_POOL_VM_SIZE = 'Standard_A1_v2'  # Standard_A2_v2, Standard_A4_v2, Standard_A8_v2
_NODE_OS_PUBLISHER = 'Canonical'
_NODE_OS_OFFER = 'UbuntuServer'
_NODE_OS_SKU = '18.04-LTS'
_JOB_ID = 'AzureBatchPythonDemoJob'


export_files = ['call_center.dat',
                'catalog_page.dat',
                'catalog_sales.dat',
                'customer.dat',
                'customer_address.dat',
                'customer_demographics.dat',
                'income_band.dat',
                'inventory.dat',
                'item.dat',
                'promotion.dat',
                'reason.dat',
                'ship_mode.dat',
                'store.dat',
                'store_sales.dat',
                'time_dim.dat',
                'warehouse.dat',
                'web_page.dat',
                'web_sales.dat',
                'web_site.dat']

# Prompt the user for yes/no input, displaying the specified question text
def query_yes_no(question, default="yes"):
    valid = {'y': 'yes', 'n': 'no'}
    if default is None:
        prompt = ' [y/n] '
    elif default == 'yes':
        prompt = ' [Y/n] '
    elif default == 'no':
        prompt = ' [y/N] '
    else:
        raise ValueError("Invalid default answer: '{}'".format(default))

    while 1:
        choice = input(question + prompt).lower()
        if default and not choice:
            return default
        try:
            return valid[choice[0]]
        except (KeyError, IndexError):
            print("Please respond with 'yes' or 'no' (or 'y' or 'n').\n")


# Wrap cmd/bash command in a shell
def wrap_commands_in_shell(ostype, commands):
    if ostype.lower() == 'linux':
        return '/bin/bash -c \'set -e; set -o pipefail; {}; wait\''.format(
            ';'.join(commands))
    elif ostype.lower() == 'windows':
        return 'cmd.exe /c "{}"'.format('&'.join(commands))
    else:
        raise ValueError('unknown ostype: {}'.format(ostype))


# Print the contents of the specified Batch exception
def print_batch_exception(batch_exception):
    print('-------------------------------------------')
    print('Exception encountered:')
    if batch_exception.error and \
            batch_exception.error.message and \
            batch_exception.error.message.value:
        print(batch_exception.error.message.value)
        if batch_exception.error.values:
            print()
            for mesg in batch_exception.error.values:
                print('{}:\t{}'.format(mesg.key, mesg.value))
    print('-------------------------------------------')


# Create a pool of compute nodes with the specified OS settings
def create_pool(batch_client, _POOL_ID, _POOL_NODE_COUNT, _POOL_VM_SIZE):
    print('\nCreating pool {poolid} (allocated VM size is: {vm})...'.format(
        poolid=_POOL_ID, vm=_POOL_VM_SIZE))
    task_commands = [' sudo apt-get update',
                     ' sudo apt-get install -y gcc make flex bison byacc git',
                     ' cd $AZ_BATCH_NODE_SHARED_DIR',
                     ' wget -O azcopy_v10.tar.gz https://aka.ms/downloadazcopy-v10-linux',
                     ' tar -xf azcopy_v10.tar.gz --strip-components=1',
                     ' git clone https://github.com/gregrahn/tpcds-kit.git',
                     ' cd tpcds-kit/tools',
                     ' make OS=LINUX']
    user = batchmodels.AutoUserSpecification(
        scope=batchmodels.AutoUserScope.pool,
        elevation_level=batchmodels.ElevationLevel.admin)
    new_pool = batch.models.PoolAddParameter(
        id=_POOL_ID,
        virtual_machine_configuration=batchmodels.VirtualMachineConfiguration(
            image_reference=batchmodels.ImageReference(
                publisher=_NODE_OS_PUBLISHER,
                offer=_NODE_OS_OFFER,
                sku=_NODE_OS_SKU,
                version="latest"
            ),
            node_agent_sku_id="batch.node.ubuntu 18.04"),
        vm_size=_POOL_VM_SIZE,
        target_dedicated_nodes=_POOL_NODE_COUNT,
        start_task=batch.models.StartTask(
            command_line=wrap_commands_in_shell('linux',
                                                task_commands),
            user_identity=batchmodels.UserIdentity(auto_user=user),
            wait_for_success=True)
    )
    batch_client.pool.add(new_pool)


# Create a job with the specified ID, associated with the specified pool.
def create_job(batch_client, _JOB_ID, _POOL_ID):

    print('Creating job {}...'.format(_JOB_ID))

    job = batch.models.JobAddParameter(
        id=_JOB_ID,
        pool_info=batch.models.PoolInformation(pool_id=_POOL_ID))
    batch_client.job.add(job)


# Add a task for each input file in the collection to the specified job
def add_tasks(batch_client, output_container_sas_token, export_files, _JOB_ID, _STORAGE_CONTAINER_NAME, _STORAGE_ACCOUNT_NAME):
    print('Adding {} tasks to job {}...'.format(len(export_files), _JOB_ID))
    tasks = list()
    output_files_path = '$AZ_BATCH_TASK_WORKING_DIR/TPCDS-DATA'
    tpcds_utilility_path = '$AZ_BATCH_NODE_SHARED_DIR/tpcds-kit/tools'
    azcopy_utility_path = '$AZ_BATCH_NODE_SHARED_DIR'
    for idx, file_name in enumerate(export_files):
        command = "/bin/bash -c \"mkdir {fpath} ".format(
            fpath=output_files_path)
        command += " && cd {upath} ".format(upath=tpcds_utilility_path)
        command += " && ./dsdgen -SCALE 1 -TABLE {tname} -DIR {fpath}".format(
            fpath=output_files_path, tname=os.path.splitext(file_name)[0])
        command += " && cd {az} ".format(az=azcopy_utility_path)
        command += " && sudo ./azcopy copy \"{opath}/TPCDS-DATA/{fname}\"".format(
            opath=output_files_path, fname=file_name)
        command += " \"https://{sacct}.blob.core.windows.net/{scontainer}/?{sastoken}\" \"".format(
            sacct=_STORAGE_ACCOUNT_NAME, scontainer=_STORAGE_CONTAINER_NAME, sastoken=output_container_sas_token)
        tasks.append(batch.models.TaskAddParameter(
            id='Task{}'.format(idx),
            command_line=command
        )
        )
    batch_client.task.add_collection(_JOB_ID, tasks)


# Return when all tasks in the specified job reach the Completed state.
def wait_for_tasks_to_complete(batch_service_client, job_id, timeout):
    timeout_expiration = datetime.now() + timeout
    spinner = itertools.cycle(['-', '/', '|', '\\'])
    print("Monitoring all tasks for 'Completed' state, timeout in {}..."
          .format(timeout), end='')
    while datetime.now() < timeout_expiration:
        sys.stdout.write(next(spinner))
        sys.stdout.flush()
        tasks = batch_service_client.task.list(job_id)

        incomplete_tasks = [task for task in tasks if
                            task.state != batchmodels.TaskState.completed]
        if not incomplete_tasks:
            print()
            return True
        else:
            sys.stdout.write('\b')
            time.sleep(1)
    raise RuntimeError("ERROR: Tasks did not reach 'Completed' state within "
                       "timeout period of " + str(timeout))


if __name__ == '__main__':
    batch_execution_start_time = timer()
    # Create a Batch service client with associated credentails
    credentials = batch_auth.SharedKeyCredentials(_BATCH_ACCOUNT_NAME,
                                                  _BATCH_ACCOUNT_KEY)
    batch_client = batch.BatchServiceClient(
        credentials,
        batch_url=_BATCH_ACCOUNT_URL)

    # Create SAS (Shared Access Signature) token
    output_container_sas_token =
        generate_container_sas(account_name=_STORAGE_ACCOUNT_NAME,
        container_name=_STORAGE_CONTAINER_NAME,
        account_key=_STORAGE_ACCOUNT_KEY,
        permission=AccountSasPermissions(
        write=True),
        expiry=datetime.utcnow() + timedelta(hours=1))
    try:
        # Create the pool that will contain the compute nodes that will execute the tasks.
        create_pool(batch_client, _POOL_ID, _POOL_NODE_COUNT, _POOL_VM_SIZE)

        # Create the job that will run the tasks.
        create_job(batch_client, _JOB_ID, _POOL_ID)

        # Add the tasks to the job.
        add_tasks(batch_client, output_container_sas_token,
                  export_files, _JOB_ID, _STORAGE_CONTAINER_NAME, _STORAGE_ACCOUNT_NAME)

        # Pause execution until tasks reach Completed state.
        wait_for_tasks_to_complete(batch_client,
                                   _JOB_ID,
                                   timedelta(minutes=20))
    except batchmodels.BatchErrorException as err:
        print_batch_exception(err)
        raise
    batch_execution_end_time = timer()
    elapsed_duration = batch_execution_end_time - batch_execution_start_time
    print('Elapsed batch processing time was {time}.'.format(
        time=format_timespan(elapsed_duration)))

    # Clean up Batch resources (if the user so chooses).
    if query_yes_no('Delete job?') == 'yes':
        batch_client.job.delete(_JOB_ID)
    if query_yes_no('Delete pool?') == 'yes':
        batch_client.pool.delete(_POOL_ID)
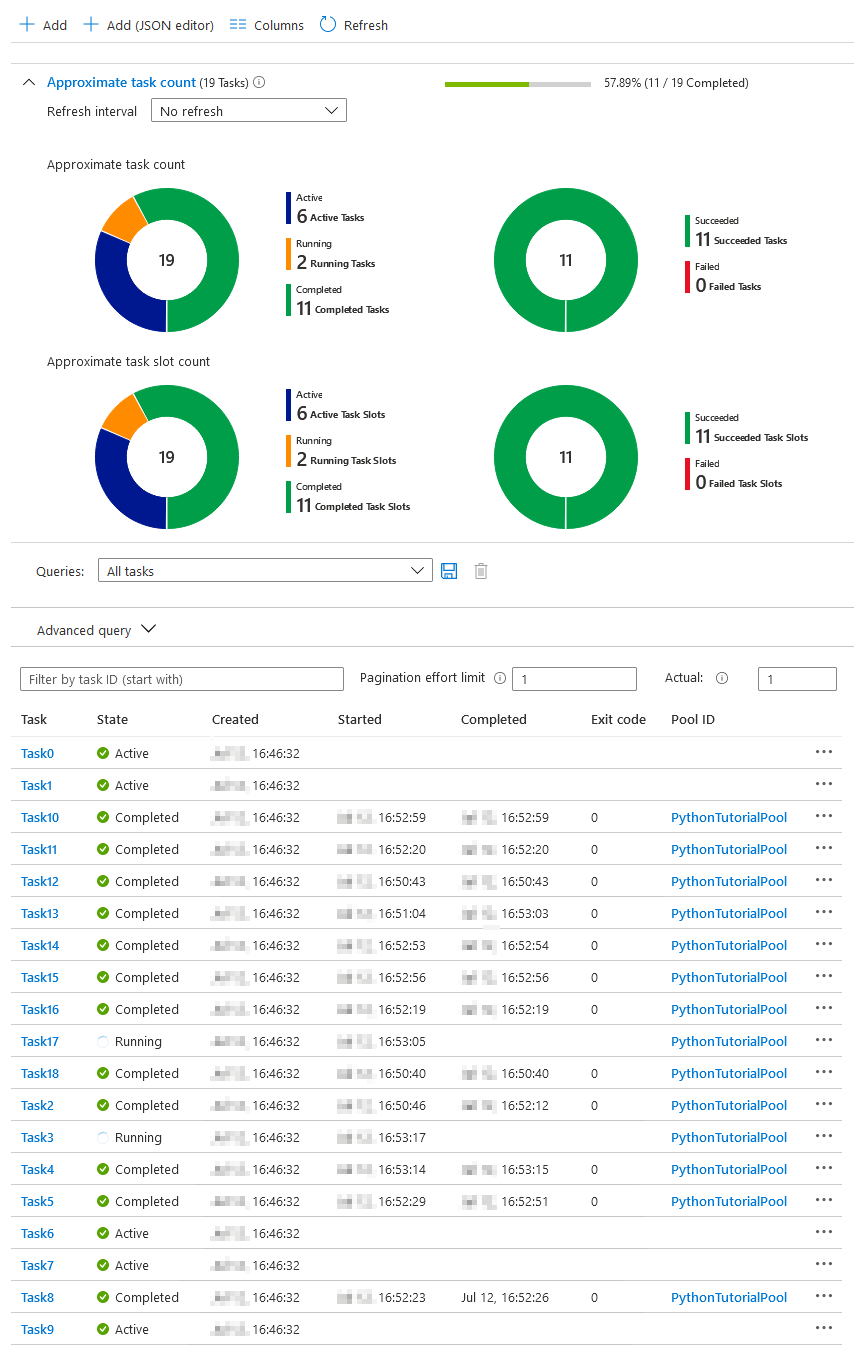
When executed, we can view the progress status, results and additional high-level information for individual tasks in Azure Portal (click on image to enlarge).
I also run the script across multiple compute instance sizes to see what difference processing time will make depending on the selected VM type. The following is a table outlying total processing time (including Pool node creation) across 4 different node sizes and 3 image types.
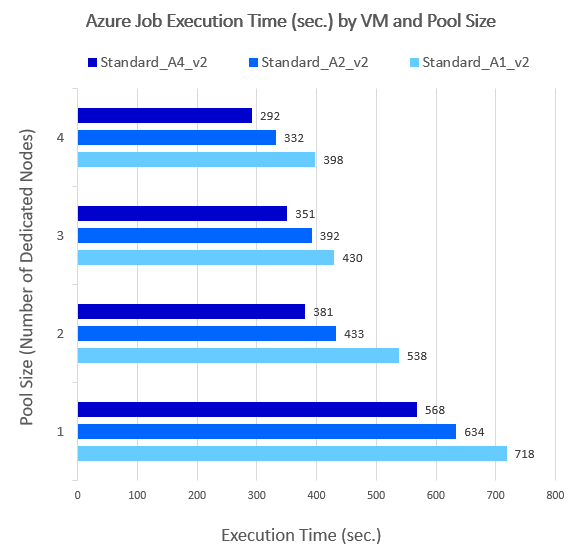
Looking at those times, it’s evident that the higher number of nodes and the larger the VM size was, the quicker the application executed. In my case it wasn’t linear and only small gains were achieved by increasing the compute capacity, most likely due to significant amount of time dedicated exclusively to VM provisioning. As such, I would imagine that for workloads spanning tens of minutes or even hours, the balance would even out proportionally to the VM size and node count.
Conclusion
The example I outlined is only a small nod to the breath of capabilities and potential use-cases Azure Batch can provide – I haven’t even outlined features such as auto-scaling or using low-priority/spot VMs. The number of applications where on-demand and scalable compute power is required is limitless and almost any domain or project can benefit from it. Additionally, one can extend these capabilities and link it up with other Azure services to build more bespoke solutions e.g. in this context, using Azure Data Factory the TPC-DS process can be executed multiple times, each run generating data for different scaling factor and loading those into a database schema for further testing and evaluation. Similarly, the internet is full of interesting and creative posts of other engineers using Batch to help them solve intricate problems, which otherwise would not see the light of day (mainly due to large upfront investment in hardware). It’s amazing how many of today’s cloud services excel at obfuscating complex and nuanced paradigms for simple implementations, saving time and money. Azure Batch is one of them.
http://scuttle.org/bookmarks.php/pass?action=addThis entry was posted on Wednesday, December 22nd, 2021 at 5:51 pm and is filed under Azure, Cloud Computing, Programming. You can follow any responses to this entry through the RSS 2.0 feed. You can leave a response, or trackback from your own site.


Luke F September 20th, 2021 at 12:34 pm
Hi Martin
This looks interesting and I am investigating a case where Azure Batch can be used for converting thousands of JSON files a day and loading those into the database. Do you think that may be a better solution than using ADF or a dedicated VM?
Great post BTW.
Luke