September 15th, 2013 / No Comments » / by admin
In previous posts to this series (HERE, HERE and HERE) I outlined some of the key concepts of data warehouse design and modelling, analysed the source objects and data they hold and build the code base for data mart objects deployment and population. In this post I will explore SQL Server Integration Services functionality and how the code samples from PREVIOUS POST will be integrated into developing an ETL routine to automate data mart loading.
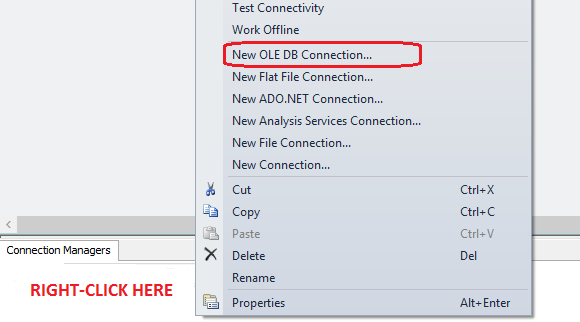
Without further ado, let’s open up BIDS or SQL Server Data Tools application (depending on which SQL Server version you’re using) and create an empty SSIS project. Next, let’s set up a database connection in Connection Managers pane pointing it to DW_Sample database. The connection type we will be using here is OLE DB connection and to kick off the connection wizard setup pane just right click inside Connection Managers pane and select OLE DB from the list provided as per image below.
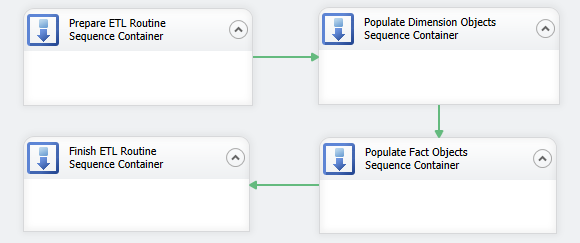
Although there is only going to be one package doing all the work, for sake of coherence and aesthetics, I would like to create logic boundaries and group similar tasks together e.g. all tasks pertaining to populating dimension objects would be encapsulated into one logic group, all tasks responsible for database and objects preparation before the load is commenced will be grouped together etc. To achieve this I will first lay out a number of Sequence Containers in Control Flow pane, which will manage the groupings and provide greater control of tasks execution. Let’s create four groups of tasks and name them in accordance with how they will be utilised in this package as per image below. I have also joined them with a default precedence constraint arrows and arranged them so they execute in the specific order – prepare database objects, load dimension data, load fact data and finally restore foreign keys constraints as the last group.
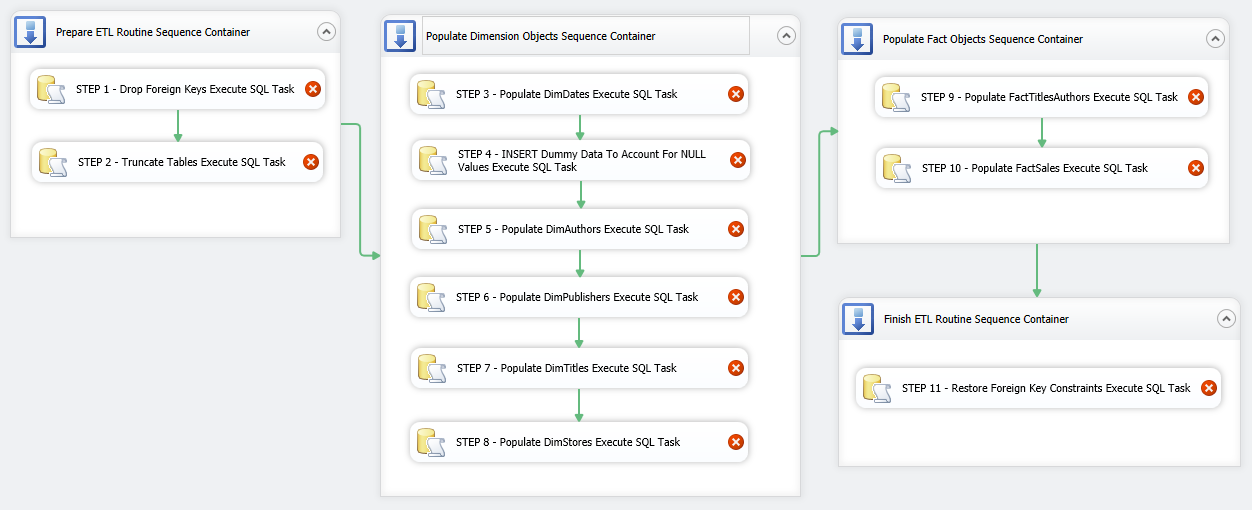
Let’s start filling in the gaps with ETL components and corresponding code from previous post. We begin with first Sequence Container and place two Execute SQL Task (EST) containers inside the first Sequence Container, joining them together using default precedence constraints. Next, let’s go through the remaining Sequence Containers and place more Execute SQL Task (EST) components inside them as per the following sequence: Populate Dimension Objects Sequence Container – 6 ESTs, Populate Fact Objects Sequence Container – 2 ESTs, Finish ETL Routine Sequence Container – 1 EST. We will also adjust the names of ESTs to correspond to their function in this SSIS solution. So far the package should look as per image below.
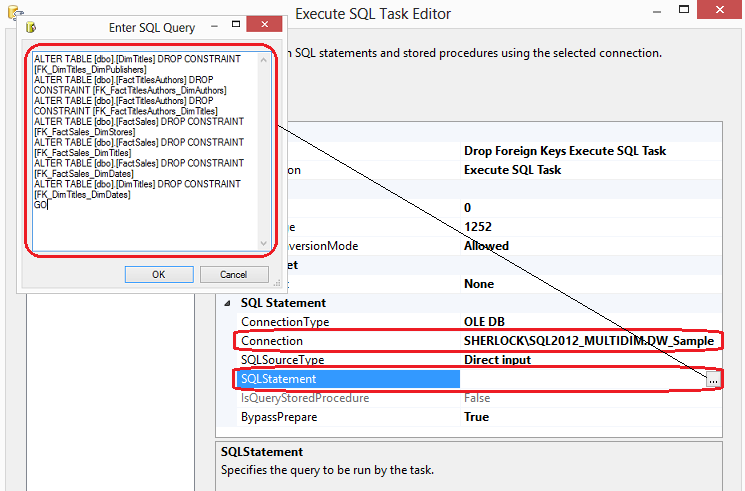
Now that we have the skeleton of our package, we can start populating individual components with the SQL code we developed as per PREVIOUS POST. Let’s open up first Execute SQL Task in Prepare ETL Routine Sequence Container by double-clicking on in and adjust Connection property by selecting the connection name of our database established earlier. Next, clicking on ellipsis next to SQLStatement property we bring up the SQL editor where we paste the SQL for each task we want to accomplish. Let’s paste SQL responsible for dropping foreign key constraints and click OK.
If you remember individual code snippets from PREVIOUS POST, most of those had number assigned to them for referencing when designing our SSIS package. This is going to make our life easier when looking up SQL representing the functionality of each SSIS component so rather than repeating the above process of adjusting individual components’ SQLStatement properties I have numbered the transformations according to how they relate to the code from PREVIOUS POST.
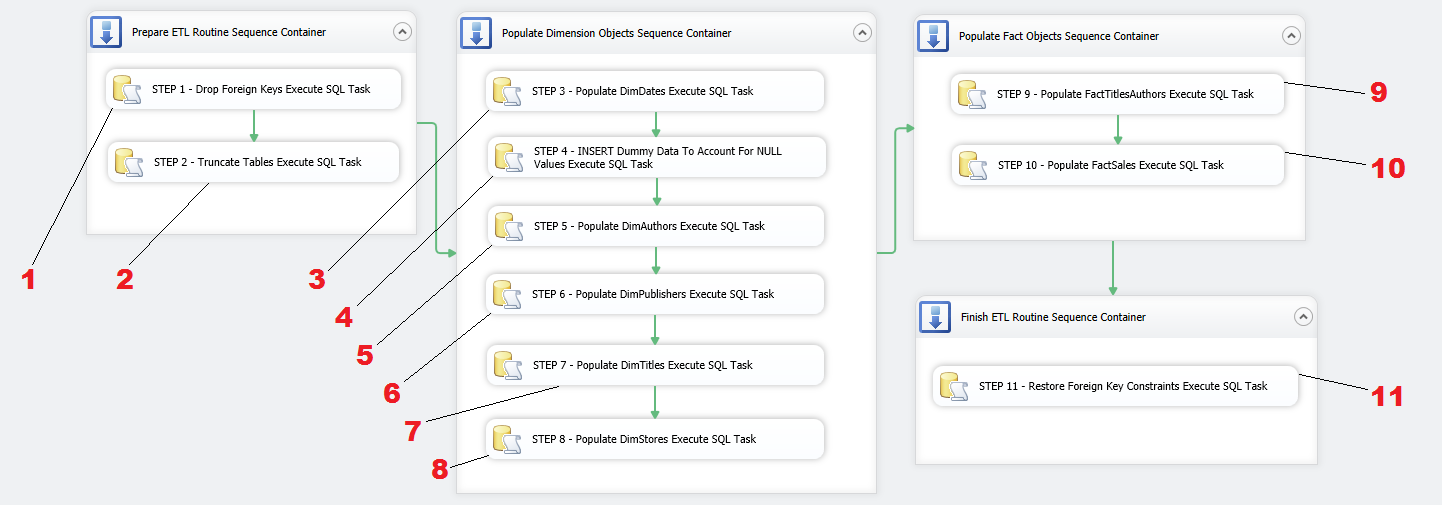
All we need to do now is to reference each Execute SQL Task component to the code snippet from PREVIOUS POST and repeat the process of selecting database connection and pasting SQL code into the editor for each task. You can retrieve the SQL from the previous post HERE or download the whole script from HERE. If you choose to download it, just make sure to break it down according to the functionality each section provides and copy and paste only applicable fragments. Once all tasks have been populated with the code hopefully all warning icons on individual tasks disappeared and we can execute the package by pressing F5 or clicking on the Start Debugging icon in the top pane.

You can re-run the package as many times as you wish, however, please note two important things about this solution. Number one, the code section responsible for truncating DimDates table as well as the code which populates this dimension can be disabled once DimDates has been populated. We do not need to repopulate date dimension more than once as this data is not subjected to changes and inserting it once is enough (unless more dates need to be added). Number two, please also note that as per previous post explanation, one of the dimensions (DimStores) and two fact tables are following incremental inserts/updates logic. This means that, in case of DimStores, once this object is populated, only changed data and new records are permitted to filter through by how the SQL code was implemented. Again, in real world scenario e.g. in production there is no need to truncate it every time the package runs. In fact, it may be detrimental to do so as all history changes will be lost. Also, in case of fact tables, they should not be emptied out as the core purpose of data warehouse is to collect historical information and store it in a central repository. In some environments, only inserts are allowed to ensure that all history is preserved. If OLTP database (data source) is occasionally ‘trimmed down’ to improve performance, a big chunk of that data will be lost when reloading data mart thus once more invalidating the core principle of data warehouse – to keep all history data for analytical purposes. If you wish to follow these principles, you can alter the package and its SQL code (once the package was run at least once and all objects have data in them) in the following manner.
- Remove the following line from Execute SQL Task number 2 (truncates database objects):
TRUNCATE TABLE [dbo].[FactSales]
TRUNCATE TABLE [dbo].[FactTitlesAuthors]
TRUNCATE TABLE [dbo].[DimStores]
TRUNCATE TABLE [dbo].[DimDates]
- Disable (do not delete) Execute SQL Task number 3 and 4 (populates DimDates table). You can do this by right-click on the container and selecting Disable from the options available
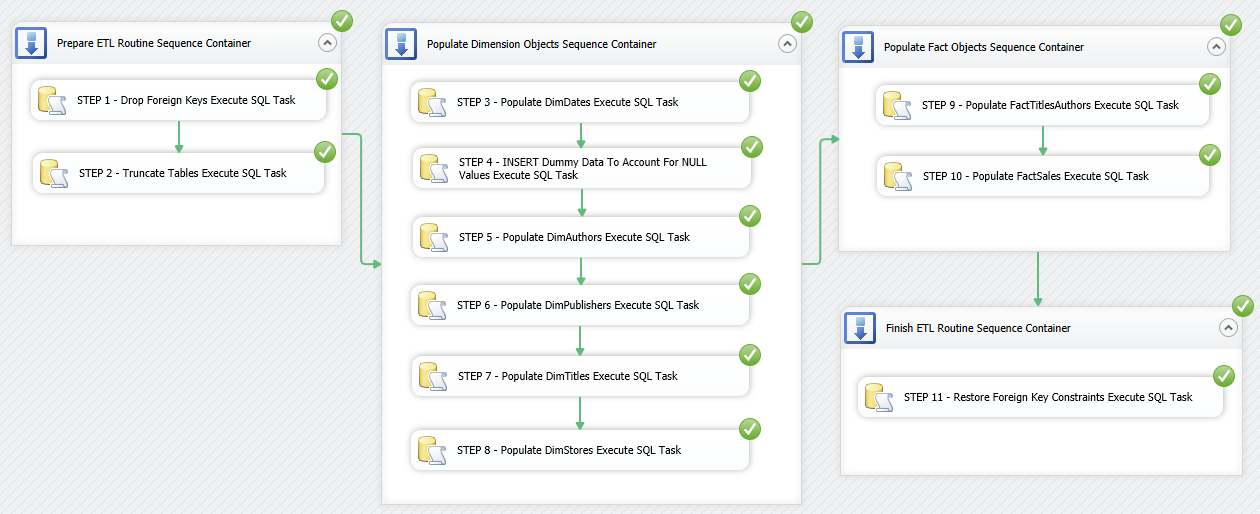
The package should run without issues, however, this time the difference is that we are not removing anything from two fact tables and the two dimensions – DimDates and DimStores. We also leave DimDates table out of the process as its data does not come from any source system and once populated can be removed/disabled. The successfully executed package should look like as per image below.
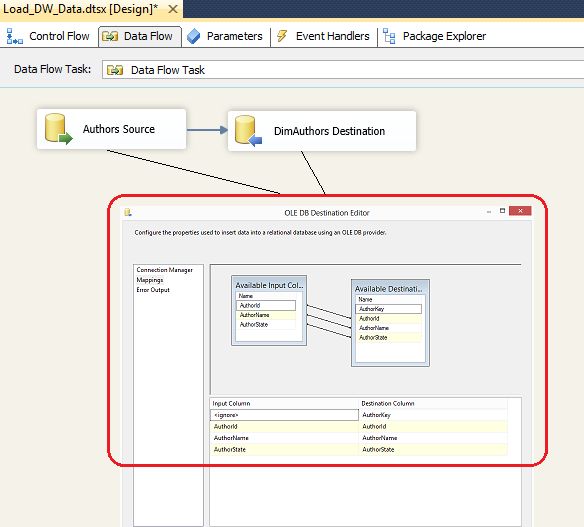
This is one of the many ways to use SSIS for data loading. Instead of using INSERT and SELECT SQL statements in every component, you could also use SELECT only and map out the attributes produced to the source schema by means of using Data Flow Task as per image below.
You could also use views, stored procedures, User-Defined Functions etc. – SSIS is quite flexible in how you wish to pull your data in and I strongly suggest you explore other options. Also, it is worth highlighting that due to the simplicity of this design, I only had a chance to use very limited number of components and options available in SSIS development environment. There is a huge myriad of tools, options and features available at your disposal that SSIS provides out-of-the-box and some transformations can be built with an extreme level of complexity. That is partially what is great about this tool – you can create a simple ETL and automate the laborious data centric processes with just a few drag-and-drop moves but SSIS also provides enough flexibility and power to cater for most advanced scenarios e.g. scripting in .NET, database maintenance tasks, data mining processing etc.
This concludes this post and, as usual, the code used in this series as well as solution files for this SSIS project can be found and downloaded from HERE. In the NEXT ITERATION to this series I will dive into the topic of SQL Server Analysis Services (SSAS), cubes and OLAP databases.
Please also check other posts from this series:
All SQL code and solution files can be found and downloaded from HERE.
Posted in: How To's, SQL, SSIS
Tags: SQL, SSIS
September 9th, 2013 / No Comments » / by admin
In the FIRST POST to this series I analysed the schema, objects and the data they hold for our mini data mart. This was followed by my SECOND POST outlining some key development concepts and preliminary code base for data mart objects schema. In this post I would like to dig dipper into technical aspects of a data mart development and touch on SQL which is used to populate the data mart tables which will become a prelude to SSIS package structure and design in the subsequent post.
For the sake of simplicity (with the exception of one dimension and one fact table which I will describe in more details later) we will assume that every time data is loaded into the data mart, we will perform a full load i.e. data will not be loaded incrementally and all the objects will be emptied and repopulated from scratch. This is not a standard approach, particularly when large volumes of data are at stake and it somewhat violates the basic principle of creating a data mart i.e. the purpose is to keep all historical information, with all the changes included. In this way, a track record of all source data is kept and any changes in history can be easily accounted for. Therefore, not trying to make things excessively complex but also reflecting some more advanced concepts such as Slowly Changing Dimensions, I will try to depict the design in such way that majority of the objects will be completely repopulated (easy approach), leaving the core fact table (FactSales) as well as one dimension table (DimStores) to conform to typical development standards and perform an incremental load (harder approach).
The typical steps involved in data warehouse table loading include:
- Deciding on full or delta load (already established as per above)
- Isolating the data to be extracted
- Developing the transformation logic
- Loading the data into the table
- Repeating until all tables have been populated
As we have already established which objects will participate in incremental load versus full load we can proceed to SQL code development and empty the tables first. To empty tables out of their data we may use the DELETE SQL statement or alternatively use TRUNCATE SQL command (this however will require dropping foreign key relationships first). There are number of reasons why we would opt for TRUNCATE versus DELETE. DELETE, for example, can prove to be quite slow as it removes table records one by one while logging all operations. TRUNCATE command, on the other hand, de-allocates data pages that internally store the data in SQL Server with no logging, therefore is much quicker. An additional benefit of truncation over deletion is that if you have a table using the identity option to create integer key values, truncation will automatically reset the numbering scheme to its original value. Deletion, on the other hand, will not reset the number; therefore, when you insert a new row, the new integer value will continue from where the previous insertions left off before deletion. Normally this is not what you want, because the numbering will no longer start from 1, which may be confusing. Let’s TRUNCATE our database objects and remove any foreign key constraints.
/*
STEP 1
Drop foreign key constraints
*/
USE DW_Sample
--DROP FOREIGN KEYS
ALTER TABLE [dbo].[DimTitles] DROP CONSTRAINT [FK_DimTitles_DimPublishers]
ALTER TABLE [dbo].[FactTitlesAuthors] DROP CONSTRAINT [FK_FactTitlesAuthors_DimAuthors]
ALTER TABLE [dbo].[FactTitlesAuthors] DROP CONSTRAINT [FK_FactTitlesAuthors_DimTitles]
ALTER TABLE [dbo].[FactSales] DROP CONSTRAINT [FK_FactSales_DimStores]
ALTER TABLE [dbo].[FactSales] DROP CONSTRAINT [FK_FactSales_DimTitles]
ALTER TABLE [dbo].[FactSales] DROP CONSTRAINT [FK_FactSales_DimDates]
ALTER TABLE [dbo].[DimTitles] DROP CONSTRAINT [FK_DimTitles_DimDates]
GO

/*
STEP 2
Truncate all data mart tables
*/
--USE DW_Sample
--DELETE FROM ALL TABLES WITHOUT RESETTING THEIR IDENTITY AUTO NUMBER
--DELETE FROM [dbo].[FactSales]
--DELETE FROM [dbo].[FactTitlesAuthors]
--DELETE FROM [dbo].[DimTitles]
--DELETE FROM [dbo].[DimPublishers]
--DELETE FROM [dbo].[DimStores]
--DELETE FROM [dbo].[DimAuthors]
--DELETE FROM [dbo].[DimDates]
--TRUNCATE ALL TABLES AND RESET THEIR IDENTITY AUTO NUMBER

USE DW_Sample
TRUNCATE TABLE [dbo].[FactSales]
TRUNCATE TABLE [dbo].[FactTitlesAuthors]
TRUNCATE TABLE [dbo].[DimTitles]
TRUNCATE TABLE [dbo].[DimPublishers]
TRUNCATE TABLE [dbo].[DimStores]
TRUNCATE TABLE [dbo].[DimAuthors]
TRUNCATE TABLE [dbo].[DimDates]
GO
Next, we will start our data mart code development by inserting data into DimDates dimension. This will be the only dimension table which is populated by generating ‘synthetic’ data, rather than retrieving it from the source. The SQL code below is a simple way of populating date dimension which contains a few attributes derived from a calendar date – just enough for this project. For more comprehensive code please refer to THIS POST.
/*
STEP 3
Populate DimDates table with date and its derrived values data
*/
USE DW_Sample
--DECLARE DATE VARIABLES FOR DATE PERIOD
DECLARE @StartDate datetime	= '01/01/1990'
DECLARE @EndDate datetime	= '01/01/1995'
DECLARE @DateInProcess datetime
SET @DateInProcess		= @StartDate
WHILE @DateInProcess	< = @EndDate
BEGIN
	SET NOCOUNT ON
--LOOP THROUGH INDIVIDUAL DATES DEFINED BY TIME PERIOD
		INSERT INTO DimDates (
		[Date],
		[DATENAME],
		[Month],
		[MonthName],
		[QUARTER],
		[QUARTERName],
		[YEAR],
		[YEARName])
		VALUES (
		@DateInProcess,
		CONVERT(varchar(50), @DateInProcess, 110) + ', ' + DATENAME(WEEKDAY, @DateInProcess ),
		MONTH( @DateInProcess),
		CAST(YEAR(@DateInProcess) as nvarchar(4)) + ' - ' + DATENAME(MONTH, @DateInProcess ),
		DATENAME( QUARTER, @DateInProcess ),
		Cast(YEAR(@DateInProcess) as nvarchar(4)) + ' - ' + 'Q' + DATENAME(QUARTER, @DateInProcess ),
		YEAR(@DateInProcess),
		Cast(YEAR(@DateInProcess) as nvarchar(4)))
	SET @DateInProcess = DATEADD(DAY, 1, @DateInProcess)
END
This is probably a good time to mention the issue of NULL values and they could be handled in data warehouse scenarios. Nulls are most often considered to be an unknown value, but what does the term ‘unknown’ really mean? Does it mean that it is unknowable and could never be known? Does it mean that is unknown at the moment but will soon be available? Does it mean that a value just does not apply in this particular instance? Any of these can be true: the value may not be known, may be missing, or may not be applicable. Because of the ambiguity of the term NULL, a decision has to be made as to which interpretation is most accurate, or you may face endless arguments over the validity of your reports. There are multiple ways of dealing with NULL values. The most common one (in case of dimensions) is to exclude those from the data and load only that data which has a valid values against it. This, however, jeopardises the project as in some cases records which have NULL against them may want to be accounted for. More common way is to translate NULLS into more descriptive values by replacing NULL with -1, Unknown, Corrupt, Not Applicable, Unavailable etc. values (depending on circumstances and data types). This will allow tables to be populated with NON-NULL values thus providing accurate results when aggregating e.g. average will bring back different results across the records when NULL values are encountered vs. when NULLS are replaced with more descriptive substitutes. There are other options which can be utilised to account for NULLS, however, given the adherence to simplicity across this series, we will be using the most standard approach – creating a dummy record in a dimension table to reference NULL values with more suitable substitutes.
If you have a closer look at the DimDates table population SQL script you will notice that we created the DimDates table with an IDENTITY option on the DateKey column. This option automatically inserts numeric values every time a new row is added. By default the IDENTITY option prevents values from being inserted into the column manually. However, we can manually insert a value if you enable SQL’s IDENTITY_INSERT option, by using the SET IDENTITY_INSERT < table name > ON SQL command. Once that is done, additional lookup values can be added to the table. Let’s update DimDates table with a record replacing NULL values if they happen to occur as per the code below.
/*
STEP 4
Append Unknown values to DimDates table
*/
USE DW_Sample
SET IDENTITY_INSERT [DW_Sample].[dbo].[DimDates] ON
GO
Insert Into [DW_Sample].[dbo].[DimDates]
([DateKey],
[Date],
[DateName],
[Month],
[MonthName],
[Quarter],
[QuarterName],
[Year], [YearName])
SELECT
[DateKey]		= -1,
[Date]			= CAST( '01/01/1900' as nvarchar(50)),
[DateName]		= CAST('Unknown_Day' as nvarchar(50)),
[Month]			= -1,
[MonthName]		= CAST('Unknown_Month' as nvarchar(50)),
[Quarter]		= -1,
[QuarterName]	= CAST('Unknown_Quarter' as nvarchar(50)),
[Year]			= -1,
[YearName]		= CAST('Unknown_Year' as nvarchar(50))
GO
SET IDENTITY_INSERT [DW_Sample].[dbo].[DimDates] OFF
GO
Thanks to this small addition, whenever lookup against DimDates table is made and null values is found, we can easily replace it with a meaningful entry indication to the end user that the date name cannot be confirmed at the time the query is executed (replaced with -1 value) as per SQL below.
/*
Show how to reference/look up dimension value to account for NULLs
*/
USE DW_Sample
SELECT
[Pubs].[dbo].[Sales].qty,
[Order_Date_Key] = ISNULL([DW_Sample].[dbo].[DimDates].[DateKey], -1)
FROM [Pubs].[dbo].[Sales]
LEFT JOIN [DW_Sample].[dbo].[DimDates]
ON [Pubs].[dbo].[Sales].[ord_date] = [DW_Sample].[dbo].[DimDates].[Date]
Now, let’s populate the next three data mart dimensions based on the data from pubs source database.
/*
STEP 5
Populate DimAuthors dimensions with source data
*/
USE DW_Sample
INSERT INTO [DW_Sample].[dbo].[DimAuthors]
(AuthorId, AuthorName, AuthorState)
SELECT
[AuthorId]		= CAST(au_id as nchar(12)),
[AuthorName]	= CAST((au_fname + ' ' + au_lname) as nvarchar(100)),
[AuthorState]	= CAST(state as nchar(12))
FROM Pubs.dbo.Authors
GO
SET IDENTITY_INSERT [DW_Sample].[dbo].[DimAuthors] ON
GO
INSERT INTO [DW_Sample].[dbo].[DimAuthors]
(AuthorKey, AuthorID, AuthorName, AuthorState)
SELECT -1, 'Unknown', 'Unknown', 'Unknown'
GO
SET IDENTITY_INSERT [DW_Sample].[dbo].[DimAuthors] OFF
GO
/*
STEP 6
Populate DimPublishers dimension with source data
*/
USE DW_Sample
INSERT INTO [DW_Sample].[dbo].[DimPublishers]
(PublisherId, PublisherName)
SELECT
[PublisherId]	= CAST(pub_id as nchar(12)),
[PublisherName] = CAST(pub_name as nvarchar(50))
FROM pubs.dbo.publishers
GO
SET IDENTITY_INSERT [DW_Sample].[dbo].[DimPublishers] ON
GO
INSERT INTO [DW_Sample].[dbo].[DimPublishers]
(PublisherKey, PublisherId, PublisherName)
SELECT -1, 'Unknown', 'Unknown'
GO
SET IDENTITY_INSERT [DW_Sample].[dbo].[DimPublishers] OFF
GO
/*
STEP 7
Populate DimTitles dimension with source data
*/
USE DW_Sample
INSERT INTO [DW_Sample].[dbo].[DimTitles]
(TitleId, TitleName, TitleType, PublisherKey, TitlePrice, PublishedDateKey)
SELECT
[TitleId]			= CAST(ISNULL([title_id], -1) AS nvarchar(12)),
[TitleName]			= CAST(ISNULL([title], 'Unknown') AS nvarchar(100)),
[TitleType]			= CASE CAST(ISNULL([type], 'Unknown') AS nvarchar(50))
						WHEN 'business'		THEN N'Business'
						WHEN 'mod_cook'		THEN N'Modern Cooking'
						WHEN 'popular_comp' THEN N'Popular Computing'
						WHEN 'psychology'	THEN N'Psychology'
						WHEN 'trad_cook'	THEN N'Traditional Cooking'
						WHEN 'UNDECIDED'	THEN N'Undecided'
						END,
[PublisherKey]		= ISNULL([DW_Sample].[dbo].[DimPublishers].[PublisherKey], -1),
[TitlePrice]		= CAST(ISNULL([price], -1) AS DECIMAL(18, 4)),
[PublishedDateKey]	= ISNULL([DW_Sample].[dbo].[DimDates].[DateKey], -1)
FROM [Pubs].[dbo].[Titles] Join [DW_Sample].[dbo].[DimPublishers]
ON [Pubs].[dbo].[Titles].[pub_id] = [DW_Sample].[dbo].[DimPublishers].[PublisherId]
Left Join [DW_Sample].[dbo].[DimDates]
ON [Pubs].[dbo].[Titles].[pubdate] = [DW_Sample].[dbo].[DimDates].[Date]
GO
SET IDENTITY_INSERT [DW_Sample].[dbo].[DimTitles] ON
GO
INSERT INTO [DW_Sample].[dbo].[DimTitles]
(TitleKey, TitleID, TitleName, TitleType, PublisherKey, TitlePrice, PublishedDateKey)
SELECT -1, 'Unknown', 'Unknown', 'Unknown', -1, -1, -1
GO
SET IDENTITY_INSERT [DW_Sample].[dbo].[DimTitles] OFF
GO
At this stage the only dimension which has not been loaded is DimStore. This is because it is the only dimension in our data model which has been identified as requiring Slowly Changing Dimension approach. Slowly Changing Dimensions (from this point forward identified as SCD) is a crucial concept of any data mart. At this time, Wikipedia identifies six types of SCDs but in this project we will only use two types – Type 1 where old data is simply overwritten with new data and history is not kept and Type 2 where multiple records are created for a given natural key in the dimensional tables with separate surrogate keys and/or different version numbers. In Type 2 SCD unlimited history is preserved for each insert. More on individual methods of SCDs handling can be viewed in my other posts, mainly HERE, HERE, HERE and HERE. For this exercise we will use a simple MERGE SQL statement, rather than resorting to third party components or SSIS native tool. As previously mentioned, DimStores table will be a mix of Type 1 and Type 2 SCD. Let’s assume that StoreAddress, StoreCity, StoreState and StoreZip attributes in DimStore table are defined as Type 1 SCD and every time source data is changed, old data is replaced with new one. Let’s also assume that StoreName attribute is defined as Type 2 SCD – every time new StoreName is assigned to the specific StoreID, we want to maintain the history and preserve old StoreName, making sure we can distinguish between retired and current StoreName. Both of those requirements can be handled by means of using MERGE SQL statement which takes care of both INSERT and UPDATE for Type 2 SCD operations depending on how the source data has been changed and which attribute it relates to. Below is the SQL for our DimStores table population.
/*
STEP 8
Populate DimStores dimension table with source data assuming that some attributes
have been defined as either Type 1 or Type 2 Slowly Changing Dimensions
*/
USE DW_Sample
INSERT INTO [DW_Sample].[dbo].[DimStores]
(StoreID, StoreName, StoreAddress, StoreCity, StoreState, StoreZip, IsCurrent)
SELECT
StoreID, StoreName, StoreAddress, StoreCity, StoreState, StoreZip, 1
FROM
    (MERGE DimStores AS Target
        USING
            (SELECT
			[StoreId]		= CAST(stor_id as nchar(12)),
			[StoreName]		= CAST(stor_name as nvarchar(50)),
			[StoreAddress]	= CAST(stor_address as nvarchar (80)),
			[StoreCity]		= CAST(city as nvarchar (40)),
			[StoreState]	= CAST(state as nvarchar (12)),
			[StoreZip]		= CAST(zip as nvarchar (12))

			FROM Pubs.dbo.Stores)
            AS [Source]
                    ON Target.StoreID = Source.StoreID AND Target.IsCurrent = 1
                    WHEN MATCHED AND
            (Target.StoreName <> [Source].StoreName)
                THEN UPDATE SET
                IsCurrent = 0
    WHEN NOT MATCHED BY TARGET
            THEN INSERT
            (StoreID, StoreName, StoreAddress, StoreCity, StoreState, StoreZip, IsCurrent)
            VALUES
            ([Source].StoreID,
			[Source].StoreName,
			[Source].StoreAddress,
			[Source].StoreCity,
			[Source].StoreState,
			[Source].StoreZip,
			1)
    WHEN NOT MATCHED BY SOURCE AND Target.IsCurrent = 1
            THEN UPDATE
            SET IsCurrent = 0
    OUTPUT $action as Action,[Source].*) AS MergeOutput
WHERE MergeOutput.Action = 'UPDATE'
AND StoreName IS NOT NULL
GO

UPDATE [DW_Sample].[dbo].[DimStores]
SET StoreAddress = source.stor_address
FROM dimstores target INNER JOIN Pubs.dbo.Stores source
ON target.StoreId = source.stor_id
AND target.storeaddress <> source.stor_address
AND target.IsCurrent = 1

UPDATE [DW_Sample].[dbo].[DimStores]
SET StoreCity = source.city
FROM dimstores target INNER JOIN Pubs.dbo.Stores source
ON target.StoreId = source.stor_id
AND target.storecity <> source.city
AND target.IsCurrent = 1

UPDATE [DW_Sample].[dbo].[DimStores]
SET StoreState = source.State
FROM dimstores target INNER JOIN Pubs.dbo.Stores source
ON target.StoreId = source.stor_id
AND target.storeState <> source.state
AND target.IsCurrent = 1

UPDATE [DW_Sample].[dbo].[DimStores]
SET StoreZip = source.Zip
FROM dimstores target INNER JOIN Pubs.dbo.Stores source
ON target.StoreId = source.stor_id
AND target.StoreZip <> source.Zip
AND target.IsCurrent = 1

BEGIN
	IF EXISTS (SELECT 1 FROM [DW_Sample].[dbo].[DimStores] WHERE StoreKey = -1)
		BEGIN
			RETURN
		END
	ELSE
		BEGIN
		SET IDENTITY_INSERT [DW_Sample].[dbo].[DimStores] ON
		INSERT INTO [DW_Sample].[dbo].[DimStores]
		(StoreKey, StoreID, StoreName, StoreAddress, StoreCity, StoreState, StoreZip, IsCurrent)
		SELECT -1, 'Unknown', 'Unknown', 'Unknown', 'Unknown', 'Unknown', 'Unknown',-1
		SET IDENTITY_INSERT [DW_Sample].[dbo].[DimStores] OFF
		END
END
To better understand how SCD and the above code logic work lets temporarily alter source data and run MERGE SQL for DimStores dimension again. To do this let’s run the following SQL and check how the records were affected.
/*
Show how a combination of MERGE and UPDATE will work with SCD 1 and SCD 2 dimensions
*/
USE DW_Sample
BEGIN
BEGIN TRANSACTION
	USE Pubs
	UPDATE [pubs].[dbo].[stores]
	SET Stor_Name = 'New Store Name'
	WHERE stor_id = 7067
	UPDATE [pubs].[dbo].[stores]
	SET stor_address = 'New Store Address'
	WHERE stor_id = 6380
	UPDATE [pubs].[dbo].[stores]
	SET zip = '00000'
	WHERE stor_id = 7131

	USE DW_Sample
	INSERT INTO [DW_Sample].[dbo].[DimStores]
	(StoreID, StoreName, StoreAddress, StoreCity, StoreState, StoreZip, IsCurrent)
	SELECT
	StoreID, StoreName, StoreAddress, StoreCity, StoreState, StoreZip, 1
	FROM
		(MERGE DimStores AS Target
			USING
				(SELECT
				[StoreId]		= CAST(stor_id as nchar(12)),
				[StoreName]		= CAST(stor_name as nvarchar(50)),
				[StoreAddress]	= CAST(stor_address as nvarchar (80)),
				[StoreCity]		= CAST(city as nvarchar (40)),
				[StoreState]	= CAST(state as nvarchar (12)),
				[StoreZip]		= CAST(zip as nvarchar (12))

				FROM Pubs.dbo.Stores)
				AS [Source]
						ON Target.StoreID = Source.StoreID AND Target.IsCurrent = 1
						WHEN MATCHED AND
				(Target.StoreName <> [Source].StoreName)
					THEN UPDATE SET
					IsCurrent = 0
		WHEN NOT MATCHED BY TARGET
				THEN INSERT
				(StoreID, StoreName, StoreAddress, StoreCity, StoreState, StoreZip, IsCurrent)
				VALUES
				([Source].StoreID,
				[Source].StoreName,
				[Source].StoreAddress,
				[Source].StoreCity,
				[Source].StoreState,
				[Source].StoreZip,
				1)
		WHEN NOT MATCHED BY SOURCE AND Target.IsCurrent = 1
				THEN UPDATE
				SET IsCurrent = 0
		OUTPUT $action as Action,[Source].*) AS MergeOutput
	WHERE MergeOutput.Action = 'UPDATE'
	AND StoreName IS NOT NULL

	UPDATE [DW_Sample].[dbo].[DimStores]
	SET StoreAddress = source.stor_address
	FROM dimstores target INNER JOIN Pubs.dbo.Stores source
	ON target.StoreId = source.stor_id
	AND target.storeaddress <> source.stor_address
	AND target.IsCurrent = 1

	UPDATE [DW_Sample].[dbo].[DimStores]
	SET StoreCity = source.city
	FROM dimstores target INNER JOIN Pubs.dbo.Stores source
	ON target.StoreId = source.stor_id
	AND target.storecity <> source.city
	AND target.IsCurrent = 1

	UPDATE [DW_Sample].[dbo].[DimStores]
	SET StoreState = source.State
	FROM dimstores target INNER JOIN Pubs.dbo.Stores source
	ON target.StoreId = source.stor_id
	AND target.storeState <> source.state
	AND target.IsCurrent = 1

	UPDATE [DW_Sample].[dbo].[DimStores]
	SET StoreZip = source.Zip
	FROM dimstores target INNER JOIN Pubs.dbo.Stores source
	ON target.StoreId = source.stor_id
	AND target.StoreZip <> source.Zip
	AND target.IsCurrent = 1

	SELECT * FROM [DW_Sample].[dbo].[DimStores]
ROLLBACK TRANSACTION
END
After executing, what we can notice an additional record added to this small dimension in accordance with the business requirements i.e. every time the source data is changed for stor_name attribute in Stores table in pubs database, an old version will be retired and a new one added to the dimension in the data mart. This is signified by means of using a control column IsCurrent which changes its value from 1 to 0 every time an old value is replaced with an updated one. In this way any alterations to the source data are preserved in history. Therefore, the name for StoreID 7067 was changed from ‘News & Brews’ to ‘New Store Name’ and IsCurrent flag updated to the new value. Also, notice that StoreAddress and StoreZip, Type 1 SCD, changed (for StoreID 6380 and 7131 correspondingly) and these columns were overwritten with new values as per SCD Type 1 definition.

In the above example I used a control attribute called IsCurrent, but using expiry dates to signify whether a given record is current or not is also common. Again, for detailed description of how MERGE behaves in SCD deployment please have a look at one of my previous posts HERE. Alternatively, if you’re not comfortable with syntax intricacies of MERGE SQL command you can try using alternative approaches e.g. Microsoft’s own Slowly Changing Dimension component as per image below. It is a good way to start if you’re just trying to get your head around the concept of SCD types as it is wizard-driven and easy to configure.

Finally, all there is left to do is to populate fact tables and add foreign keys as per the SQL below.
/*
STEP 9
Populate FactTitlesAuthors fact table with source data assuming that
if historical load has already been run, only new values should be inserted.
*/
USE DW_Sample
INSERT INTO [DW_Sample].[dbo].[FactTitlesAuthors]
(TitleKey, AuthorKey, AuthorOrder)
SELECT
[TitleKey]		= ISNULL(titles.TitleKey, -1),
[AuthorKey]		= ISNULL(authors.AuthorKey, -1),
[AuthorOrder]	= au_ord
FROM pubs.dbo.titleauthor AS titleauthor
JOIN DW_Sample.dbo.DimTitles AS titles
ON titleauthor.Title_id = titles.TitleId
JOIN DW_Sample.dbo.DimAuthors AS authors
ON titleauthor.Au_id = authors.AuthorId
WHERE NOT EXISTS	(SELECT TOP 1 'I already exist' FROM
					[DW_Sample].[dbo].[FactTitlesAuthors] fact
					WHERE fact.AuthorKey	= authors.AuthorKey
					AND fact.TitleKey		= titles.TitleKey)
/*
STEP 10
Populate FactSales fact table with source data assuming that
if historical load has already been run, only new values should be inserted.
*/
USE DW_Sample
INSERT INTO [DW_Sample].[dbo].[FactSales]
(OrderNumber, OrderDateKey, TitleKey, StoreKey, SalesQuantity)
SELECT
[OrderNumber]	= CAST(sales.ord_num AS nvarchar(50)),
[OrderDateKey]	= ISNULL(dates.DateKey, -1),
[TitleKey]		= ISNULL(titles.TitleKey, -1),
[StoreKey]		= ISNULL(stores.StoreKey, -1),
[SalesQuantity] = sales.Qty
FROM pubs.dbo.sales AS sales
JOIN DW_Sample.dbo.DimDates AS dates
ON sales.ord_date = dates.[date]
JOIN DW_Sample.dbo.DimTitles AS titles
ON sales.Title_id = titles.TitleId
JOIN DW_Sample.dbo.DimStores AS stores
ON sales.Stor_id = stores.StoreId
WHERE NOT EXISTS	(SELECT TOP 1 'I already exist' FROM
					[DW_Sample].[dbo].[FactSales] as fact
					WHERE sales.ord_num	= fact.OrderNumber
					AND dates.DateKey	= fact.OrderDateKey
					AND titles.TitleKey = fact.TitleKey
					AND stores.StoreKey = fact.StoreKey)
/*
STEP 11
Recreate all foreign key constraints
*/
USE DW_Sample
ALTER TABLE [dbo].[DimTitles] WITH CHECK ADD CONSTRAINT [FK_DimTitles_DimPublishers]
FOREIGN KEY ([PublisherKey]) REFERENCES [dbo].[DimPublishers] ([PublisherKey])
ALTER TABLE [dbo].[FactTitlesAuthors] WITH CHECK ADD CONSTRAINT [FK_FactTitlesAuthors_DimAuthors]
FOREIGN KEY ([AuthorKey]) REFERENCES [dbo].[DimAuthors] ([AuthorKey])
ALTER TABLE [dbo].[FactTitlesAuthors] WITH CHECK ADD CONSTRAINT [FK_FactTitlesAuthors_DimTitles]
FOREIGN KEY ([TitleKey]) REFERENCES [dbo].[DimTitles] ([TitleKey])
ALTER TABLE [dbo].[FactSales] WITH CHECK ADD CONSTRAINT [FK_FactSales_DimStores]
FOREIGN KEY ([StoreKey]) REFERENCES [dbo].[DimStores] ([Storekey])
ALTER TABLE [dbo].[FactSales] WITH CHECK ADD CONSTRAINT [FK_FactSales_DimTitles]
FOREIGN KEY ([TitleKey]) REFERENCES [dbo].[DimTitles] ([TitleKey])
ALTER TABLE [dbo].[FactSales] WITH CHECK ADD CONSTRAINT [FK_FactSales_DimDates]
FOREIGN KEY([OrderDateKey]) REFERENCES [dbo].[DimDates] ([DateKey])
ALTER TABLE [dbo].[DimTitles] WITH CHECK ADD CONSTRAINT [FK_DimTitles_DimDates]
FOREIGN KEY([PublishedDateKey]) REFERENCES [dbo].[DimDates] ([DateKey])
Please note that both queries populating fact tables have NOT EXISTS statement as part of the WHARE clause. We talked about inserting new values into dimensions e.g. SCD Type 2, this time it’s executing incremental INSERT as part of fact table population. As we only wish to commit INSERT when new fact data has been found, NOT EXISTS and everything else that follows provides this functionality and excludes records which can already be found in a fact table. There are different types of fact tables and some of those e.g. cumulative snapshot facts allow for the same data to be inserted multiple times over a period of time. In our case, however, we are only interested in new records thus exclude all transactions which have already been accounted for. We can test this out by executing the following SQL where a new record is temporarily added to Sales source table in Pubs database and the code tries to INSERT the same record twice, with only one successful INSERT.
/*
Show how NOT EXISTS will work to prevent duplicate data being inserted in fact table
*/
USE DW_Sample
BEGIN
BEGIN TRANSACTION
USE pubs
	INSERT INTO sales
	(stor_id, ord_num, ord_date, qty, payterms, title_id)
	SELECT
	'7066', 'ZZZ999', '1994-09-14', 1, 'Net 30', 'PS2091'
	SELECT * FROM sales WHERE ord_num = 'ZZZ999'

	DECLARE @CountOfInserts int = 0
	DECLARE @RowsAffected int = 0
	WHILE @CountOfInserts < 2
		BEGIN
			INSERT INTO [DW_Sample].[dbo].[FactSales]
			(OrderNumber, OrderDateKey, TitleKey, StoreKey, SalesQuantity)
			SELECT
			[OrderNumber]	= CAST(sales.ord_num AS nvarchar(50)),
			[OrderDateKey]	= ISNULL(dates.DateKey, -1),
			[TitleKey]		= ISNULL(titles.TitleKey, -1),
			[StoreKey]		= ISNULL(stores.StoreKey, -1),
			[SalesQuantity] = sales.Qty
			FROM pubs.dbo.sales AS sales
			JOIN DW_Sample.dbo.DimDates AS dates
			ON sales.ord_date = dates.[date]
			JOIN DW_Sample.dbo.DimTitles AS titles
			ON sales.Title_id = titles.TitleId
			JOIN DW_Sample.dbo.DimStores AS stores
			ON sales.Stor_id = stores.StoreId
			WHERE NOT EXISTS	(SELECT TOP 1 'I already exist' FROM
								[DW_Sample].[dbo].[FactSales] as fact
								WHERE sales.ord_num	= fact.OrderNumber
								AND dates.DateKey	= fact.OrderDateKey
								AND titles.TitleKey = fact.TitleKey
								AND stores.StoreKey = fact.StoreKey)
			SET @RowsAffected = @@ROWCOUNT

			SELECT 'Pass number' + ' ' + CAST(@CountOfInserts + 1 as varchar (10)) + '. ' +
			'Number of records affected = ' + CAST(@RowsAffected as varchar (10))
			FROM [DW_Sample].[dbo].[FactSales] WHERE OrderNumber = 'ZZZ999'
			SET @CountOfInserts = @CountOfInserts + 1
	END
ROLLBACK TRANSACTION
END

This last bit of code concludes this post and, as usual, all the code samples can be found and downloaded from HERE. Also, if you’re keen to follow along, please take note of the sequence number assigned to most of the above SQL snippets as these will be a required reference for ETL development in the NEXT POST. In the next iteration to this series I will explore SQL Server Integration Services functionality and how the above code samples will be integrated into developing an ETL routine to automate data mart loading.
Please also check other posts from this series:
All SQL code and solution files can be found and downloaded from HERE.
Posted in: Data Modelling, How To's, SQL, SSIS
Tags: Code, Data Modelling, SQL


Never thought Polybase could be used in this capacity and don't think Microsoft advertised this feature (off-loading DB data as…