How To Build A Data Mart Using Microsoft BI Stack Part 4 – Data Mart Load Using SSIS
In previous posts to this series (HERE, HERE and HERE) I outlined some of the key concepts of data warehouse design and modelling, analysed the source objects and data they hold and build the code base for data mart objects deployment and population. In this post I will explore SQL Server Integration Services functionality and how the code samples from PREVIOUS POST will be integrated into developing an ETL routine to automate data mart loading.
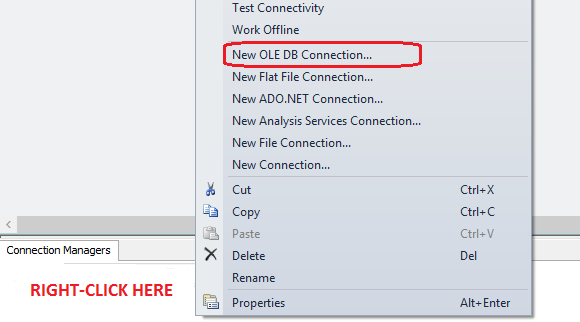
Without further ado, let’s open up BIDS or SQL Server Data Tools application (depending on which SQL Server version you’re using) and create an empty SSIS project. Next, let’s set up a database connection in Connection Managers pane pointing it to DW_Sample database. The connection type we will be using here is OLE DB connection and to kick off the connection wizard setup pane just right click inside Connection Managers pane and select OLE DB from the list provided as per image below.
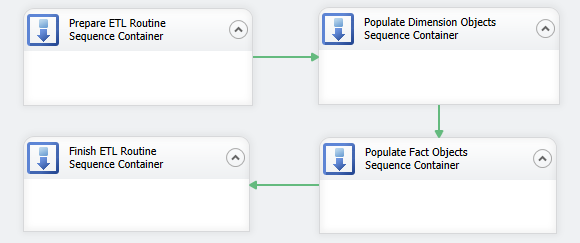
Although there is only going to be one package doing all the work, for sake of coherence and aesthetics, I would like to create logic boundaries and group similar tasks together e.g. all tasks pertaining to populating dimension objects would be encapsulated into one logic group, all tasks responsible for database and objects preparation before the load is commenced will be grouped together etc. To achieve this I will first lay out a number of Sequence Containers in Control Flow pane, which will manage the groupings and provide greater control of tasks execution. Let’s create four groups of tasks and name them in accordance with how they will be utilised in this package as per image below. I have also joined them with a default precedence constraint arrows and arranged them so they execute in the specific order – prepare database objects, load dimension data, load fact data and finally restore foreign keys constraints as the last group.
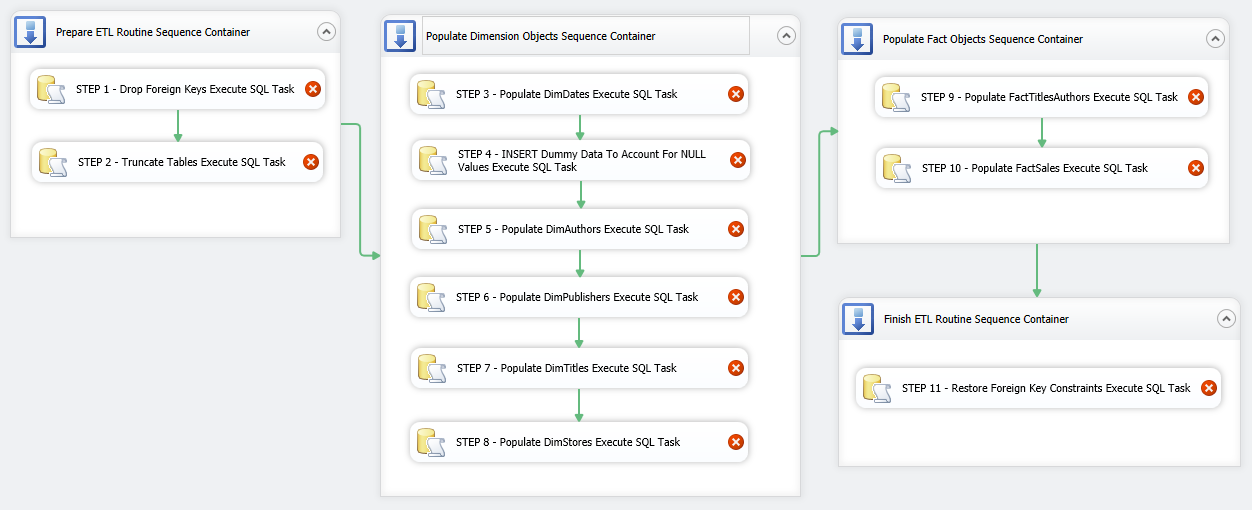
Let’s start filling in the gaps with ETL components and corresponding code from previous post. We begin with first Sequence Container and place two Execute SQL Task (EST) containers inside the first Sequence Container, joining them together using default precedence constraints. Next, let’s go through the remaining Sequence Containers and place more Execute SQL Task (EST) components inside them as per the following sequence: Populate Dimension Objects Sequence Container – 6 ESTs, Populate Fact Objects Sequence Container – 2 ESTs, Finish ETL Routine Sequence Container – 1 EST. We will also adjust the names of ESTs to correspond to their function in this SSIS solution. So far the package should look as per image below.
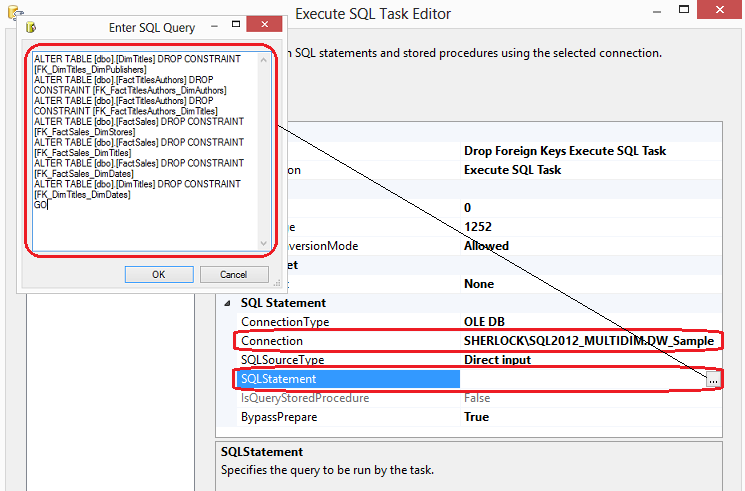
Now that we have the skeleton of our package, we can start populating individual components with the SQL code we developed as per PREVIOUS POST. Let’s open up first Execute SQL Task in Prepare ETL Routine Sequence Container by double-clicking on in and adjust Connection property by selecting the connection name of our database established earlier. Next, clicking on ellipsis next to SQLStatement property we bring up the SQL editor where we paste the SQL for each task we want to accomplish. Let’s paste SQL responsible for dropping foreign key constraints and click OK.
If you remember individual code snippets from PREVIOUS POST, most of those had number assigned to them for referencing when designing our SSIS package. This is going to make our life easier when looking up SQL representing the functionality of each SSIS component so rather than repeating the above process of adjusting individual components’ SQLStatement properties I have numbered the transformations according to how they relate to the code from PREVIOUS POST.
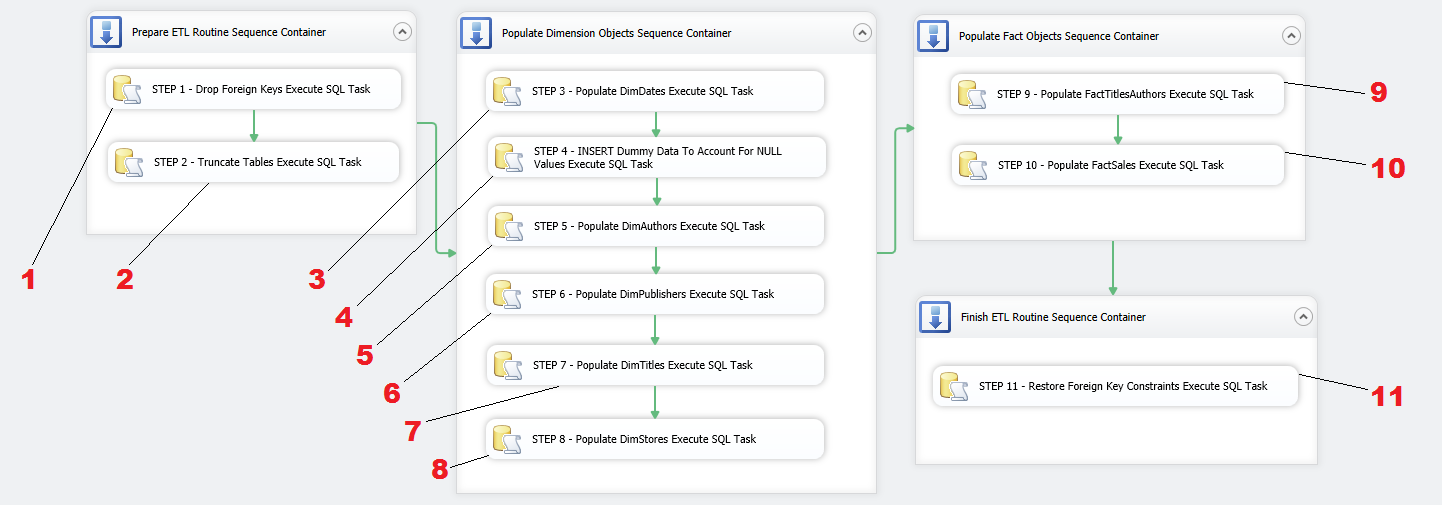
All we need to do now is to reference each Execute SQL Task component to the code snippet from PREVIOUS POST and repeat the process of selecting database connection and pasting SQL code into the editor for each task. You can retrieve the SQL from the previous post HERE or download the whole script from HERE. If you choose to download it, just make sure to break it down according to the functionality each section provides and copy and paste only applicable fragments. Once all tasks have been populated with the code hopefully all warning icons on individual tasks disappeared and we can execute the package by pressing F5 or clicking on the Start Debugging icon in the top pane.

You can re-run the package as many times as you wish, however, please note two important things about this solution. Number one, the code section responsible for truncating DimDates table as well as the code which populates this dimension can be disabled once DimDates has been populated. We do not need to repopulate date dimension more than once as this data is not subjected to changes and inserting it once is enough (unless more dates need to be added). Number two, please also note that as per previous post explanation, one of the dimensions (DimStores) and two fact tables are following incremental inserts/updates logic. This means that, in case of DimStores, once this object is populated, only changed data and new records are permitted to filter through by how the SQL code was implemented. Again, in real world scenario e.g. in production there is no need to truncate it every time the package runs. In fact, it may be detrimental to do so as all history changes will be lost. Also, in case of fact tables, they should not be emptied out as the core purpose of data warehouse is to collect historical information and store it in a central repository. In some environments, only inserts are allowed to ensure that all history is preserved. If OLTP database (data source) is occasionally ‘trimmed down’ to improve performance, a big chunk of that data will be lost when reloading data mart thus once more invalidating the core principle of data warehouse – to keep all history data for analytical purposes. If you wish to follow these principles, you can alter the package and its SQL code (once the package was run at least once and all objects have data in them) in the following manner.
- Remove the following line from Execute SQL Task number 2 (truncates database objects):
TRUNCATE TABLE [dbo].[FactSales]
TRUNCATE TABLE [dbo].[FactTitlesAuthors]
TRUNCATE TABLE [dbo].[DimStores]
TRUNCATE TABLE [dbo].[DimDates]
- Disable (do not delete) Execute SQL Task number 3 and 4 (populates DimDates table). You can do this by right-click on the container and selecting Disable from the options available
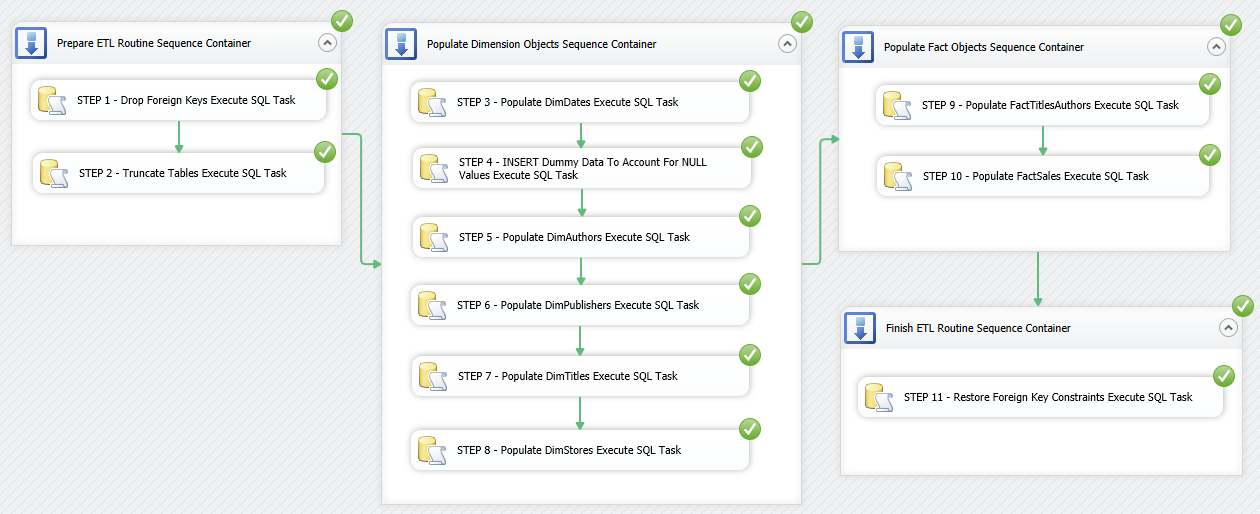
The package should run without issues, however, this time the difference is that we are not removing anything from two fact tables and the two dimensions – DimDates and DimStores. We also leave DimDates table out of the process as its data does not come from any source system and once populated can be removed/disabled. The successfully executed package should look like as per image below.
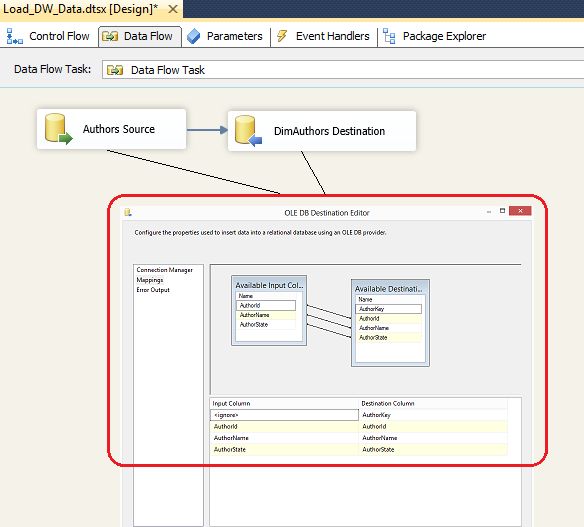
This is one of the many ways to use SSIS for data loading. Instead of using INSERT and SELECT SQL statements in every component, you could also use SELECT only and map out the attributes produced to the source schema by means of using Data Flow Task as per image below.
You could also use views, stored procedures, User-Defined Functions etc. – SSIS is quite flexible in how you wish to pull your data in and I strongly suggest you explore other options. Also, it is worth highlighting that due to the simplicity of this design, I only had a chance to use very limited number of components and options available in SSIS development environment. There is a huge myriad of tools, options and features available at your disposal that SSIS provides out-of-the-box and some transformations can be built with an extreme level of complexity. That is partially what is great about this tool – you can create a simple ETL and automate the laborious data centric processes with just a few drag-and-drop moves but SSIS also provides enough flexibility and power to cater for most advanced scenarios e.g. scripting in .NET, database maintenance tasks, data mining processing etc.
This concludes this post and, as usual, the code used in this series as well as solution files for this SSIS project can be found and downloaded from HERE. In the NEXT ITERATION to this series I will dive into the topic of SQL Server Analysis Services (SSAS), cubes and OLAP databases.
Please also check other posts from this series:
- How To Build A Data Mart Using Microsoft BI Stack Part 1 – Introduction and OLTP Database Analysis
- How To Build A Data Mart Using Microsoft BI Stack Part 2 – OLAP Database Objects Modelling
- How To Build A Data Mart Using Microsoft BI Stack Part 3 – Data Mart Load Approach And Coding
- How To Build A Data Mart Using Microsoft BI Stack Part 5 – Defining SSAS Project And Its Dimensions
- How To Build A Data Mart Using Microsoft BI Stack Part 6 – Refining SSAS Data Warehouse Dimensions
- How To Build A Data Mart Using Microsoft BI Stack Part 7 – Cube Creation, Cube Deployment And Data Validation
- How To Build A Data Mart Using Microsoft BI Stack Part 8 – Creating Sample SSRS Report
All SQL code and solution files can be found and downloaded from HERE.
http://scuttle.org/bookmarks.php/pass?action=addThis entry was posted on Sunday, September 15th, 2013 at 5:08 am and is filed under How To's, SQL, SSIS. You can follow any responses to this entry through the RSS 2.0 feed. You can leave a response, or trackback from your own site.


